Introduction and examples
This is a tutorial for a crochet stitch I’ve been calling the interlocking granny stitch. It’s a pretty dense stitch that produces interesting textures on both sides, and its honeycomb-like pattern is a fun base for color work.
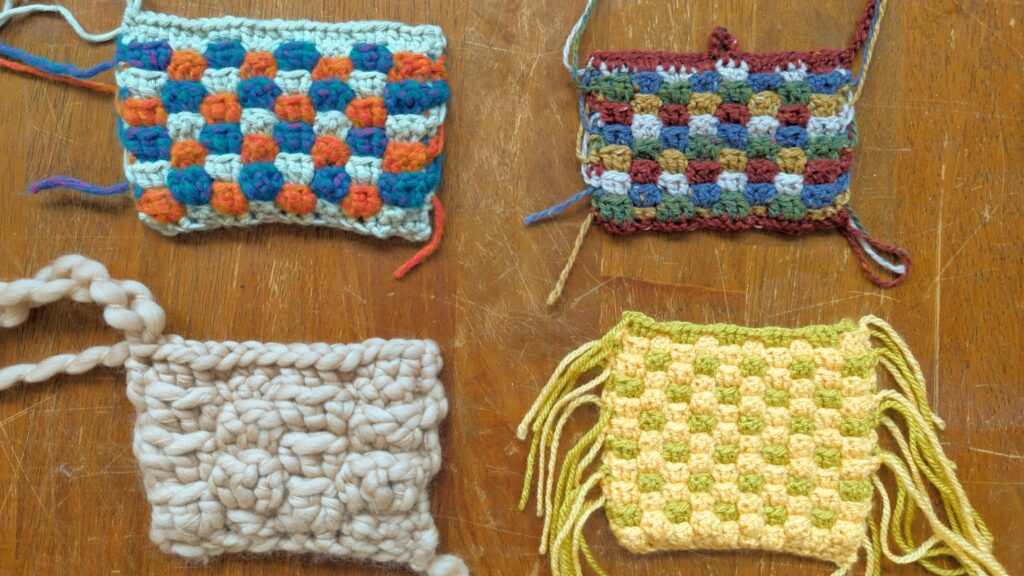
Examples of the interlocking granny stitch. Clockwise from top left: 3 color design using Aran weight yarn and a 5.0mm hook (Scheepjes River Washed XL Yarra, Nile, Crystal Quartz); 5 color design using DK yarn and a 4.0mm hook (Scheepjes Terrazzo Espresso, Acero, Pera, Acciaio, Prosecco); 2 color design using DK yarn and a 3.5mm hook (I think it’s Scheepjes Colour Crafter Gouda and Nijmegen?); single color design using super bulky yarn and a 8.0mm hook (Loopy Mango Merino No. 5 Cafe Con Leche)
I’m not quite sure whether to claim I invented this stitch – on the one hand, I had the idea for a texture I wanted, couldn’t find anything similar in my crochet books or online, and played around with yarn until I came up with this. On the other hand, enough people have been doing crochet for enough years that it seems very likely to me that I’m not the first person to have this idea! If you’ve seen this stitch before, please let me know where and I will happily link it here.
I hope you give the interlocking granny stitch a try! If anything is unclear, please use the comments to ask me.
DETAILED INSTRUCTIONS (with photos) | SIMPLE INSTRUCTIONS (for after you know what you’re doing and just need a reminder)
Detailed instructions – interlocking granny stitch
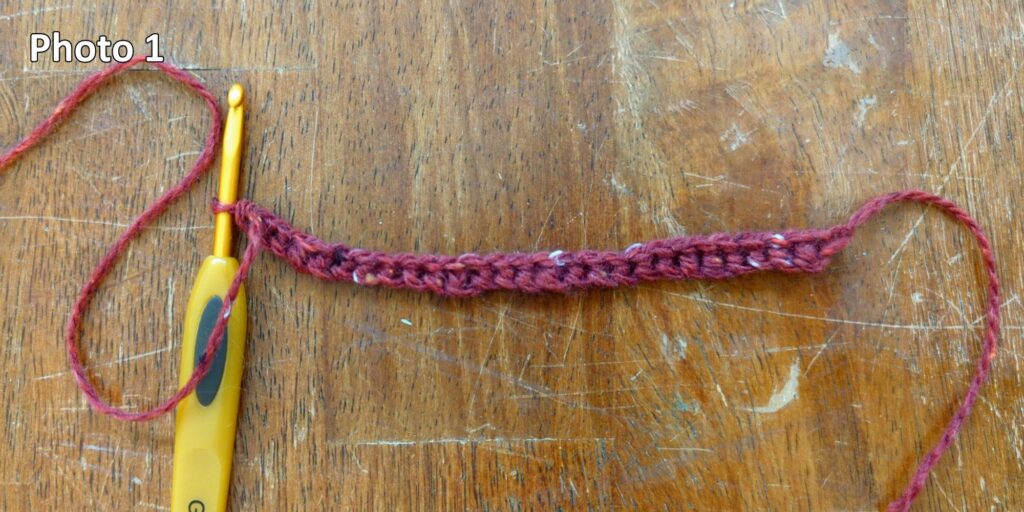
Row 1 – Right side facing. Foundation single crochet a multiple of 6, plus 2. Ch 1 and turn (Photo 1). If you find foundation sc really annoying, you can chain a multiple of 6 plus 3, then sc across starting in the second ch from the hook, which should give you a multiple of 6 plus 2 scs.
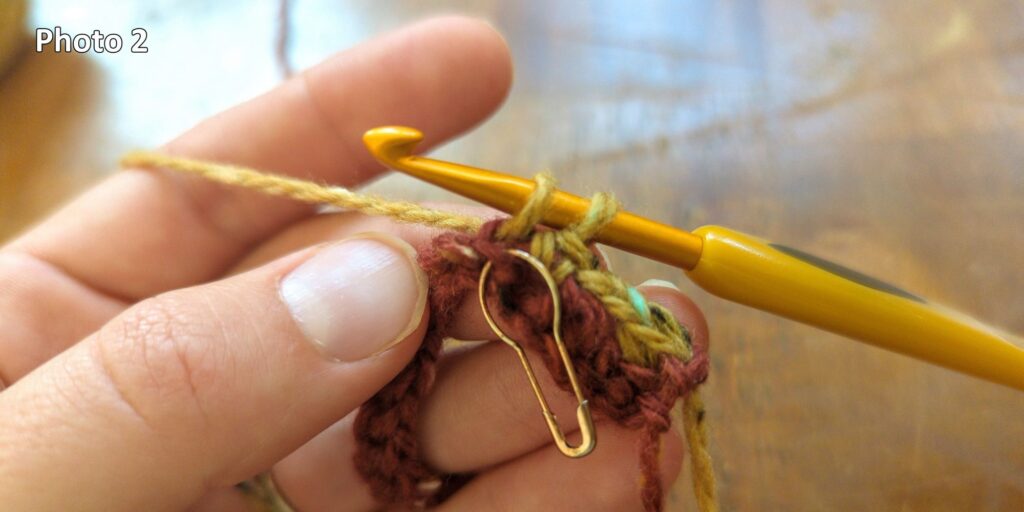
Row 2 – Wrong side facing. Sc in first stitch. *Ch 2 and skip 3 stitches, sc in the next stitch, sc in the back loop only [i.e. the loop on the right side] of the next stitch, marking the other loop with a stitch marker (Photo 2), sc in next stitch*. Repeat from * to * until 1 stitch left. Sc in last stitch. Ch 1 and turn.
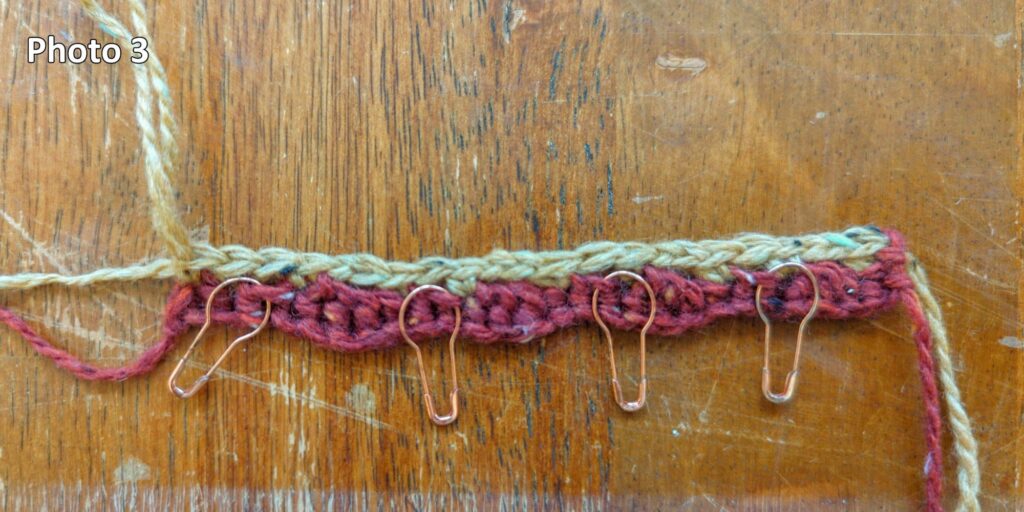
Your work should have scs in the first and last stitch, and the stitches in between make alternating groups of chain 2/skip 3 and three scs where the center sc is blo (Photo 3). Note that if you make your chains tight, you might want to do ch 3 every time I say ch 2 for this row and all following rows.
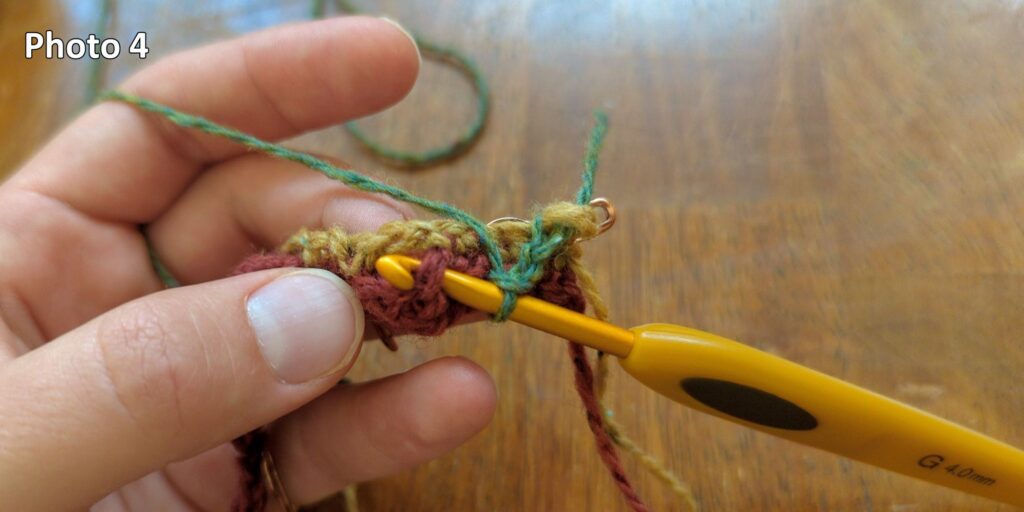
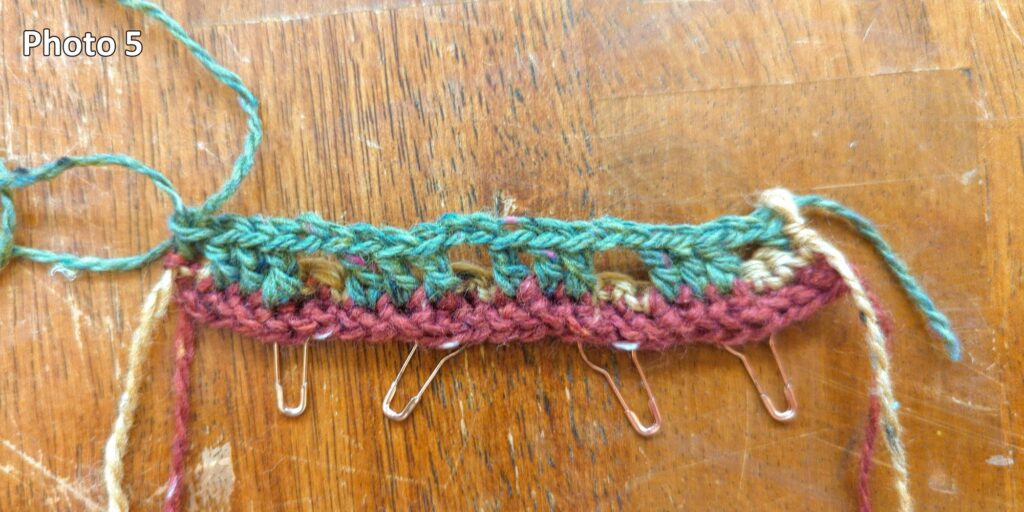
Row 3 – Right side facing. Sc in the first stitch from R2. Ch 2 and skip the 3 scs from R2. Working in front of the ch 2 space from R2, dc in each of the 3 stitches from R1 that were skipped in Row 2 (Photo 4 shows how to bend the chain from R2 to the wrong side to work in these stitches). *Ch 2, skip the 3 sc from R2, dc in the 3 skipped stitches from R1*. Repeat from * to * until 1 stitch left. Sc in the last stitch from R2 (Photo 5). Ch 1 and turn.
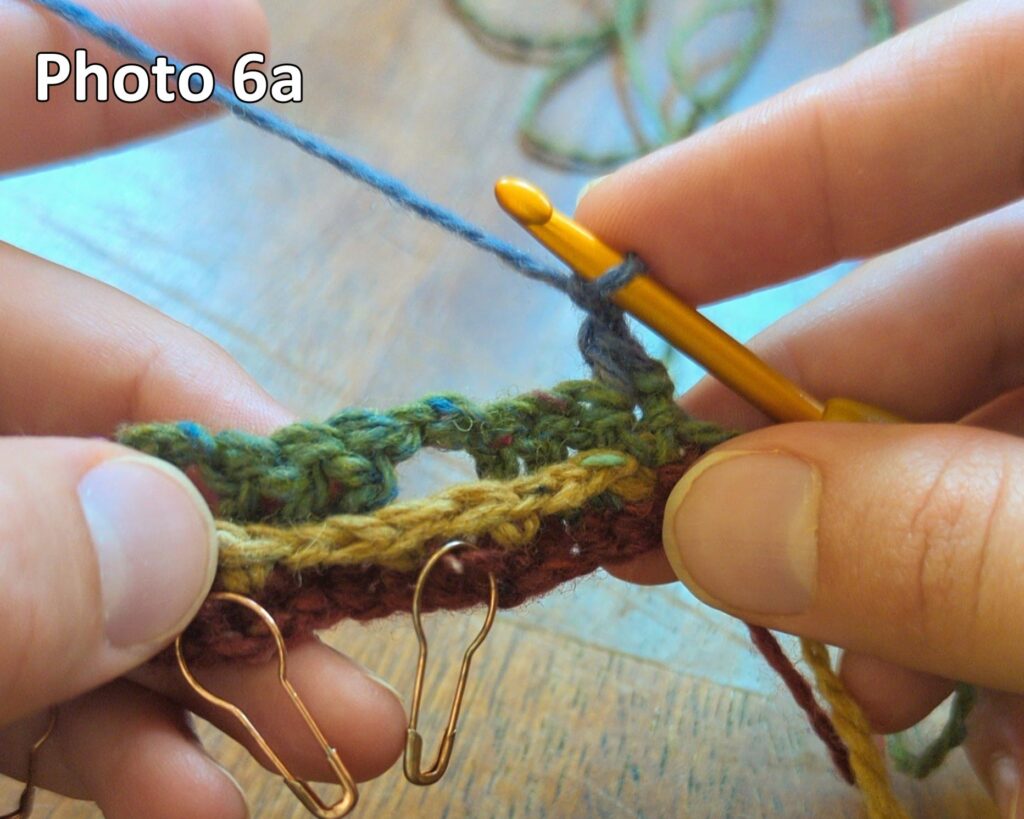
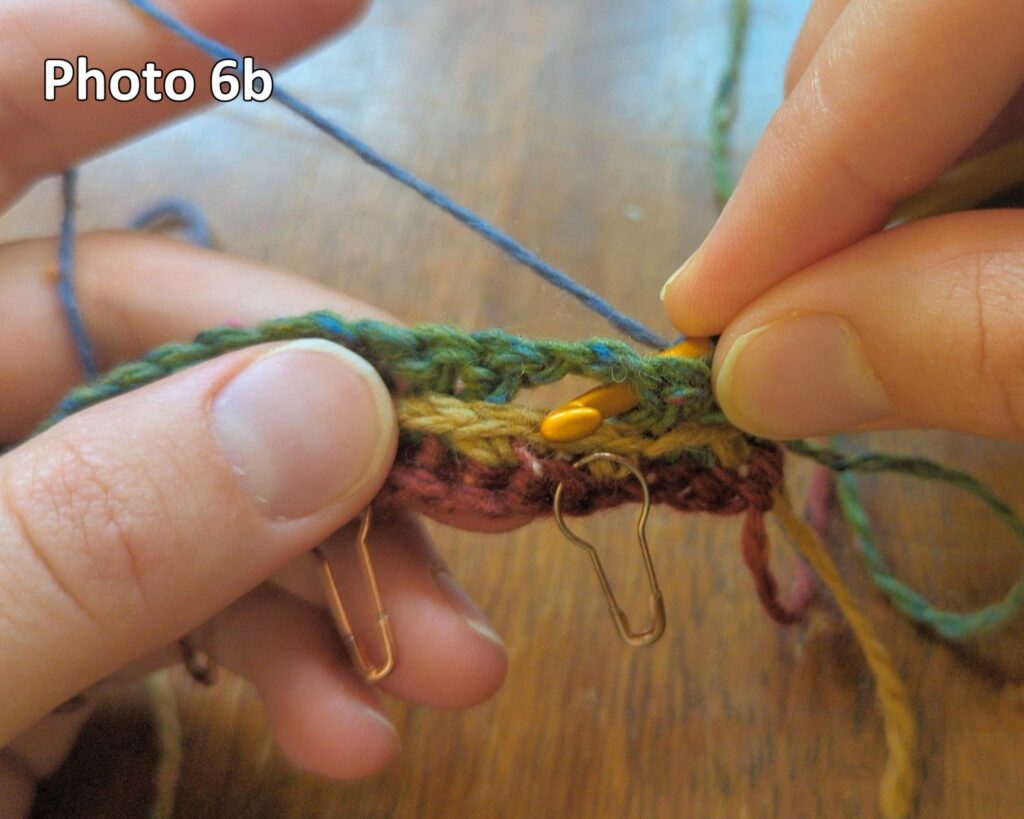
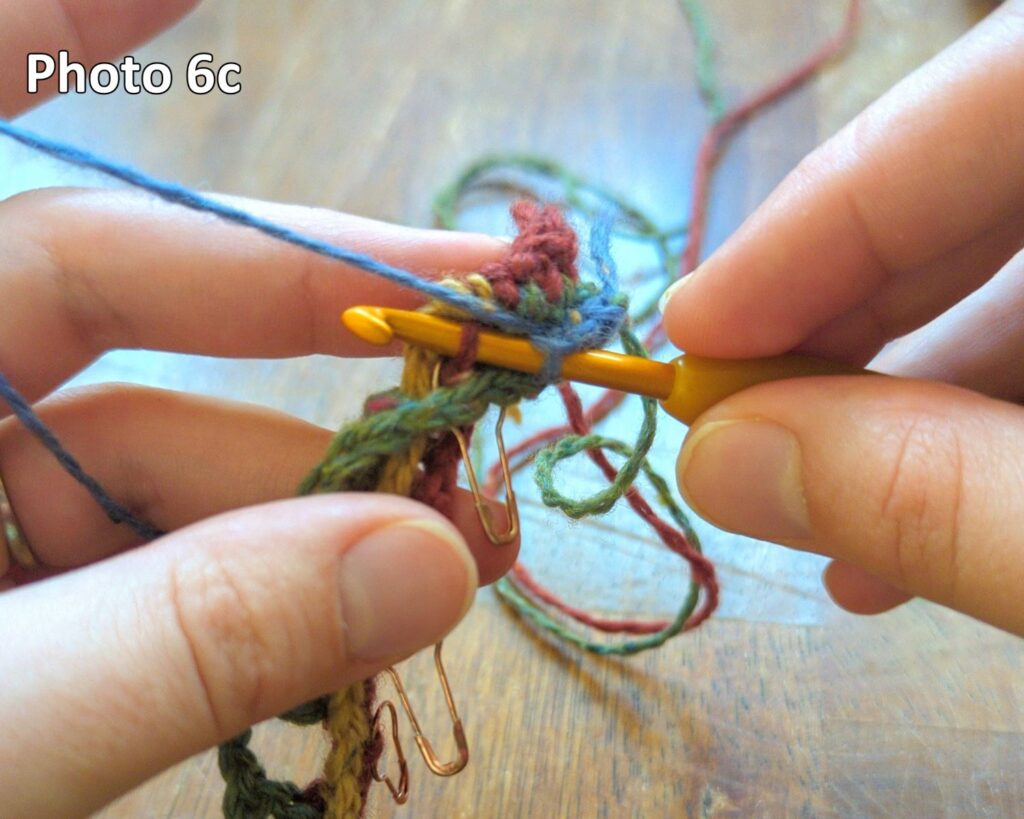
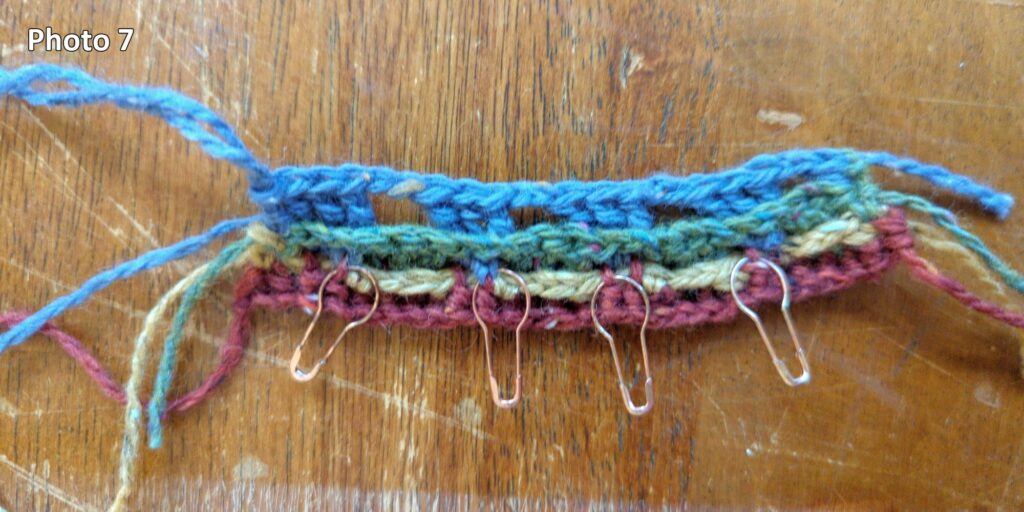
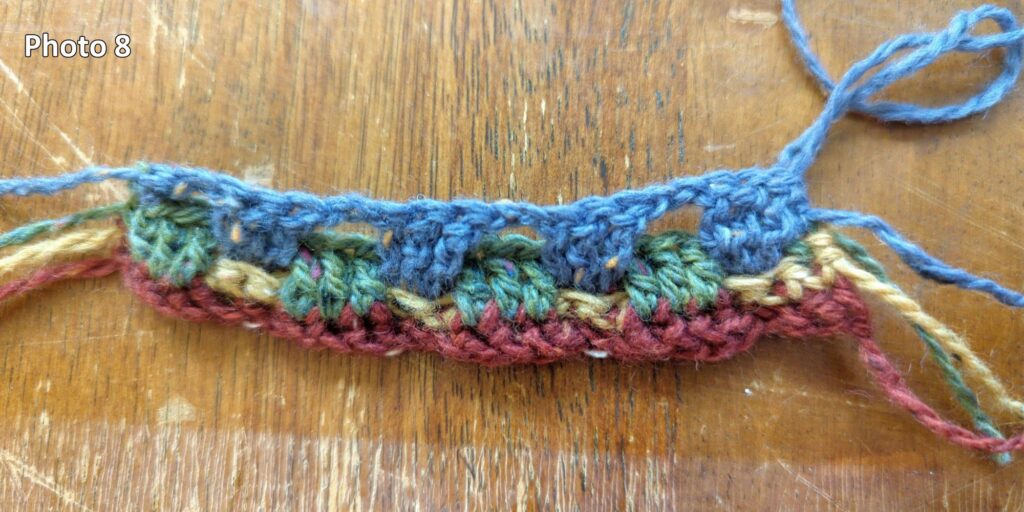
Row 4 – Wrong side facing. Ch 1 and hdc in first sc from R3. *Ch 2, skip the 3 dcs from R3. Bend the ch 2 space from R3 towards the wrong side, and bend the scs from R2 towards the right side. Tr 3 in the front loop of the sc from R1 with the stitch marker (Photos 6a-c show how to find this loop and pull it up)*. Repeat from * to * until 1 stitch left. Hdc in the last stitch from R3 (Photo 7 shows the wrong side at this point, Photo 8 shows the right side). Ch1 and turn.
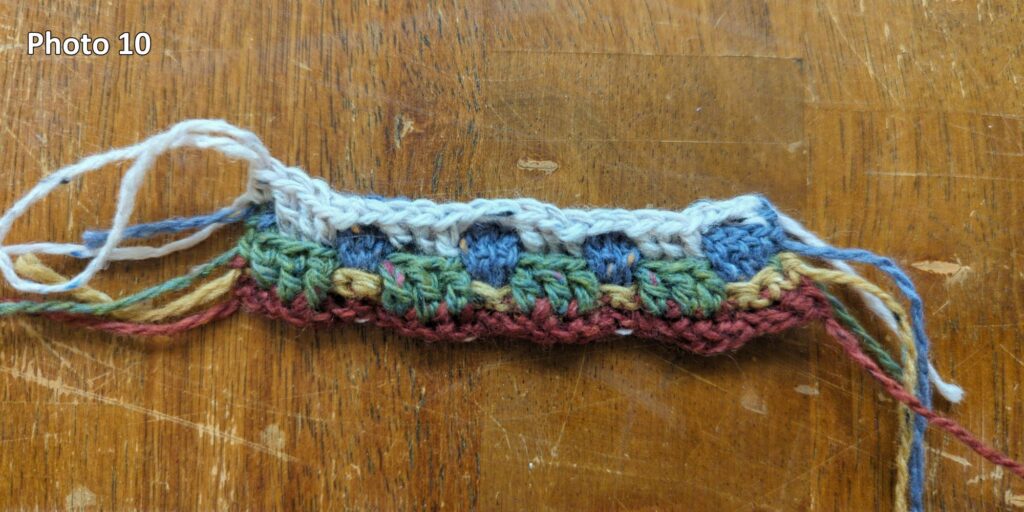
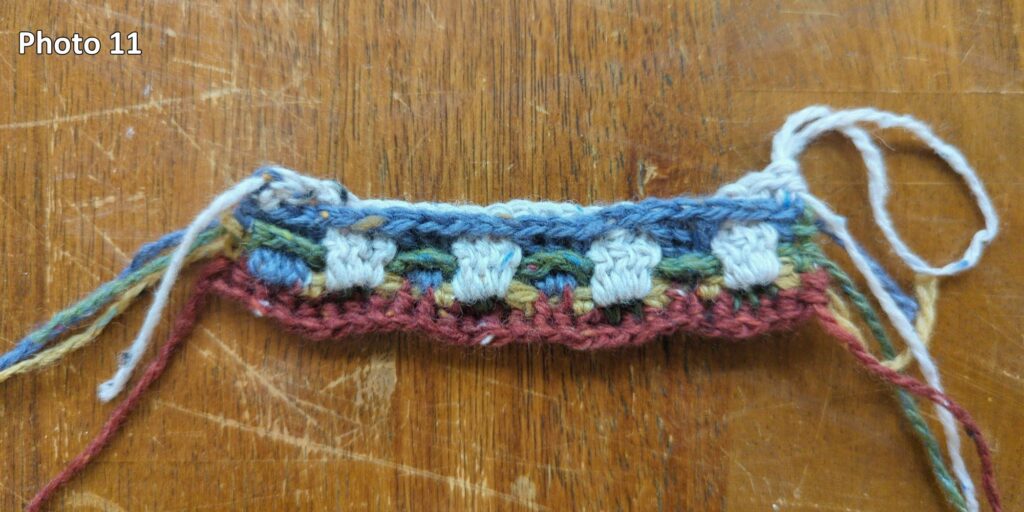
Row 5 – Right side facing. Ch 1 and hdc in the first stitch from R4. *Ch 2, skip the 3 trs from R4. Fold the chain from R4 towards the wrong side, and fold the trs from R3 towards the right side. Tr 3 in the ch 2 space from R2 (Photos 9a,b show how to find this chain and pull it up).* Repeat from * to * until 1 stitch left. Hdc in the last stitch from R4 (Photo 10 shows the right side at this point, Photo 11 shows the wrong side). Ch1 and turn.


Repeat the instructions for Row 5 until you’re about one tr short of the desired length.
In the instructions for the last couple rows, I’m going to call the final row Row F, the second to last row Row F-1, and so on.
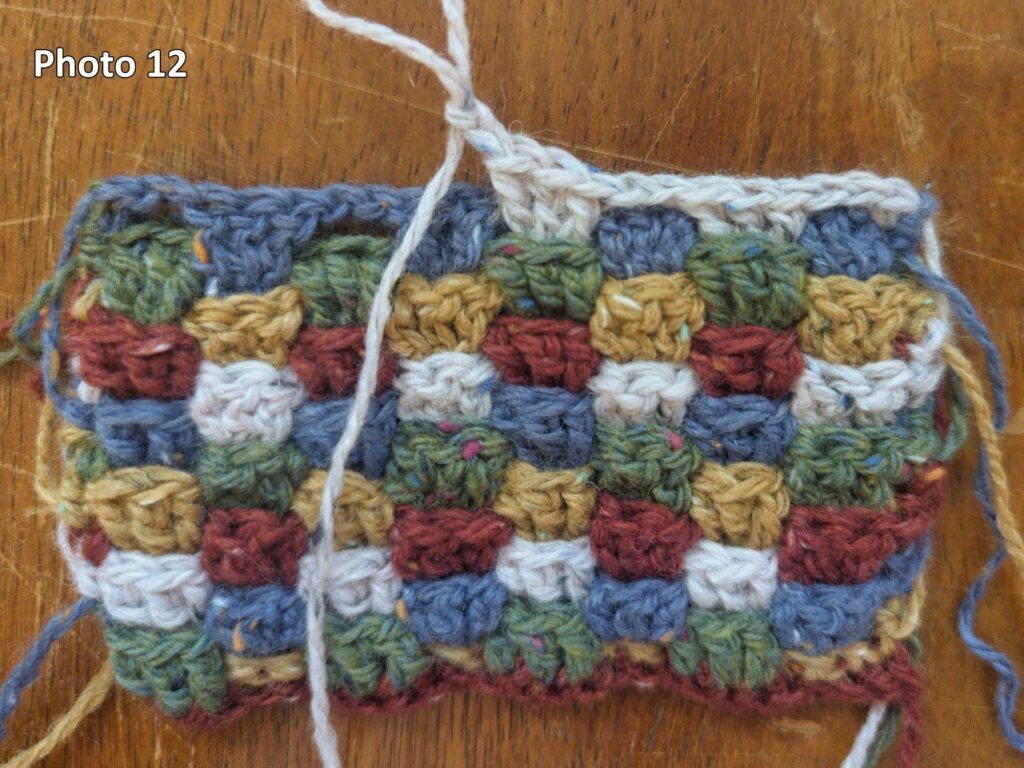
Row F-1 – Sc in the first stitch from Row F-2. *Ch 2, skip the 3 trs from Row F-2, and dc 3 into the ch 2 space from Row F-4*. (Photo 12 shows this row in progress from the right side, notice that because we used dcs instead of trs, this row is shorter and approximately level with the previous row.) Repeat from * to * until 1 stitch left. Hdc in the last stitch from Row F-2. Ch1 and turn.
Now, take a look at the wrong side of your work. Photo 13 shows the wrong side after Row F-1 is completed.
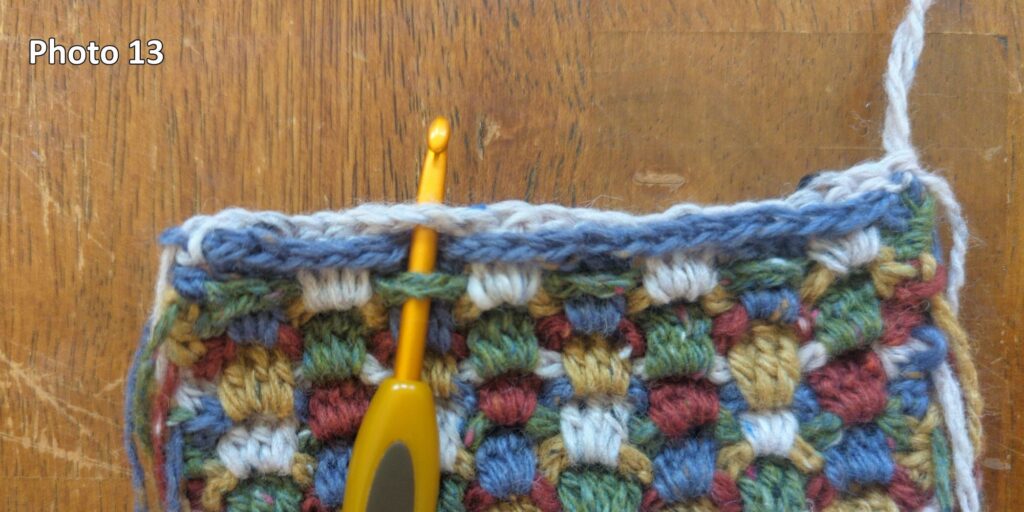
As you have been working, each row hides the chain 2 spaces from a single previous row (the one three rows prior), but now we have three sets of chains (Row F-1, white; Row F-2, blue; and Row F-3, green) to hide and only a single final row. There are two methods for the final row, depending on whether you want the chains from Row F-1 and Row F-2 to be visible.
Row F (SHOWING the extra chains) – Hdc in the first stitch from Row F-1. *With the ch 2 spaces from Row F-2 bent to the wrong side, hdc in all 3 dcs from Row F-1. With the ch 2 spaces from Row F-1 bent to the wrong side, dc 3 in the ch 2 space from Row F-3*. Repeat from * to * until 1 stitch left. Hdc in final stitch from Row F-1.
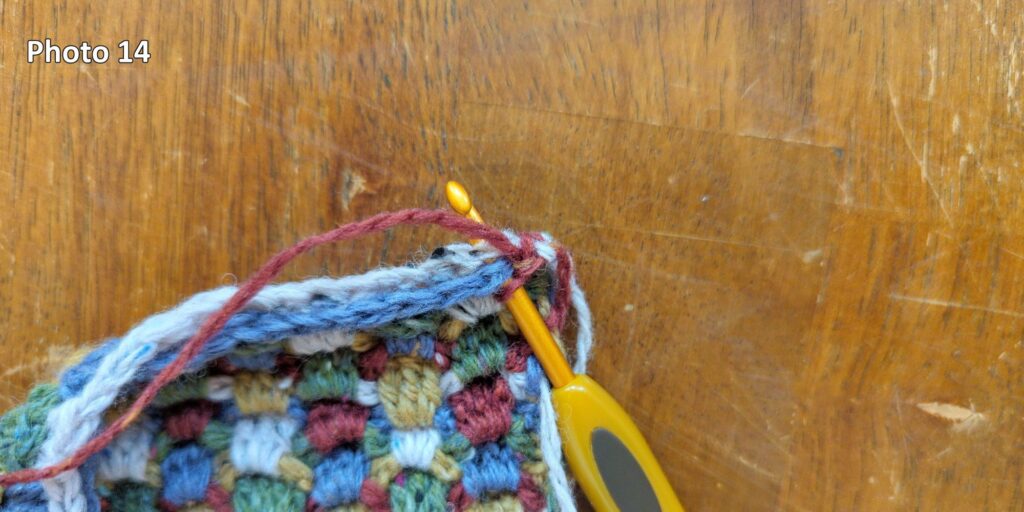
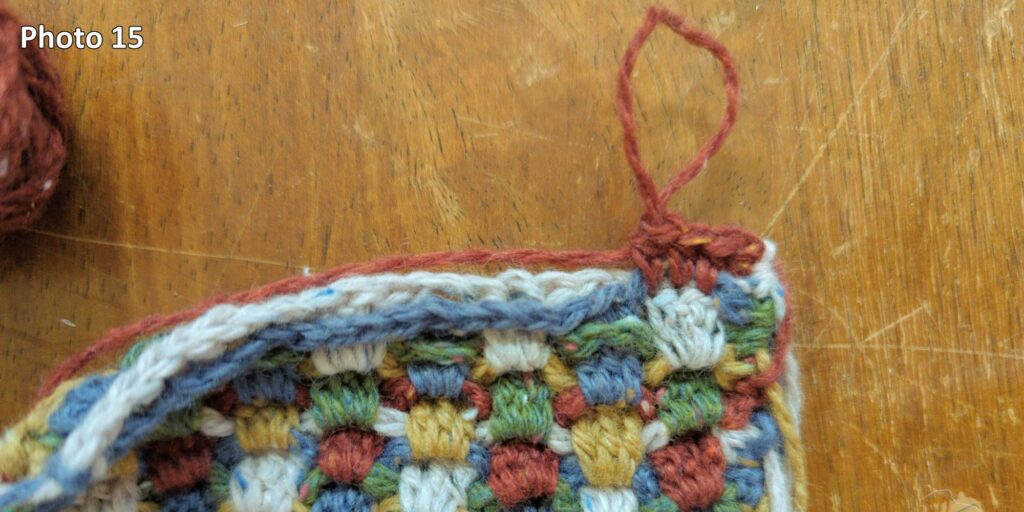
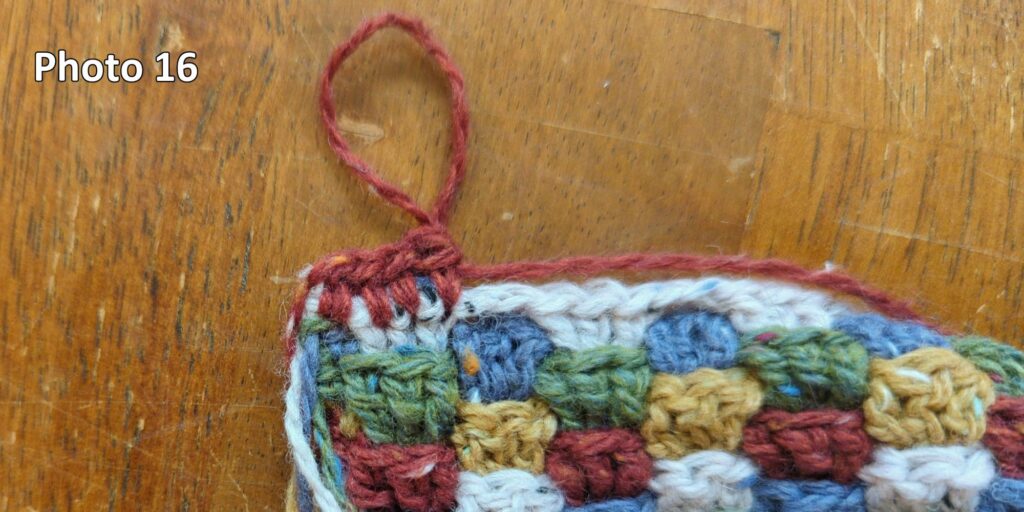
Row F (HIDING the extra chains) – Hdc in the first stitch from Row F-1. Hdc in all 3 dcs from Row F-1, making sure to catch the chain 2 space from Row F-2 and work around it (Photo 14 shows where to put your hook, Photo 15 shows the hdcs from the wrong side, and Photo 16 shows them from the right side).
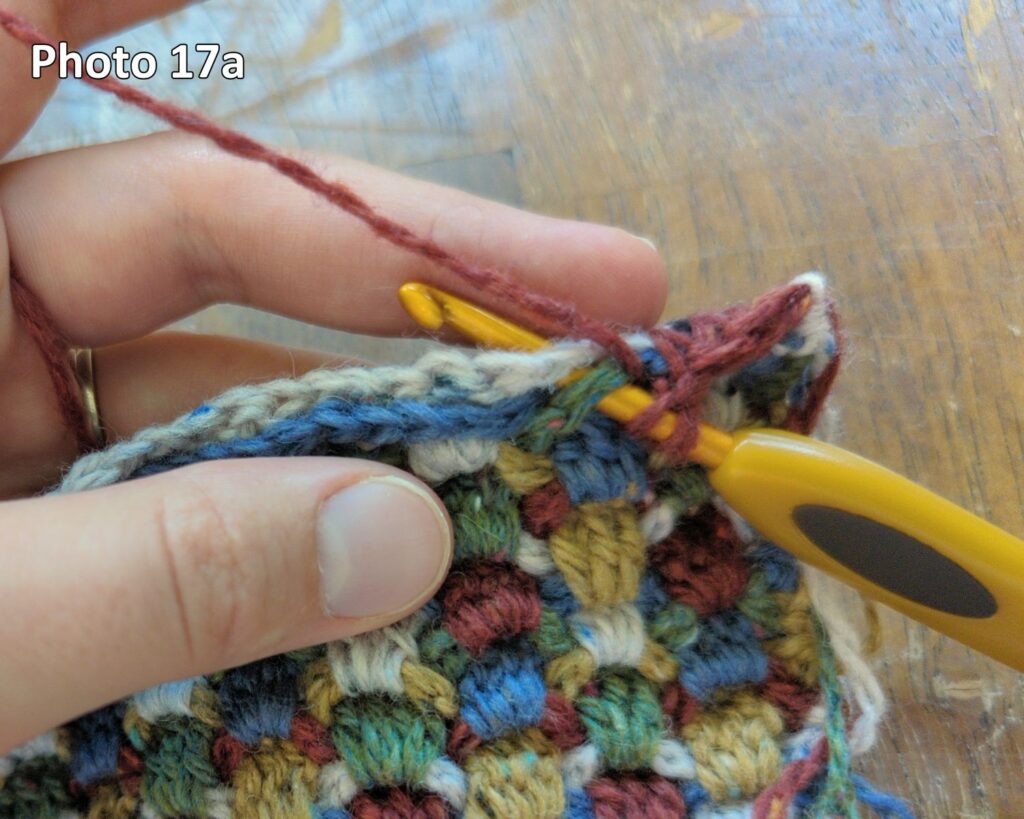
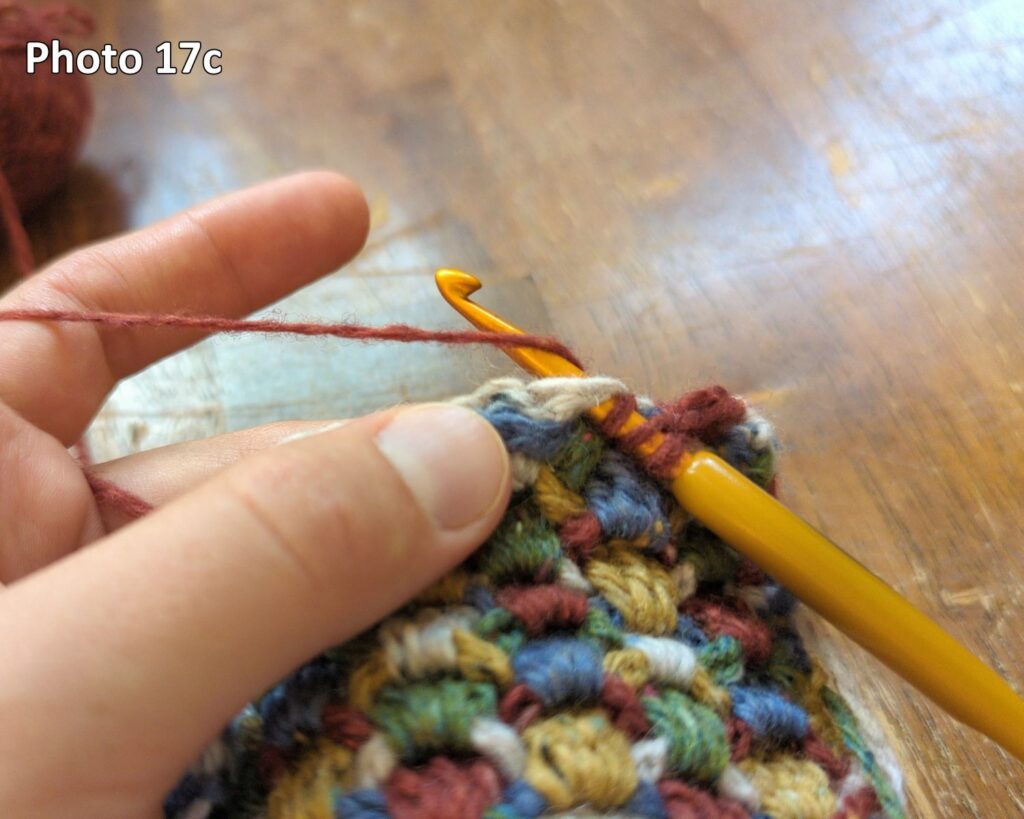
Next, we need to dc in the ch 2 space from Row F-3 (green in photos), but we need to do it around the ch 2 space from Row F-1 (white). If you just put your hook through both loops (as in Photo 13, above) and make a regular dc, the stitches will pull and look bad. Instead, we want to catch the chain from Row F-1 in the middle of the dc, not at the bottom. Here’s how we do that:
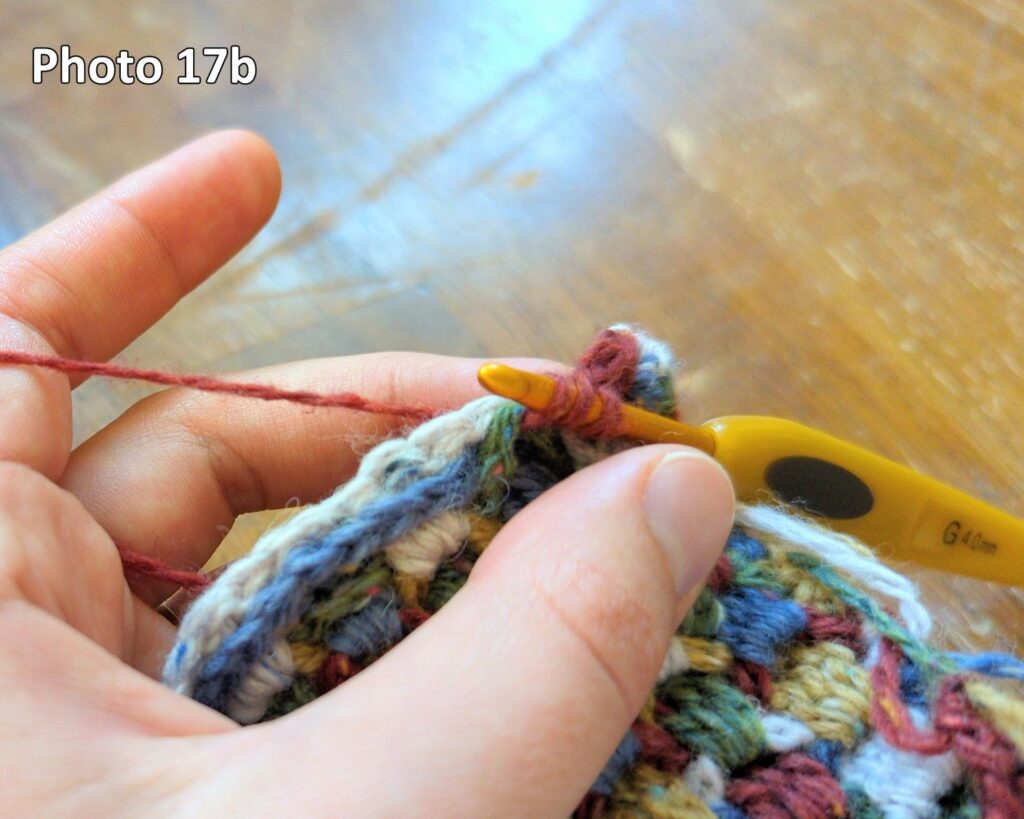
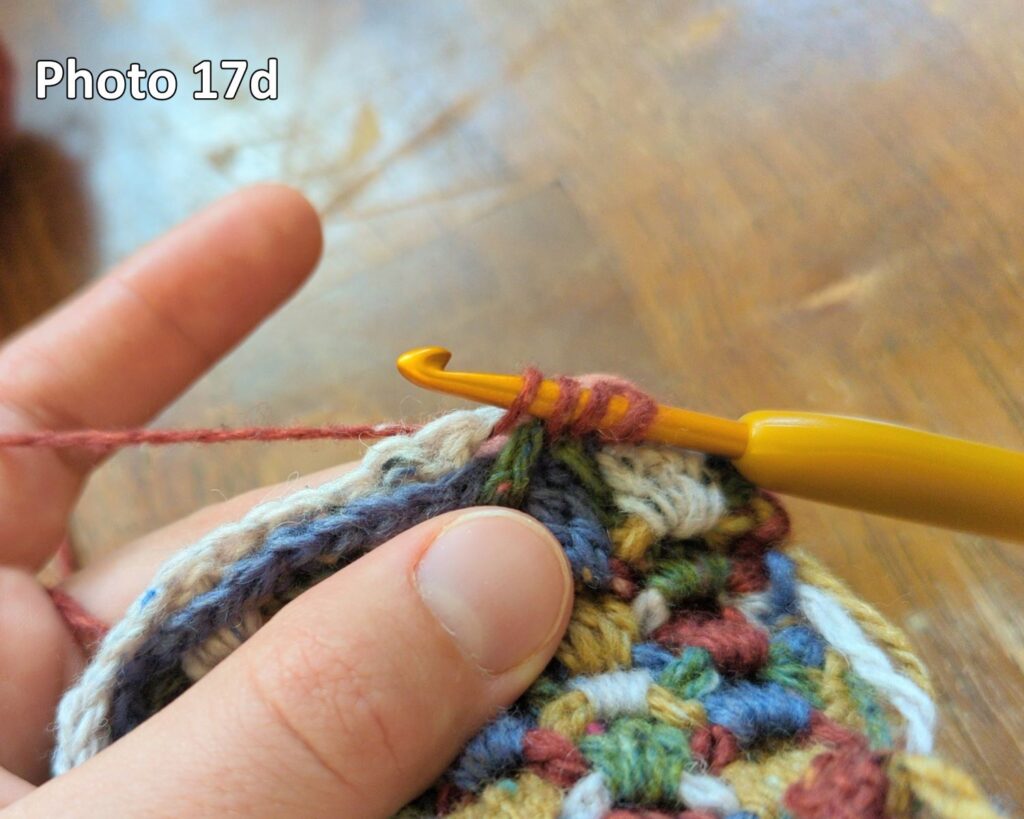
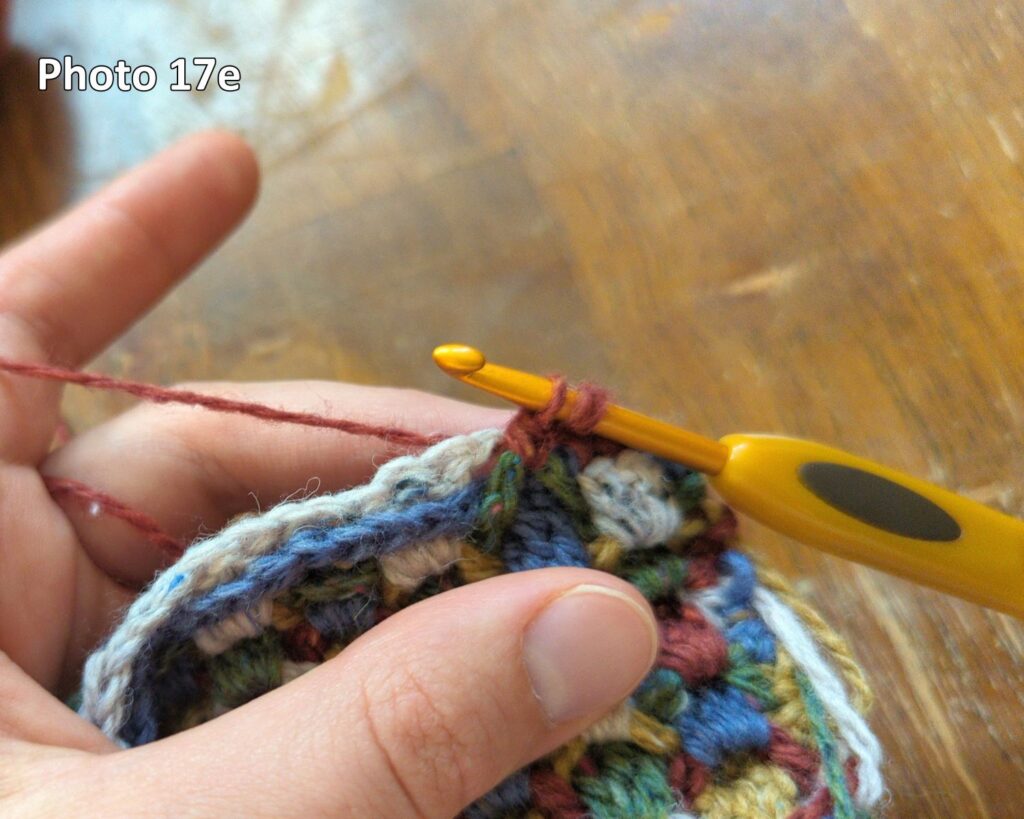
**Yarn over (2 loops on hook), insert your hook under both chains (Photo 17a), yarn over, and pull up loop (3 loops on hook, Photo 17b). Instead of finishing your dc the usual way, insert your hook under the top chain only (Photo 17c), yarn over, and pull up a loop (4 loops on hook, Photo 17d). Be careful NOT to yarn over again at this point, as that will make a tr instead of a dc. Instead, pull the most recent loop through the next 2 loops (2 loops on hook, Photo 17e), yarn over (3 loops on hook, Photo 17f), and pull through 2 loops (dc made, Photo 18).**
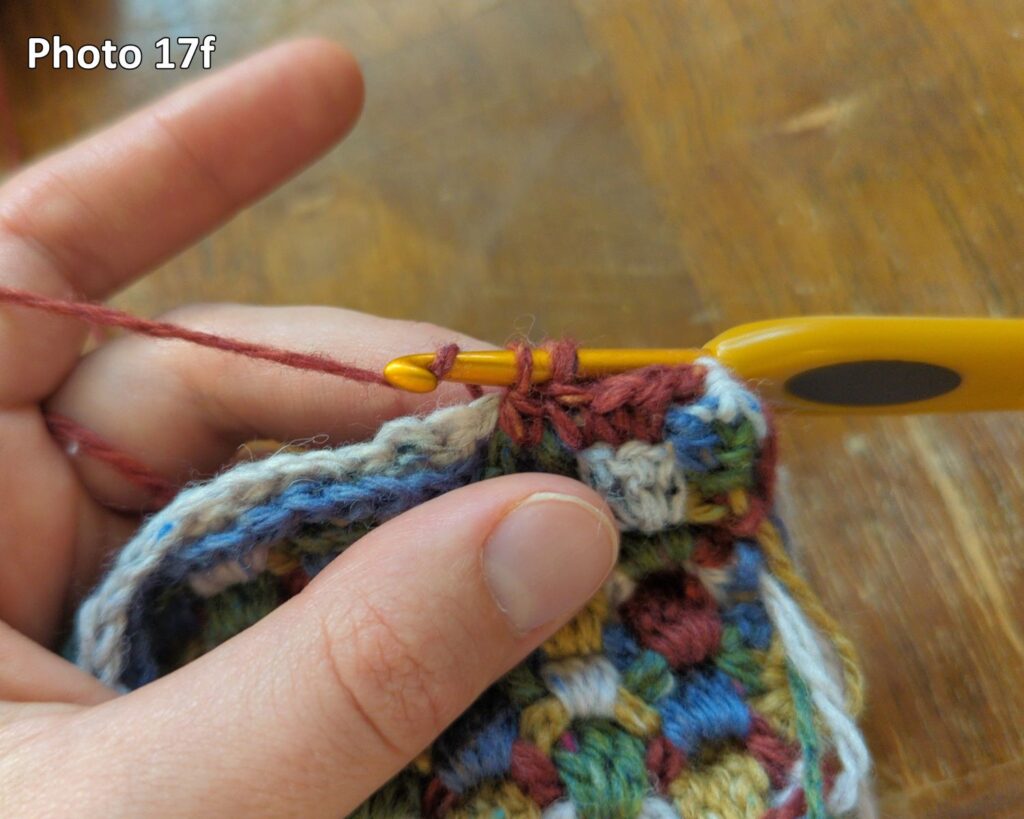
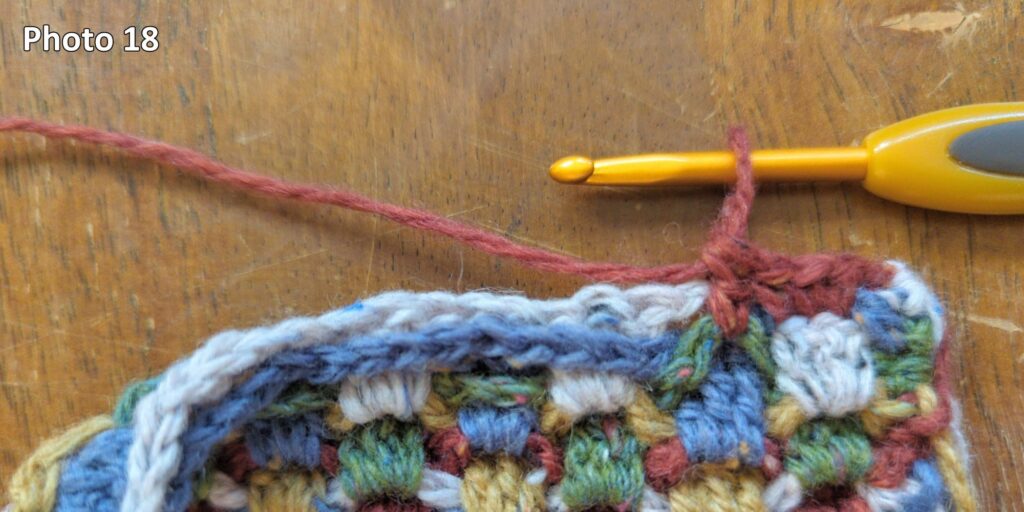
Repeat from ** to ** twice to complete the group of 3 dcs.
*Hdc in the next 3 dcs from Row F-1, working around the ch 2 space from Row F-2. Dc 3 in the next ch 2 space from Row F-3, working around the ch 2 space from Row F-1*. Repeat from * to * until 1 stitch left. Hdc in final stitch from Row F-1.
Photo 19 shows the finished row from the wrong side, Photo 20 shows it from the right side. The first half of the row (right in Photo 19, left in Photo 20) is worked using the second method to hide all the ch 2 spaces. The second half of the row leaves the white and blue ch 2 spaces visible on the wrong side.

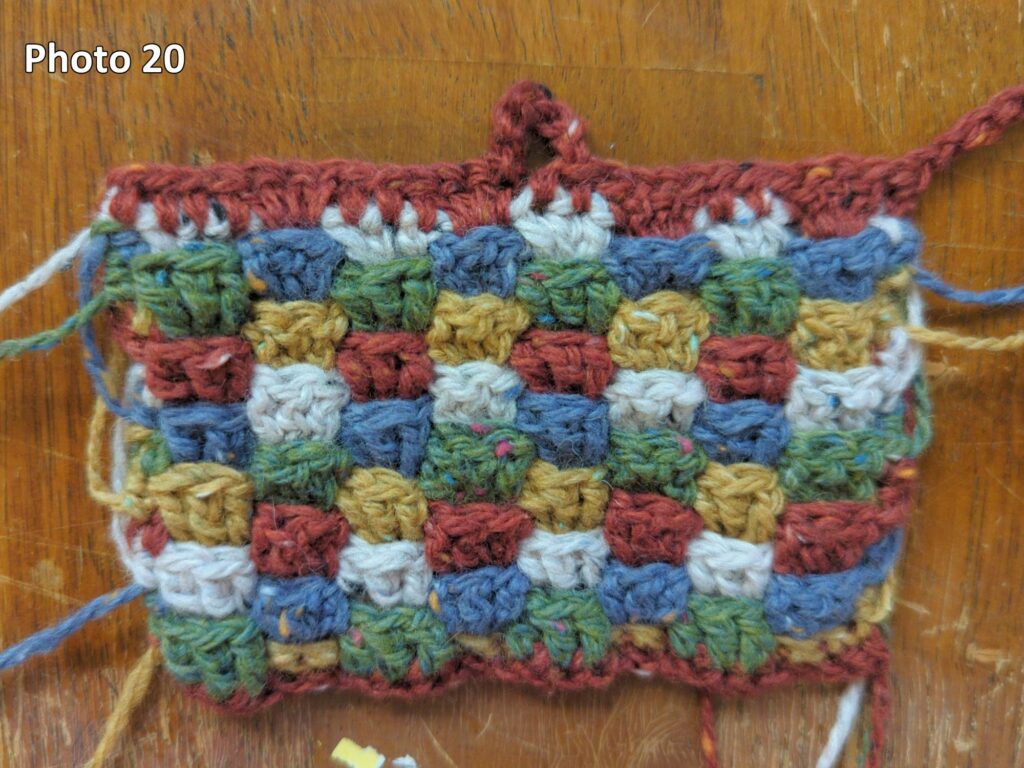
I did the final row in red for the tutorial, but in general, it looks better to match the color of the final row to the row before it, as in the sample below (Photo 21).

That’s it! Experiment with different color combinations and yarn sizes and see what you can make!
NOTE: I wrote the interlocking granny stitch pattern using multiples of 6 stitches, so that each row would start with a ch 2 space and end with a group of trs. This makes it so that the same instructions apply to odd and even rows. Once you understand the stitch, you can work in multiples of 3 instead. Everything will be the same except that your rows will start and end with either a ch2 space or a group of trs, depending on whether the right or wrong side is facing.
Simple instructions – interlocking granny stitch
Row 1 – RS facing. Fsc a multiple of 6, plus 2. Ch 1 and turn.
Row 2 – WS facing. Sc in first st. *Ch 2 and skip 3 sts, sc in next st, sc blo in next st, sc in next st*. Repeat from * to * until 1 st left. Sc 1 in last st. Ch 1 and turn.
Row 3 – RS facing. Sc in first st from R2. Ch 2 and skip the 3 scs from R2. Working in front of the ch 2 space from R2, dc in each of the 3 sts from R1 that were skipped in R2. *Ch 2, skip the 3 scs from R2, dc in the 3 skipped sts from R1*. Repeat from * to * until 1 st left. Sc in last st from R2. Ch 1 and turn.
Row 4 – WS facing. Ch 1 and hdc in first sc from R3. *Ch 2, skip the 3 dcs from R3. Bend the ch 2 space from R3 towards the ws and bend the scs from R2 towards the rs. Tr 3 in the front loop of the sc from R1*. Repeat from * to * until 1 st left. Hdc in the last st from R3. Ch1 and turn.
Row 5 – RS facing. Ch 1 and hdc in the first stitch from R4. *Ch 2, skip the 3 trs from R4. Fold the chain from R4 towards the wrong side, and fold the trs from R3 towards the right side. Tr 3 in the ch 2 space from R2.* Repeat from * to * until 1 st left. Hdc in the last st from R4. Ch1 and turn.
Repeat the instructions for Row 5 until you’re about one tr short of the desired length.
Row F-1 – Sc in the first st from the Row F-2. *Ch 2, skip the 3 trs from Row F-2, and dc 3 into the ch 2 space from R F-4*. Repeat from * to * until 1 st left. Hdc in the last st from Row F-2. Ch1 and turn.
Row F – Hdc in the first st from Row F-1. *Hdc in all 3 dcs from Row F-1. Dc 3 in the ch 2 space from Row F-3*. Repeat from * to * until 1 st left. Hdc in final st from Row F-1. To make the back neater, make the hdcs around the ch 2 spaces from Row F-2, and make the dcs so that the ch 2 spaces from Row F-1 are caught in the middle of the dc.
Please let me know in the comments if you spot any errors in these instructions, or if there’s anything I can clarify! If you try this stitch, I would love to see what you make with it – you can find me as @katederosier on instagram, tumblr, and tiktok.
If you liked this post, you can find my other free patterns and tutorials here.