tutorial

2 posts

How do I make a sharp edge with oil paint?

Last year I started painting with oil paints again, after almost a decade of only using acrylic and gouache. I had gotten used to making solid, crisp blocks of color with gouache, and I found myself wondering how I could make a sharp edge with oil paint.

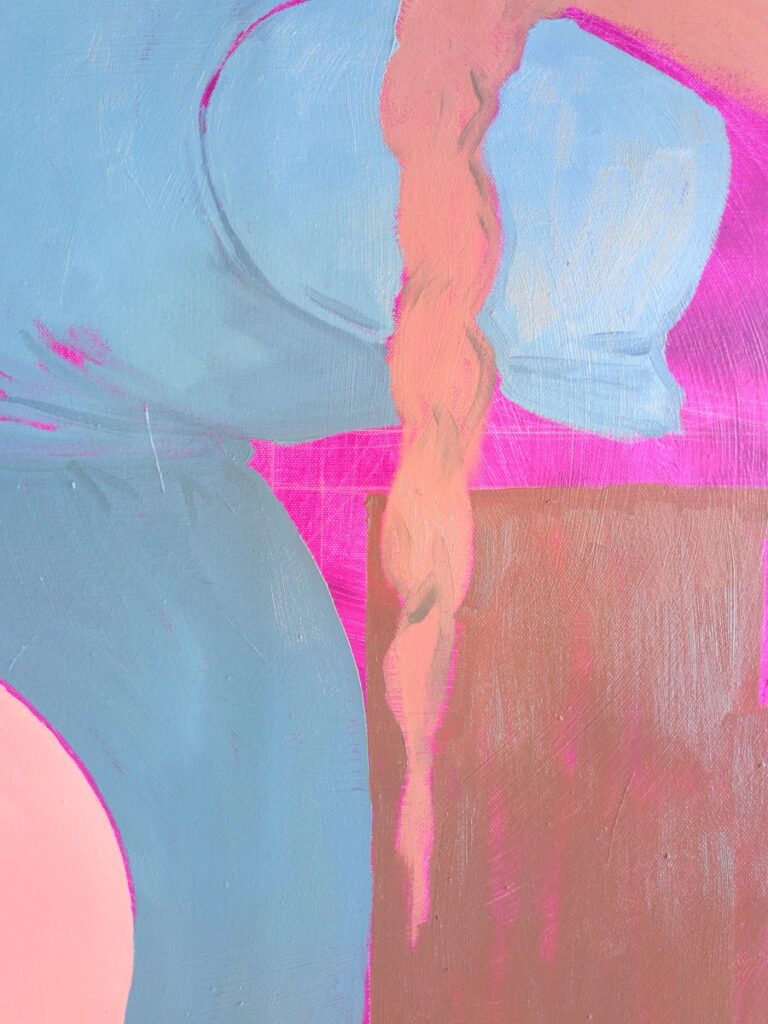
I feel a little silly making a blog post about this, because it’s something I still struggle with, but after a lot of web-searching, forum-reading, and experimentation, I’m getting much cleaner lines and edges than before – as evidenced by the progress photo below, where you can see that the blue shape of the dress is pretty crisp against the magenta underpainting. The curve of the belly especially is much sharper than anything I was getting a year ago! So, here’s a post summarizing what I’ve changed about my painting in my quest to get a crisp, sharp edge with oil paint.

Photograph of an in-progress oil painting, showing several blocks of color with sharp edges.

1. Make sure previous layers are dry enough

This is the big one, and the one I didn’t see discussed when I was searching for answers – perhaps it’s obvious to most people! But after some experimenting, I realized that my main problem was that I just wasn’t letting the prior layers dry enough.

My previous experience with oil paint was when taking elective classes in college, and in that setting, we would usually have a week or two to finish an assignment, which meant they could only dry for a couple days in between painting sessions. When I started using oil paint again, it took me a while to realize that I could let paintings sit for much longer, and that in fact, I needed to let them dry for longer if I wanted to get a really sharp edge with the next layer.

Obviously the specific amount of time you have to wait is going to depend on which medium or solvent you use, how much of it you use, how thick your paint is, and even what the temperature/humidity/air circulation is like where you’re storing your paintings, but to get a crisp edge, you want any previous layers of paint to be really dry. Not “well, I guess I can probably paint over this,” not just barely dry to the touch – it needs to be dry enough that the older paint is not going to blend with the new paint (unless you drown it in solvent, which you’re not going to do). I’m now often letting paintings wait for 2 weeks (or even a month) if I want to get a really sharp edge.

3. Rest your hand on your canvas

Since your previous layers are really dry (see tip #1 above), you can rest your hand right on your canvas as you work! This will give you more stability and control. If you plan carefully, working from the center out and rotating, raising, or lowering your canvas as needed, you can probably find a safe place to rest your hand for almost any spot you want to paint. If you’ve got a situation where you really can’t find somewhere to rest your hand, there’s also a tool called a mahlstick that can help (and it’s easy to DIY, I have just used a yardstick and paper towel before).

3. Hold your brush at the correct angle

This is another one that might be obvious to everyone but me, but I’m going to spell it out for anyone else whose intuition is leading them astray!

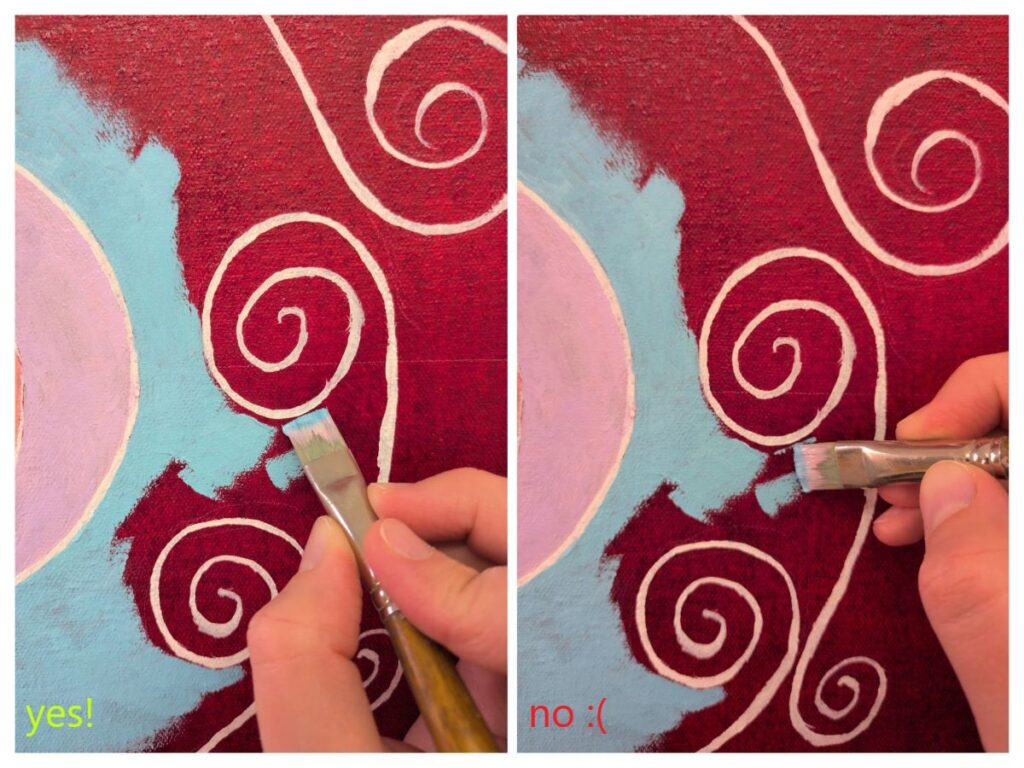
A paintbrush is not a pencil. When using a flat or bright brush shape, you should not be holding the brush with the line of the tip perpendicular to the edge you want to make and drawing along it with the outer edge of the brush. Although this movement might feel intuitive, it’s not going to make a clean edge because any variation in the pressure of the brush against the canvas is going to spread the bristles out and make your edge wobbly! Instead, you should should be lining up the tip of the brush parallel to the line you want to paint, and then making short strokes away from the edge.

The photos below show an example where I’m filling in a big block of light blue, following the curve of a white line I had previously sketched in. On the left, I’m holding the brush correctly: the end of the brush is tangent to the white line I’m following, and my hand is positioned to make a clean stroke away from the edge I’m creating (although if I wasn’t trying to take a photograph with my other hand, I would probably start even closer to the white line, or even a little on top of it). Lots of little strokes like this will allow me to fill in the shape right up to the line, and leave a very sharp edge. On the right, I am holding my brush incorrectly: if I push down to make a mark, the bristles will spread, and it will be difficult to have enough control to keep them off the white line.

Two photos of a hand holding a paintbrush and painting an edge with oil paint, demonstrating the hand/brush positions described above.

4. Use a round brush for thin, crisp lines

A flat or bright brush works well for making a straight edge or filling in the outside of a curve (as in the example above), but what if you want fill in the inside of a curve? In this situation, if you line up the end of your brush tangent to the edge you want to make, the outside edges of your brush might cross the line you’re trying to follow.

If the curvature isn’t too great, a smaller flat brush might do okay, but if it’s a very small area or a tight curve, you’re going to want to switch to a round brush. With a round brush, you want to use just the tip, and you can go along the edge (like using a pencil).

If you want to make a particularly thin line, having a round brush with especially long hairs helps. I have seen people recommend “rigger” brushes (as far as I know that’s just a long round brush), but I ended up buying a pinstriping brush and a longliner brush by Kafka Design (link to Blick, but I’m sure they’re sold elsewhere too). What I like about these is that they’re designed with short handles, so you can use them with the end of the handle resting on your hand between your thumb and index finger. My hand is not as steady as I wish it was, and I find that holding the brush that way helps.

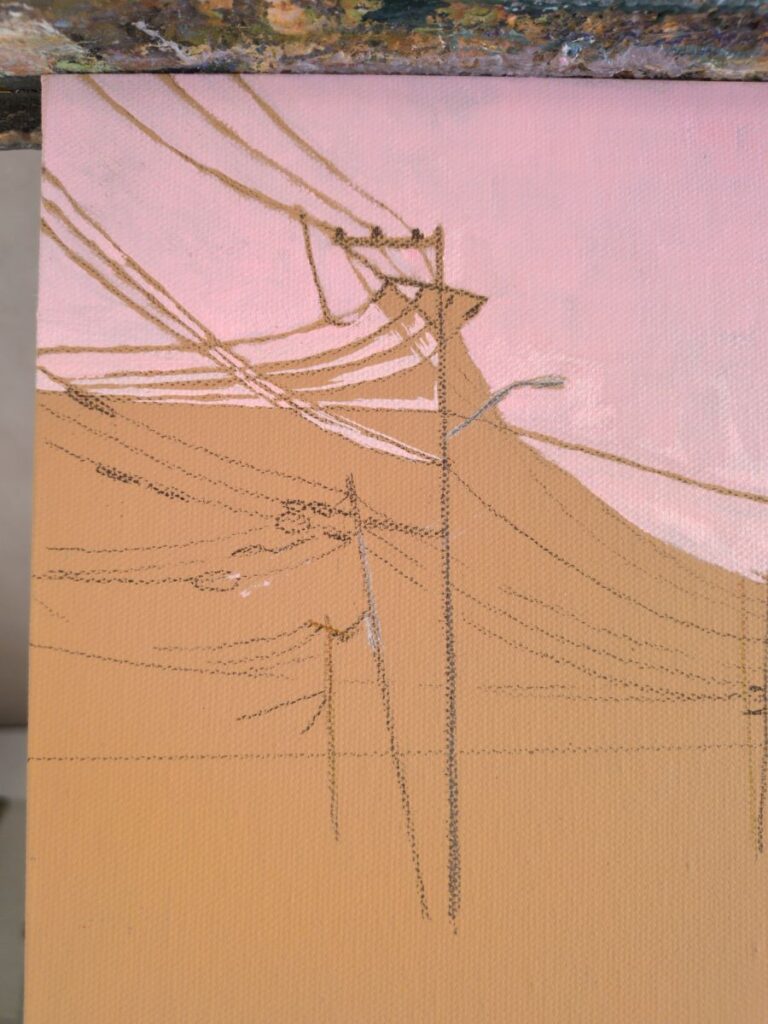
If you look near the middle of the photo below (or a little bit up from the middle), you can find a very, very thin pink line that I painted with my Kafka Design longliner brush. This is a closeup photo of an 8 inch by 10 inch panel (the sketched in lines were made by recently sharpened colored pencil), so that pink line is incredibly thin. I’m still working on getting the consistent pressure needed to make a constantt line width, but I do think these long hair / short handle brushes were a big upgrade.

Photograph of an in progress oil painting showing several blocks of color, including a couple edged with very thin lines.

5. Use tape

It’s pretty common to see acrylic painters use masking tape to get extra crisp, straight lines – turns out, you can actually do that with oil paint too! I haven’t tried putting tape straight on a prepared canvas or panel, and I suspect it wouldn’t work well on top of thick textured paint, but masking tape on top of a thin, dry layer of oil paint has worked fine for me. Just make sure your previous layers are extremely dry before putting it on (funny how this whole blog post comes back to that one tip…), and take it off as soon as you can.

Interlocking Granny Stitch

Introduction and examples

This is a tutorial for a crochet stitch I’ve been calling the interlocking granny stitch. It’s a pretty dense stitch that produces interesting textures on both sides, and its honeycomb-like pattern is a fun base for color work.

Examples of the interlocking granny stitch. Clockwise from top left: 3 color design using Aran weight yarn and a 5.0mm hook (Scheepjes River Washed XL Yarra, Nile, Crystal Quartz); 5 color design using DK yarn and a 4.0mm hook (Scheepjes Terrazzo Espresso, Acero, Pera, Acciaio, Prosecco); 2 color design using DK yarn and a 3.5mm hook (I think it’s Scheepjes Colour Crafter Gouda and Nijmegen?); single color design using super bulky yarn and a 8.0mm hook (Loopy Mango Merino No. 5 Cafe Con Leche)

I’m not quite sure whether to claim I invented this stitch – on the one hand, I had the idea for a texture I wanted, couldn’t find anything similar in my crochet books or online, and played around with yarn until I came up with this. On the other hand, enough people have been doing crochet for enough years that it seems very likely to me that I’m not the first person to have this idea! If you’ve seen this stitch before, please let me know where and I will happily link it here.

I hope you give the interlocking granny stitch a try! If anything is unclear, please use the comments to ask me.

DETAILED INSTRUCTIONS (with photos) | SIMPLE INSTRUCTIONS (for after you know what you’re doing and just need a reminder)


Detailed instructions – interlocking granny stitch

Row 1 – Right side facing. Foundation single crochet a multiple of 6, plus 2. Ch 1 and turn (Photo 1). If you find foundation sc really annoying, you can chain a multiple of 6 plus 3, then sc across starting in the second ch from the hook, which should give you a multiple of 6 plus 2 scs.

Row 2 – Wrong side facing. Sc in first stitch. *Ch 2 and skip 3 stitches, sc in the next stitch, sc in the back loop only [i.e. the loop on the right side] of the next stitch, marking the other loop with a stitch marker (Photo 2), sc in next stitch*. Repeat from * to * until 1 stitch left. Sc in last stitch. Ch 1 and turn.

Your work should have scs in the first and last stitch, and the stitches in between make alternating groups of chain 2/skip 3 and three scs where the center sc is blo (Photo 3). Note that if you make your chains tight, you might want to do ch 3 every time I say ch 2 for this row and all following rows.

Row 3 – Right side facing. Sc in the first stitch from R2. Ch 2 and skip the 3 scs from R2. Working in front of the ch 2 space from R2, dc in each of the 3 stitches from R1 that were skipped in Row 2 (Photo 4 shows how to bend the chain from R2 to the wrong side to work in these stitches). *Ch 2, skip the 3 sc from R2, dc in the 3 skipped stitches from R1*. Repeat from * to * until 1 stitch left. Sc in the last stitch from R2 (Photo 5). Ch 1 and turn.

Row 4 – Wrong side facing. Ch 1 and hdc in first sc from R3. *Ch 2, skip the 3 dcs from R3. Bend the ch 2 space from R3 towards the wrong side, and bend the scs from R2 towards the right side. Tr 3 in the front loop of the sc from R1 with the stitch marker (Photos 6a-c show how to find this loop and pull it up)*. Repeat from * to * until 1 stitch left. Hdc in the last stitch from R3 (Photo 7 shows the wrong side at this point, Photo 8 shows the right side). Ch1 and turn.

Row 5 – Right side facing. Ch 1 and hdc in the first stitch from R4. *Ch 2, skip the 3 trs from R4. Fold the chain from R4 towards the wrong side, and fold the trs from R3 towards the right side. Tr 3 in the ch 2 space from R2 (Photos 9a,b show how to find this chain and pull it up).* Repeat from * to * until 1 stitch left. Hdc in the last stitch from R4 (Photo 10 shows the right side at this point, Photo 11 shows the wrong side). Ch1 and turn.

Repeat the instructions for Row 5 until you’re about one tr short of the desired length.

In the instructions for the last couple rows, I’m going to call the final row Row F, the second to last row Row F-1, and so on.

Row F-1  – Sc in the first stitch from Row F-2. *Ch 2, skip the 3 trs from Row F-2, and dc 3 into the ch 2 space from Row F-4*. (Photo 12 shows this row in progress from the right side, notice that because we used dcs instead of trs, this row is shorter and approximately level with the previous row.) Repeat from * to * until 1 stitch left. Hdc in the last stitch from Row F-2. Ch1 and turn.

Now, take a look at the wrong side of your work. Photo 13 shows the wrong side after Row F-1 is completed.

As you have been working, each row hides the chain 2 spaces from a single previous row (the one three rows prior), but now we have three sets of chains (Row F-1, white; Row F-2, blue; and Row F-3, green) to hide and only a single final row. There are two methods for the final row, depending on whether you want the chains from Row F-1 and Row F-2 to be visible.

Row F (SHOWING the extra chains) – Hdc in the first stitch from Row F-1. *With the ch 2 spaces from Row F-2 bent to the wrong side, hdc in all 3 dcs from Row F-1. With the ch 2 spaces from Row F-1 bent to the wrong side, dc 3 in the ch 2 space from Row F-3*. Repeat from * to * until 1 stitch left. Hdc in final stitch from Row F-1.

Row F (HIDING the extra chains) – Hdc in the first stitch from Row F-1. Hdc in all 3 dcs from Row F-1, making sure to catch the chain 2 space from Row F-2 and work around it (Photo 14 shows where to put your hook, Photo 15 shows the hdcs from the wrong side, and Photo 16 shows them from the right side).

Next, we need to dc in the ch 2 space from Row F-3 (green in photos), but we need to do it around the ch 2 space from Row F-1 (white). If you just put your hook through both loops (as in Photo 13, above) and make a regular dc, the stitches will pull and look bad. Instead, we want to catch the chain from Row F-1 in the middle of the dc, not at the bottom. Here’s how we do that:

**Yarn over (2 loops on hook), insert your hook under both chains (Photo 17a), yarn over, and pull up loop (3 loops on hook, Photo 17b). Instead of finishing your dc the usual way, insert your hook under the top chain only (Photo 17c), yarn over, and pull up a loop (4 loops on hook, Photo 17d). Be careful NOT to yarn over again at this point, as that will make a tr instead of a dc. Instead, pull the most recent loop through the next 2 loops (2 loops on hook, Photo 17e), yarn over (3 loops on hook, Photo 17f), and pull through 2 loops (dc made, Photo 18).**

Repeat from ** to ** twice to complete the group of 3 dcs. 

*Hdc in the next 3 dcs from Row F-1, working around the ch 2 space from Row F-2. Dc 3 in the next ch 2 space from Row F-3, working around the ch 2 space from Row F-1*. Repeat from * to * until 1 stitch left. Hdc in final stitch from Row F-1.

Photo 19 shows the finished row from the wrong side, Photo 20 shows it from the right side. The first half of the row (right in Photo 19, left in Photo 20) is worked using the second method to hide all the ch 2 spaces. The second half of the row leaves the white and blue ch 2 spaces visible on the wrong side.

I did the final row in red for the tutorial, but in general, it looks better to match the color of the final row to the row before it, as in the sample below (Photo 21).

That’s it! Experiment with different color combinations and yarn sizes and see what you can make!

NOTE: I wrote the interlocking granny stitch pattern using multiples of 6 stitches, so that each row would start with a ch 2 space and end with a group of trs. This makes it so that the same instructions apply to odd and even rows. Once you understand the stitch, you can work in multiples of 3 instead. Everything will be the same except that your rows will start and end with either a ch2 space or a group of trs, depending on whether the right or wrong side is facing.


Simple instructions – interlocking granny stitch

Row 1 – RS facing. Fsc a multiple of 6, plus 2. Ch 1 and turn.

Row 2 – WS facing. Sc in first st. *Ch 2 and skip 3 sts, sc in next st, sc blo in next st, sc in next st*. Repeat from * to * until 1 st left. Sc 1 in last st. Ch 1 and turn.

Row 3 – RS facing. Sc in first st from R2. Ch 2 and skip the 3 scs from R2. Working in front of the ch 2 space from R2, dc in each of the 3 sts from R1 that were skipped in R2. *Ch 2, skip the 3 scs from R2, dc in the 3 skipped sts from R1*. Repeat from * to * until 1 st left. Sc in last st from R2. Ch 1 and turn.

Row 4 – WS facing. Ch 1 and hdc in first sc from R3. *Ch 2, skip the 3 dcs from R3. Bend the ch 2 space from R3 towards the ws and bend the scs from R2 towards the rs. Tr 3 in the front loop of the sc from R1*. Repeat from * to * until 1 st left. Hdc in the last st from R3. Ch1 and turn.

Row 5 – RS facing. Ch 1 and hdc in the first stitch from R4. *Ch 2, skip the 3 trs from R4. Fold the chain from R4 towards the wrong side, and fold the trs from R3 towards the right side. Tr 3 in the ch 2 space from R2.* Repeat from * to * until 1 st left. Hdc in the last st from R4. Ch1 and turn.

Repeat the instructions for Row 5 until you’re about one tr short of the desired length.

Row F-1  – Sc in the first st from the Row F-2. *Ch 2, skip the 3 trs from Row F-2, and dc 3 into the ch 2 space from R F-4*. Repeat from * to * until 1 st left. Hdc in the last st from Row F-2. Ch1 and turn.

Row F – Hdc in the first st from Row F-1. *Hdc in all 3 dcs from Row F-1. Dc 3 in the ch 2 space from Row F-3*. Repeat from * to * until 1 st left. Hdc in final st from Row F-1. To make the back neater, make the hdcs around the ch 2 spaces from Row F-2, and make the dcs so that the ch 2 spaces from Row F-1 are caught in the middle of the dc.


Please let me know in the comments if you spot any errors in these instructions, or if there’s anything I can clarify! If you try this stitch, I would love to see what you make with it – you can find me as @katederosier on instagram, tumblr, and tiktok.

If you liked this post, you can find my other free patterns and tutorials here.