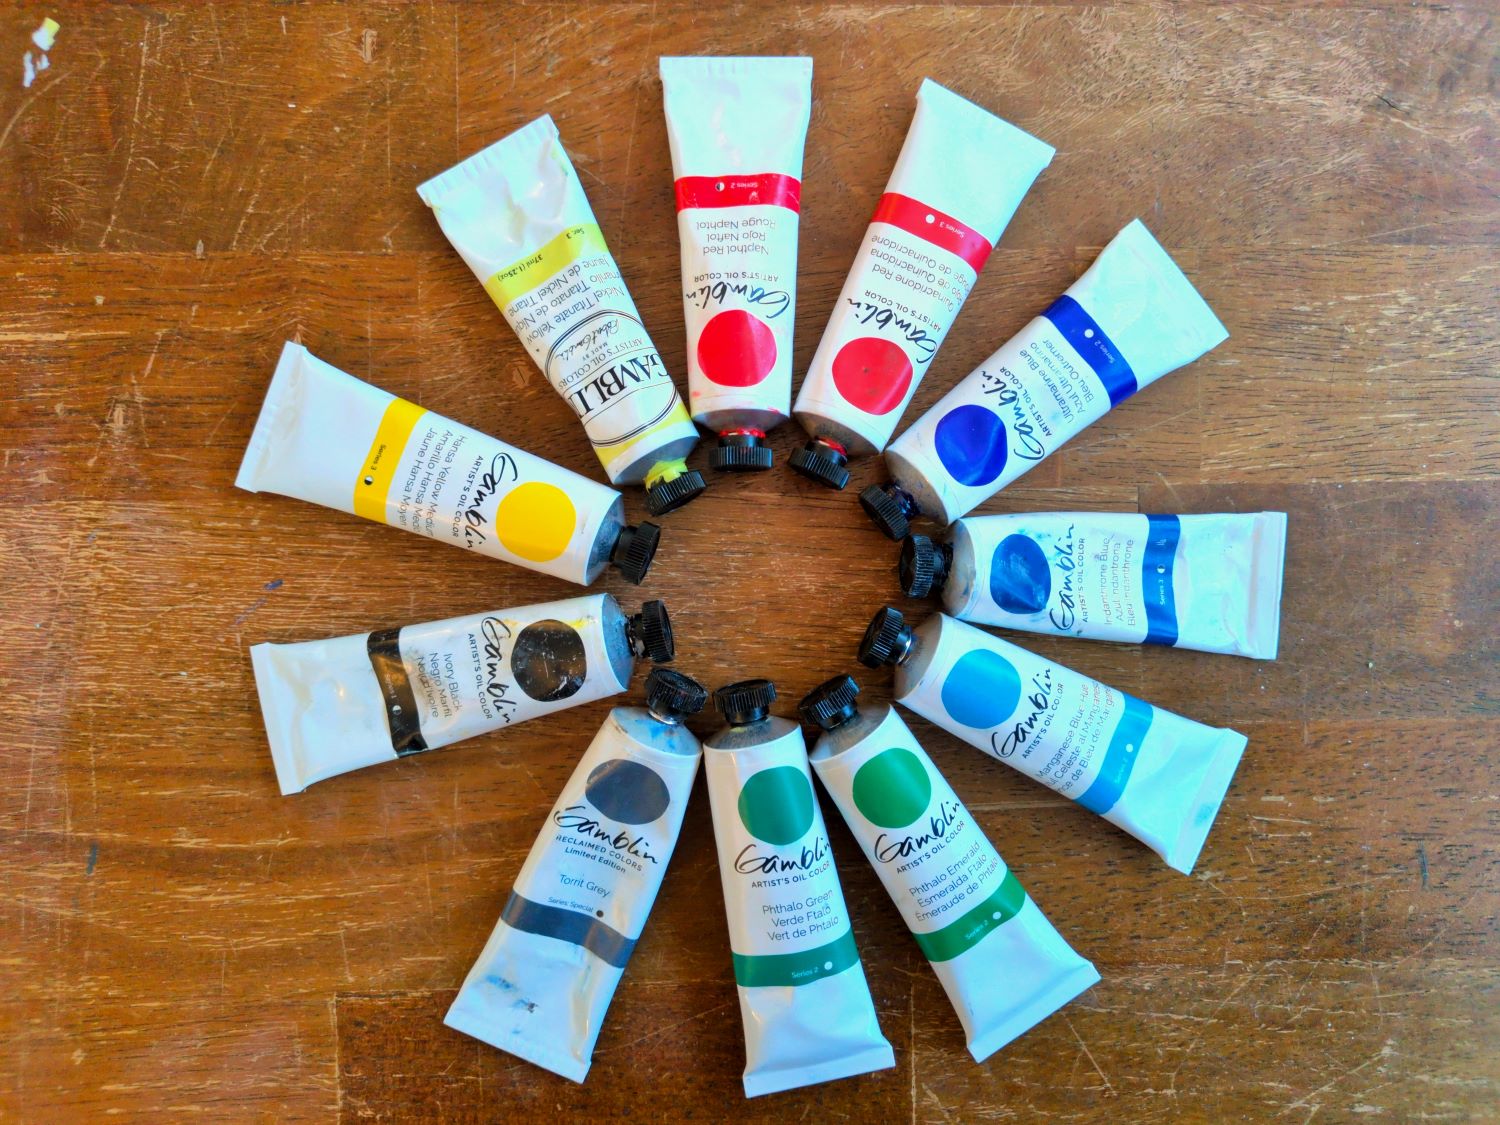
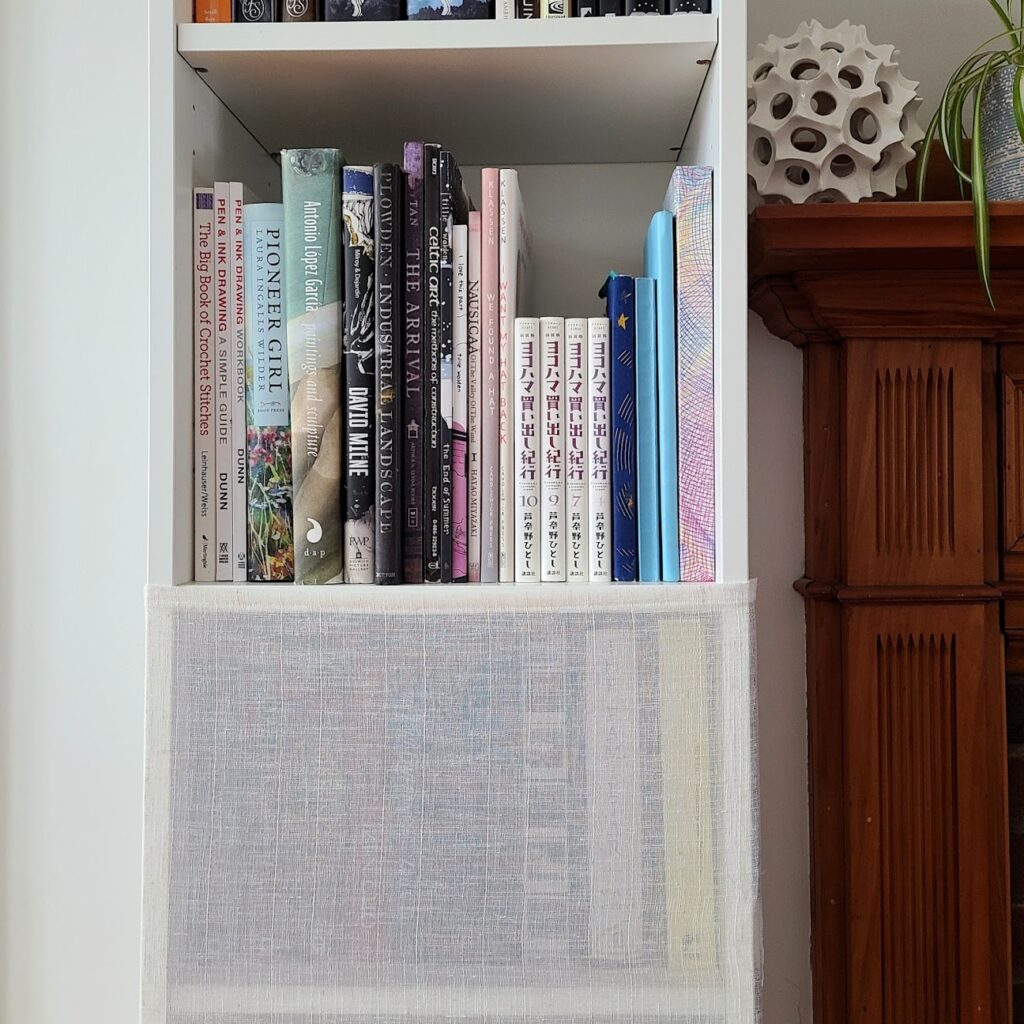
I often find myself in an art store holding a new tube of paint, trying to decide if I really need it or if I should just get by with the ones I already own. One of the things I like about Gamblin paints is that their website provides all the information you need to answer that question: there’s the “Color Temperature and Value List“, which is a very helpful table listing the Munsell color values for all their paints; and the Gamblin Artist’s Oil Colors page has really good photos of color swatches, little blurbs about what is special or useful about each paint, and information on pigment, vehicle, and lightfastness.
However, despite having all the information I want, the swatch page isn’t organized the way I’d like it to be. The information is all in little pop-ups when you click on the swatches, instead of in a table, so you can’t ctrl+F to look for something. I keep finding myself scrolling around, opening and closing pop-ups, whispering to myself, “Ok, so Olive Green is a mix of PBr 7, PY 75, PB 29… PBr is Burnt Umber, maybe? But which yellow and blue are those…?”
So, I decided to make my own table and put it online. All the information below is from the Gamblin website, either the Gamblin Artist’s Oil Colors page or the New Colors 2026 page. I’ve broken it into two tables: one for single pigment paints, and a second for multi-pigment paints. I used the Excel export as web page function to make these tables, so they’re not the most beautiful/responsive html ever, but you should be able to ctrl+F to search for a pigment code.
This table lists the Gamblin single pigment Artist’s Oil Colors, as of February 2026. They’re in the same order as on the Gamblin website, with the exception of Cobalt Turquoise, a new color that isn’t on the Gamblin Artist’s Oil Colors page yet (so I guessed where it would fit in). For each paint, I’ve given a color swatch (I used a color picker on the real swatches to get something fairly representative), the name of the paint, the pigment code, the chemical name of the pigment (where provided), a brief description of the color, whether it’s opaque (O), transparent (T), or semi-transparent (S-T), and its series (higher series numbers are more expensive).
All of these paints are made with a single pigment, so in some sense they’re each unique, but some can be pretty well approximated by mixing others. For example, it’s possible to mix a color that is identical (to my eyes) to Yellow Ochre from Burnt Umber and Hansa Yellow Medium. Gamblin mentions a couple colors as being particularly difficult to approximate from other colors: Permanent Orange, Cobalt Violet, Cobalt Blue, and Cobalt Green.
Not included in this table are the Reclaimed Earth Colors, as they are limited edition, but I believe those are all iron oxide.
Swatch
Paint name
Pigment code
Pigment name
Color description
Transparency
Series
#FADC47
Cadmium Lemon
PY 35
CP cadmium zinc
sulfide
Coolest cadmium yellow
O
4
#EBD132
Cadmium Yellow Light
PY 35
Concentrated cadmium
zinc sulfide
Cool yellow
O
4
#DFC103
Cadmium Yellow Medium
PY 37
Concentrated cadmium
sulfide
Warm yellow
O
4
#EE9F00
Cadmium Yellow Deep
PY 37
Concetrated cadmium
sulfide
Warm yellow
O
4
#DDC751
Nickel Titanate Yellow
PY 53
Nickel antimony
titanium yellow
Cool muted yellow
O
3
#FDDD00
Hansa Yellow Light
PY 3
Arylide yellow
Coolest yellow
S-T
3
#DCB100
Hansa Yellow Medium
PY 74
Arylide yellow
Warm yellow
S-T
3
#FBA800
Hansa Yellow Deep
PY 75
Arylide yellow
Warmest hansa yellow
S-T
3
#E86700
India Yellow
PY 83
Diarylide yellow
Warmyellow, bright glaze
T
3
#E87902
Cadmium Orange
PO 20
Concentrated cadmium
sulfo-selenide
Warm medium orange
O
4
#E45601
Cadmium Orange Deep
PO 20
Concentrated cadmium
sulfo-selenide
Warm deep orange
O
4
#E66700
Permanent Orange
PO 62
Monoacetolone
Warm bright orange,
can’t mix
S-T
3
#650003
Alizarin Crimson
PR 83
Synthetic 1:2
dihydroxyanthraquinone on alumina
Cool red, poor
lightfastness
T
3
#691115
Alizarin Crimson
Permanent
PR 177
Anthraquinone red
Cool red
T
3
#E52B02
Cadmium Red Light
PR 108
Concentrated cadmium
sulfo-selenide
Warm red
O
5
#D80001
Cadmium Red Medium
PR 108
Concentrated cadmium
sulfo-selenide
Warm red
O
5
#AC0001
Cadmium Red Deep
PR 108
Concentrated cadmium
sulfo-selenide
Warm red
O
5
#C00000
Napthol Red
PR 112
Napthol AS-D
Warm red
S-T
2
#D70101
Napthol Scarlet
PR 188
Napthol AS-OL
Warm red
S-T
2
#A70000
Perylene Red
PR 149
Perylene
Warm red, brght glaze
T
2
#84002B
Quinacridone Magenta
PR 122
Quinacridone Y
Coolest red
T
3
#84001F
Quinacridone Red
PV 19*
Quinacridone red b
Cool red
T
3
#4E091E
Quinacridone Violet
PV 19*
Quinacridone Violet
Cool red / warmest
violet
T
3
#4F006D
Cobalt Violet
PV 14
Cobalt phosphate
Warm violet, can’t mix
T
6
#3E255A
Ultramarine Violet
PV 15
Complex silicate of
sodium & aluminum with sulfur
Warmer than Co Violet,
cooler than Mn Violet
T
2
#431176
Dioxazine Purple
PV 23
Carbazol dioxazine
Coolest violet,
intense glaze
T
2
#4A093E
Manganese Violet
PV 16
Manganese ammonium
phosphate
Warm violet
S-T
3
#0F6BAA
Cerulean Blue
PB 36
Oxides of cobalt &
tin
Cool blue, muted tints
O
6
#002786
Cobalt Blue
PB 28
Oxides of cobalt &
aluminum
Warm blue, can’t mix
S-T
5
#42A59D
Cobalt Teal
PB 28
Oxides of cobalt &
aluminum
Cool green-blue
O
4
#00706A
Cobalt Turquoise
PB 36
Cool green-blue
O
4
#088DBE
Manganese Blue Hue
PB 15:4
Copper phthalocyanine
Cool blue, bright
glaze
T
2
#002358
Phthalo Blue
PB 15:2
Copper phthalocyanine
Warm blue, intense
tints
T
2
#1D2B4B
Prussian Blue
PB 27:1
Ferri-ammonium
ferrocyanide
Cool blue, muted tints
S-T
2
#062254
Indanthrone Blue
PB 60
Indanthrone
Warm blue
S-T
3
#041A5D
Ultramarine Blue
PB 29
Complex silicate of
sodium & aluminum with sulfur
Warm blue, bright
glaze
T
2
#214A31
Cobalt Green
PG 19
Oxides of cobalt and
zinc
Cool green, muted
tints, can’t mix
S-T
4
#054735
Phthalo Green
PG 7
Chlorinated copper
phthalocyanine
Cool green, intense
tints
T
2
#064C26
Phthalo Emerald
PG 36
Chlorinated and
bromated copper phthalocyanine
Warm green, intense
tints
T
2
#1C382E
Viridian
PG 18
Hydrated chromium
oxide
Cool green, muted
tints
T
4
#4B5F2C
Chromium Oxide Green
PG 17
Anhydrous chromium
sesquioxide
Warm green, muted
tints
O
3
#56560F
Green Gold
PY 129
Azomethine Yellow 56
Warm green, cool
yellow as glaze/tint
S-T
4
#662C20
Burnt Sienna
PBr 7
Calcined natural iron
oxide
Warm brown
S-T
1
#3C2118
Burnt Umber
PBr 7
Calcined natural iron
oxide, containing manganese
Warm brown
S-T
1
#902714
India Red
PR 101
Synthetic red iron
oxide (bluish shade)
Warm brown
O
1
#872A00
Venetian Red
PR 101
Synthetic red iron
oxide (yellowish shade)
Warm brown
O
1
#AF682A
Raw Sienna
PBr 7
Natural iron oxide
Warm brown
S-T
1
#3A2E21
Raw Umber
PBr 7
Natural iron oxide
containing manganese
Cool brown
S-T
1
#956100
Yellow Ochre
PY 43
Natural hydrated iron
oxide
Warm brown
S-T
1
#5D3400
Transparent Earth
Yellow
PY 42
Transparent Mars
Yellow
Cool brown
T
3
#390D0C
Transparent Earth Red
PR 101
Transparent Mars Red
Warm brown
T
3
#0C0A0B
Ivory Black
PBk 9
Bone black
Neutral black,
slightly warm as glaze
S-T
1
#100A0A
Mars Black
PBk 11
Synthetic black iron
oxide
Cool masstone, but
slightly warm tint
O
1
#0C0707
Black Spinel
PBk 29
Copper chromite black
spinel
Matte finish black
O
4
#BEB58E
Titanium Buff
PW 6
Titanium dioxide
Warm yellow-grey
O
1
#E9E9E9
Titanium White
PW 6
Titanium dioxide
Most opaque white
O
1
#F0F0F0
Radiant White
PW 6
Titanium dioxide
Brightest white
(safflower instead of linseed oil)
O
2
#E4E4E4
Flake White
Replacement
PW 6
Titanium dioxide
Replacement for lead
white, unique texture
O
1
#E6E6E6
Zinc White
PW 4
Zinc oxide
Most transparent white
S-T
1
#EDEDED
Fast Dry Titanium
White
PW 6
Titanium dioxide
Faster drying titanium
white
O
1
#C28153
Copper
PM 2**
Copper powder
Metallic copper
O
4
#948055
Pale Gold
PM 2
Bronze powder
Metallic green-gold
O
4
#C2935C
Rich Gold
PM 2
Bronze powder
Metallic rose gold
O
4
#BBBAB5
Silver
PM 1
Aluminum
powder
Metallic
silver
O
4
* Both Quinacridone Red and Quiacridone Violet have their pigment listed as PV 19, although the chemical names given are different. I don’t know why this is.
** Copper, Pale Gold, and Rich Gold all have pigment listed as PM 2, although Copper is described as “copper powder” while the others are described as “bronze powder” — possibly because bronze is mostly copper?
Gamblin multi-pigment paints
This table lists the Gamblin multi-pigment paints, as of February 2026. As with the single pigment paints, I used the ordering from the Gamblin website, except for the new 2026 colors, which I worked in wherever made the most sense. For each paint, I’ve given a color swatch, the name of the paint, the pigment codes, what I’m calling the “parent” paints (i.e. the single pigment paints for each of the pigments in the mix), a brief description of the color, whether it’s opaque (O), transparent (T), or semi-transparent (S-T), and its series (higher series numbers are more expensive).
In principle, you could mix each of the paints in the multi-pigment table yourself from the parent paints listed. Some artists see multi-pigment paints as wasted space in your paint box / on your palette, but depending on how you work, the consistent mix and saved time might be worth it. For most of these colors, the swatches on the Gamblin website have little blurbs to explain why the mix might be useful.
Not included in this table is Torrit Grey, which is a reclaimed paint that includes every pigment. The exact color of Torrit Grey varies; Gamblin says it often leans green, but my particular tube is a warm gray.
Swatch
Paint name
Pigment codes
Parent paints
Color description
Transparency
Series
#D3C502
Cadmium Chartreuse
PY 35, PG 36
Cadmium Lemon, Phthalo
Emerald
Cool green-yellow
O
4
#E04004
Transparent Orange
PY 83, PR 149
India Yellow, Perylene
Red
Warm orange, bright
glaze
T
3
#E84132
Coral
PO 62, PR 188, PW 6
Permanent Orange,
Napthol Scarlet, Titanium White
Warm orange-red
O
2
#50000B
Brown Pink
PR 101, PR 149
Transparent Earth Red,
Perylene Red
Warm red, bright tints
T
2
#005FA5
Cerulean Blue Hue
PW 6, PB 15:4
Titanium White,
Manganese Blue Hue
Cool blue
O
2
#1387CF
Sevres Blue
PB 15:4, PB 15:2
Manganese Blue Hue,
Phthalo Blue
Cool blue
O
2
#1D2025
Indigo
PB 15:2, PV 15, PBr 7
Phthalo Blue,
Ultramarine Violet, Burnt Umber
Cool blue-black
S-T
3
#0F282E
Phthalo Turquoise
PB 15:2, PG 7
Phthalo Blue, Phthalo
Green
Cool turquoise, strong
tints
T
2
#374F51
Alpine Blue-Green
PB 28, PBr 7, PW 6
Cobalt Blue, Burnt
Umber, Titanium White
Cool green
S-T
2
#AEB301
Cadmium Green
PY 35, PG 18
Cadmium Yellow Light,
Viridian
Warm yellow-green
O
4
#299102
Permanent Green Light
PY 74, PG 7
Hansa Yellow Medium,
Phthalo Green
Warm green
S-T
2
#0D8042
Emerald Green
PG 36, PW 6, PY 74
Phthalo Emerald,
Titanium White, Hansa Yellow Medium
Warm green
S-T
2
#1D2C05
Sap Green
PY 83, PB 15:2
India Yellow, Phthalo
Blue
Warm green
T
2
#465830
Forest Floor Green
PY 37, PB 29
Cadmium Yellow Medium,
Ultramarine Blue
Warm green
S-T
2
#52622D
Bush Green
PY 35, PY 43, PB 29
Cadmium Yellow Light,
Yellow Ochre, Ultramarine Blue
Warm green
S-T
2
#978C10
Canopy Green
PY 35, PY 83, PB 29
Cadmium Yellow Light,
India Yellow, Ultramarine Blue
Warm yellow-green
S-T
2
#4E472A
Terre Verte
PBr 7, PG 18
Burnt Umber, Viridian
Warm brown-green,
muted tints
T
2
#3A3712
Olive Green
PBr 7, PY 75, PB 29
Burnt Umber, Hansa
Yellow Deep, Ultramarine Blue
Warm brown-green
S-T
2
#E6C06C
Naples Yellow
PW 6, PY 75, PY 43
Titanium White, Hansa
Yellow Deep, Yellow Ochre
Warm pale brown/earthy
yellow
O
2
#E0B188
Naples Orange
PW 6, PY 43, PR 188
Titanium White, Yellow
Ochre, Napthol Scarlet
Warm pale brown/earthy
orange
O
2
#B67926
GoldOchre
PY 43, PY 83
Yellow Ochre, India
Yellow
Warm light
brown/earthy yellow
T
2
#440502
Transparent Earth
Orange
PY 42, PR 101
Transparent Earth
Yellow, Transparent Earth Red
Warm brown/earthy
orange
T
3
#3C2C24
Asphaltum
PR 101, PB 29
Transparent Earth Red,
Ultramarine Blue
Warm brown
T
3
#161010
Van Dyke Brown
PBr 7, PB 29
Burnt Umber,
Ultramarine Blue
Warmest black
S-T
1
#000000
Chromatic Black
PG 36, PV 19
Phthalo Emerald,
Quinacridone Red
Neutral black
T
2
#0E0C11
Payne’s Grey
PBr 7, PB 29
Burnt Umber,
Ultramarine Blue
Coolest black
T
2
#C7C7C7
Portland Grey Light
PW 6, PW 4, PBr 7, PBk
11
Titanium White, Zinc
White, Burnt Umber, Mars Black
Neutral grey, Munsell
Value 8
O
2
#919191
Portland Grey Medium
PW 6, PW 4, PBr 7, PBk
11
Titanium White, Zinc
White, Burnt Umber, Mars Black
Neutral grey, Munsell
Value 6
O
2
#5E5E5E
Portland Grey Deep
PW 6, PW 4, PBr 7, PBk
11
Titanium White, Zinc
White, Burnt Umber, Mars Black
Neutral grey, Munsell
Value 4
O
2
#C8B4AD
Portland Warm Grey
PW 6, PR 101, PBk 11
Titanium White,
Transparent Earth Red, Mars Black
Warm red-gray
O
2
#BAC0C6
Portland Cool Grey
PW 6, PB 29, PBk 11
Titanium White,
Ultramarine Blue, Mars Black
Cool blue-gray
O
2
#F2E2C1
Warm White
PW 6, PY 75, PO 62, PW
4
Titanium White, Hansa
Yellow Deep, Permanent Orange, Zinc White
Warmest white/cream
O
1
#E2E9F1
Cool White
PW 6, PB 15:2, PW 4
Titanium White,
Phthalo Blue, Zinc White
Coolest white
O
1
#E9E9E9
Titanium Zinc White
PW 6, PW 4
Titanium White, Zinc
White
White
O
1
#EEDE86
Radiant Lemon
PY 3, PW 6
Hansa Yellow Light,
Titanium White
Cool pale yellow
O
2
#FCD669
Radiant Yellow
PY 83, PW 6
India Yellow, Titanium
White
Warm pale yellow
O
2
#ED9A51
Radiant Orange
PO 62, PY 75, PW 6
Permanent Orange,
Hansa Yellow Deep, Titanium White
Warm pale orange
O
2
#EA9C92
Radiant Red
PR 149, PW 6
Perylene Red, Titanium
White
Warm pale red
O
2
#DC94AA
Radiant Magenta
PV 19, PW 6
Quinacridone Red,
Titanium White
Cool pale red
O
2
#C4ADC7
Radiant Violet
PV 23, PW 6
Dioxazine Purple,
Titanium White
Cool pale violet
O
2
#BECBDE
Radiant Blue
PB 29, PW 6
Ultramarine Blue,
Titanium White
Warm pale blue
O
2
#9AC5BE
Radiant Turquoise
PG 7, PB 15, PW 6
Phthalo Green, Phthalo
Blue, Titanium White
Cool pale blue
O
2
#A1CB8B
Radiant Green
PG 36, PY 3, PW 6
Phthalo Emerald, Hansa
Yellow Light, Titanium White
Cool pale green
O
2
#8AC747
Radiant Warm Green
PY 3, PG 36, PW 6
Hansa Yellow Light,
Phthalo Emerald, Titanium White
Warm pale green
O
2
#39A9E5
Azure
PB 15:2, PB 29, PW 6
Phthalo Blue,
Ultramarine Blue, Titanium White
Warm pale blue
O
2
#D4A4A2
Shell Pink
PR 188, PY 3, PW 6
Napthol Scarlet, Hansa
Yellow Light, Titanium White
Last year I started painting with oil paints again, after almost a decade of only using acrylic and gouache. I had gotten used to making solid, crisp blocks of color with gouache, and I found myself wondering how I could make a sharp edge with oil paint.
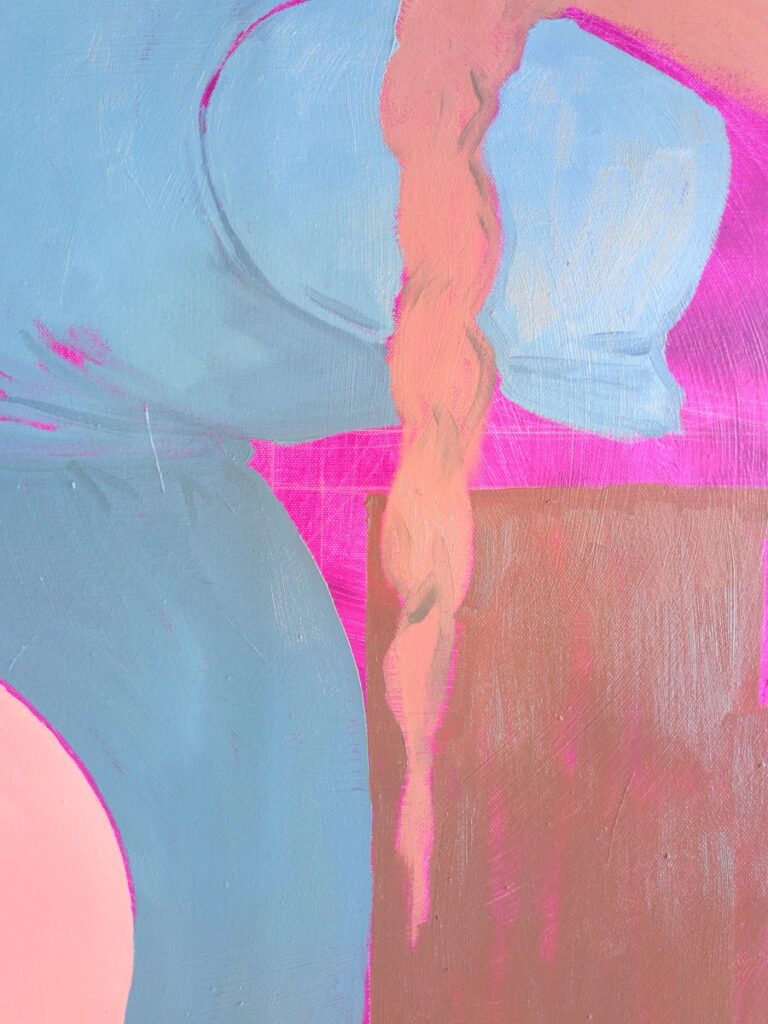
I feel a little silly making a blog post about this, because it’s something I still struggle with, but after a lot of web-searching, forum-reading, and experimentation, I’m getting much cleaner lines and edges than before – as evidenced by the progress photo below, where you can see that the blue shape of the dress is pretty crisp against the magenta underpainting. The curve of the belly especially is much sharper than anything I was getting a year ago! So, here’s a post summarizing what I’ve changed about my painting in my quest to get a crisp, sharp edge with oil paint.
1. Make sure previous layers are dry enough
This is the big one, and the one I didn’t see discussed when I was searching for answers – perhaps it’s obvious to most people! But after some experimenting, I realized that my main problem was that I just wasn’t letting the prior layers dry enough.
My previous experience with oil paint was when taking elective classes in college, and in that setting, we would usually have a week or two to finish an assignment, which meant they could only dry for a couple days in between painting sessions. When I started using oil paint again, it took me a while to realize that I could let paintings sit for much longer, and that in fact, I needed to let them dry for longer if I wanted to get a really sharp edge with the next layer.
Obviously the specific amount of time you have to wait is going to depend on which medium or solvent you use, how much of it you use, how thick your paint is, and even what the temperature/humidity/air circulation is like where you’re storing your paintings, but to get a crisp edge, you want any previous layers of paint to be really dry. Not “well, I guess I can probably paint over this,” not just barely dry to the touch – it needs to be dry enough that the older paint is not going to blend with the new paint (unless you drown it in solvent, which you’re not going to do). I’m now often letting paintings wait for 2 weeks (or even a month) if I want to get a really sharp edge.
3. Rest your hand on your canvas
Since your previous layers are really dry (see tip #1 above), you can rest your hand right on your canvas as you work! This will give you more stability and control. If you plan carefully, working from the center out and rotating, raising, or lowering your canvas as needed, you can probably find a safe place to rest your hand for almost any spot you want to paint. If you’ve got a situation where you really can’t find somewhere to rest your hand, there’s also a tool called a mahlstick that can help (and it’s easy to DIY, I have just used a yardstick and paper towel before).
3. Hold your brush at the correct angle
This is another one that might be obvious to everyone but me, but I’m going to spell it out for anyone else whose intuition is leading them astray!
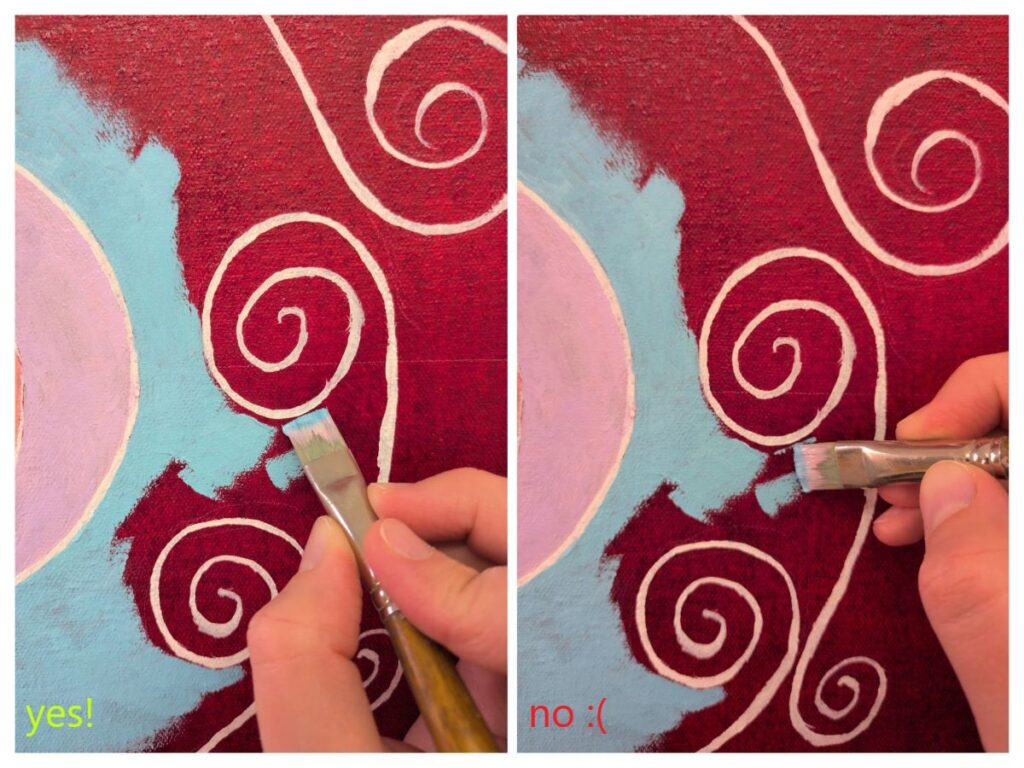
A paintbrush is not a pencil. When using a flat or bright brush shape, you should not be holding the brush with the line of the tip perpendicular to the edge you want to make and drawing along it with the outer edge of the brush. Although this movement might feel intuitive, it’s not going to make a clean edge because any variation in the pressure of the brush against the canvas is going to spread the bristles out and make your edge wobbly! Instead, you should should be lining up the tip of the brush parallel to the line you want to paint, and then making short strokes away from the edge.
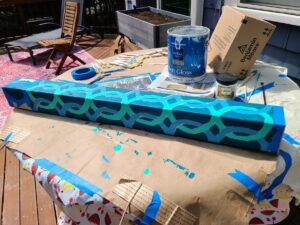
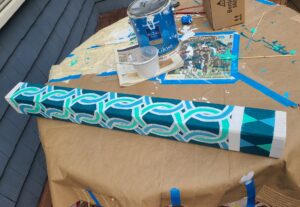
The photos below show an example where I’m filling in a big block of light blue, following the curve of a white line I had previously sketched in. On the left, I’m holding the brush correctly: the end of the brush is tangent to the white line I’m following, and my hand is positioned to make a clean stroke away from the edge I’m creating (although if I wasn’t trying to take a photograph with my other hand, I would probably start even closer to the white line, or even a little on top of it). Lots of little strokes like this will allow me to fill in the shape right up to the line, and leave a very sharp edge. On the right, I am holding my brush incorrectly: if I push down to make a mark, the bristles will spread, and it will be difficult to have enough control to keep them off the white line.
4. Use a round brush for thin, crisp lines
A flat or bright brush works well for making a straight edge or filling in the outside of a curve (as in the example above), but what if you want fill in the inside of a curve? In this situation, if you line up the end of your brush tangent to the edge you want to make, the outside edges of your brush might cross the line you’re trying to follow.
If the curvature isn’t too great, a smaller flat brush might do okay, but if it’s a very small area or a tight curve, you’re going to want to switch to a round brush. With a round brush, you want to use just the tip, and you can go along the edge (like using a pencil).
If you want to make a particularly thin line, having a round brush with especially long hairs helps. I have seen people recommend “rigger” brushes (as far as I know that’s just a long round brush), but I ended up buying a pinstriping brush and a longliner brush by Kafka Design (link to Blick, but I’m sure they’re sold elsewhere too). What I like about these is that they’re designed with short handles, so you can use them with the end of the handle resting on your hand between your thumb and index finger. My hand is not as steady as I wish it was, and I find that holding the brush that way helps.
If you look near the middle of the photo below (or a little bit up from the middle), you can find a very, very thin pink line that I painted with my Kafka Design longliner brush. This is a closeup photo of an 8 inch by 10 inch panel (the sketched in lines were made by recently sharpened colored pencil), so that pink line is incredibly thin. I’m still working on getting the consistent pressure needed to make a constantt line width, but I do think these long hair / short handle brushes were a big upgrade.
5. Use tape
It’s pretty common to see acrylic painters use masking tape to get extra crisp, straight lines – turns out, you can actually do that with oil paint too! I haven’t tried putting tape straight on a prepared canvas or panel, and I suspect it wouldn’t work well on top of thick textured paint, but masking tape on top of a thin, dry layer of oil paint has worked fine for me. Just make sure your previous layers are extremely dry before putting it on (funny how this whole blog post comes back to that one tip…), and take it off as soon as you can.
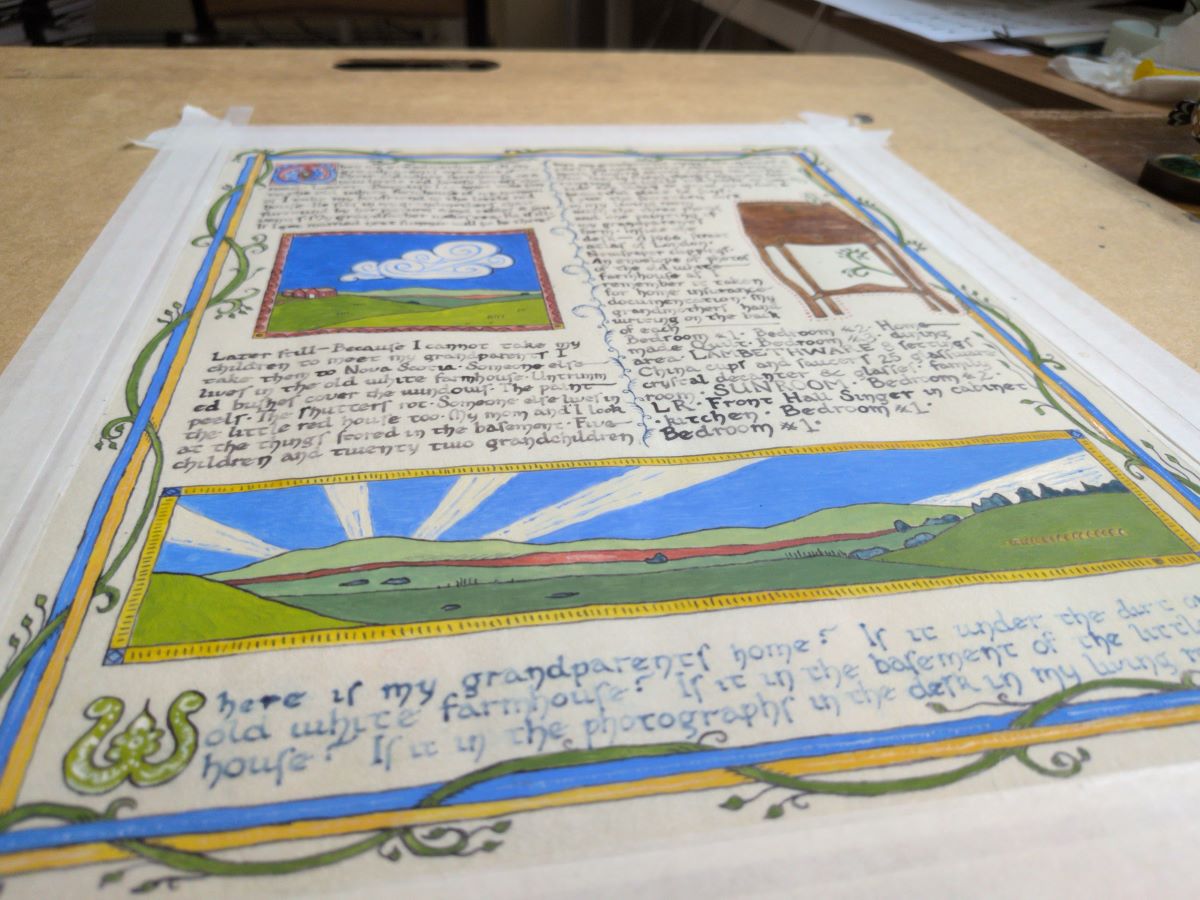
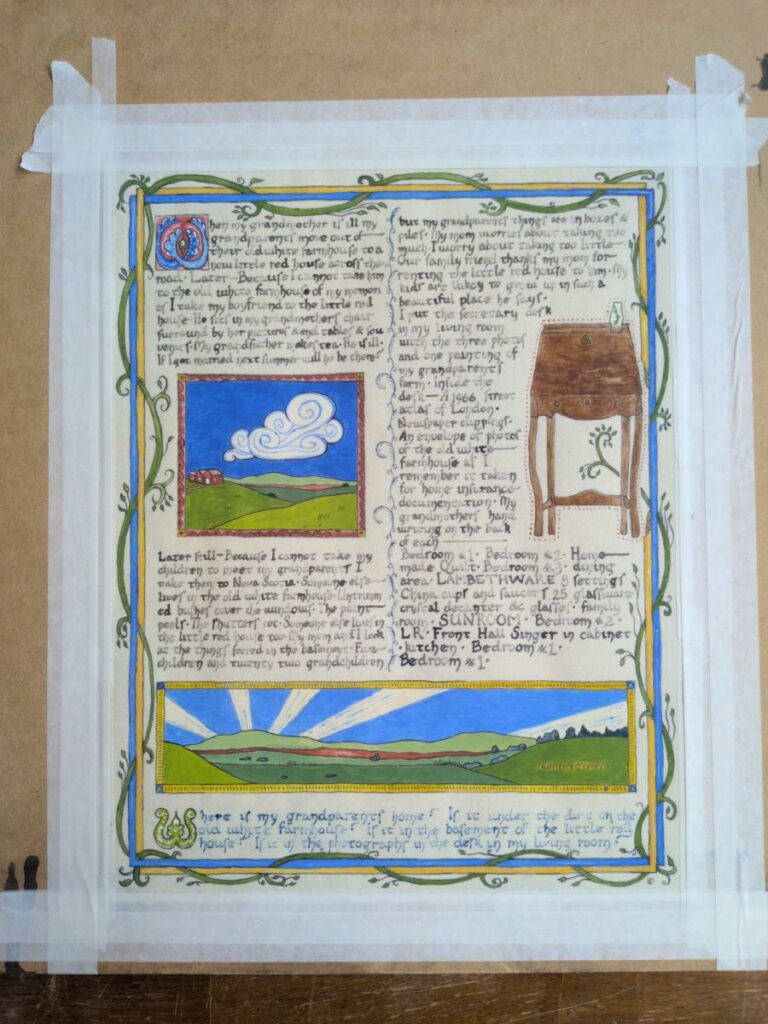
Over the past couple months, I’ve been teaching myself how to do art in the style of illuminated manuscripts from medieval Europe. (That’s actually a huge category, which covers hundreds of years and many cultures and therefore many many different styles, but you know what I mean…)
I started by copying pages out of random books – anything I could find a good reproduction of – but I’d been wanting to do something fully original, and when I read the call for art for HOME, the collaborative show between LexArt and LexHab, some things I’d been thinking about came together into the idea to do a piece about missing places that no longer exist in the way you remember them (specifically, my grandparents’ home).
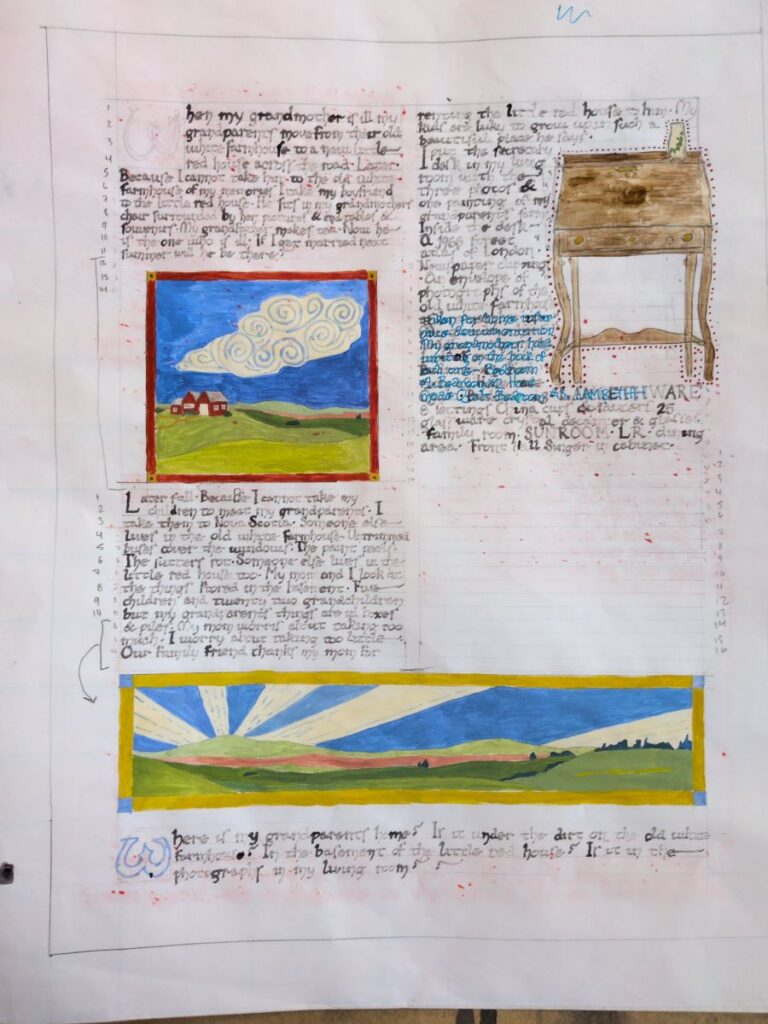
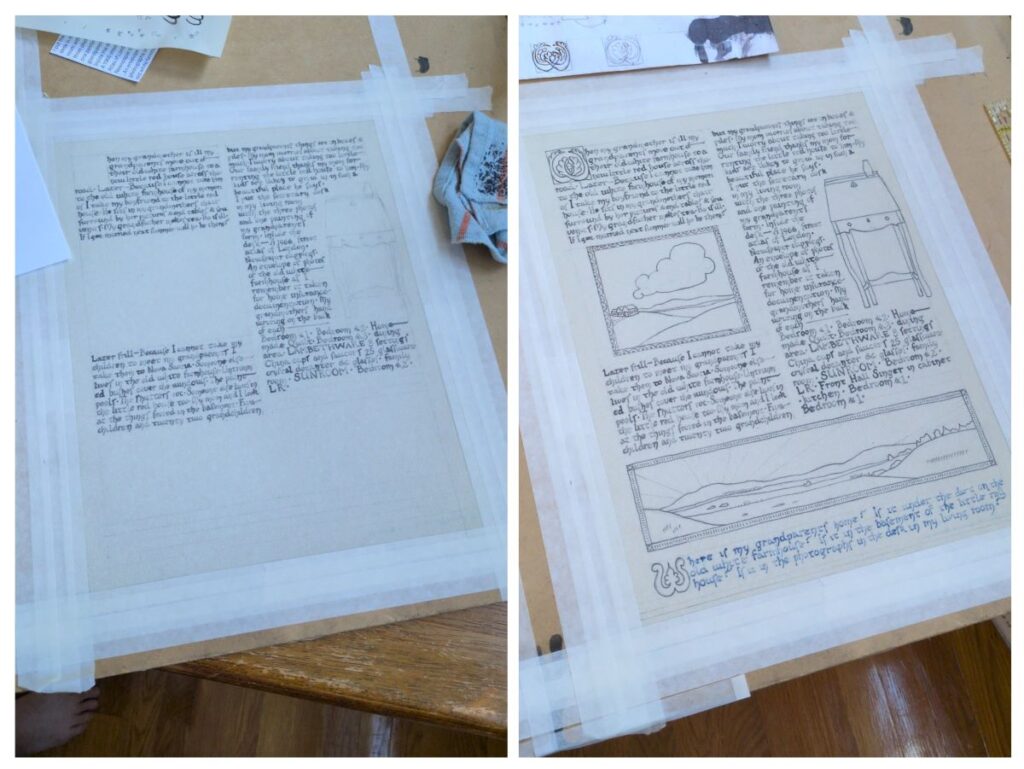
I started by writing a sort of journal entry, or maybe a sort of poetic personal essay? I don’t want to say I fictionalized anything, but I did maybe magnify a couple things for effect. The hardest part was editing it down so that I could fit it on a single page (thank you to my friend Nerissa who helped me with the initial round of cuts and edits!). I knew more or less what I wanted to do with the illustrations, and roughly where in the text I wanted them to fall, but it took a lot of work to figure out how to make the text fit properly. I wrote it all out four times on regular paper to work out the line spacing, quill size, and things like when to say “can’t” vs. “cannot”. On one version, I also did a draft of the illustrations, which you can see below:
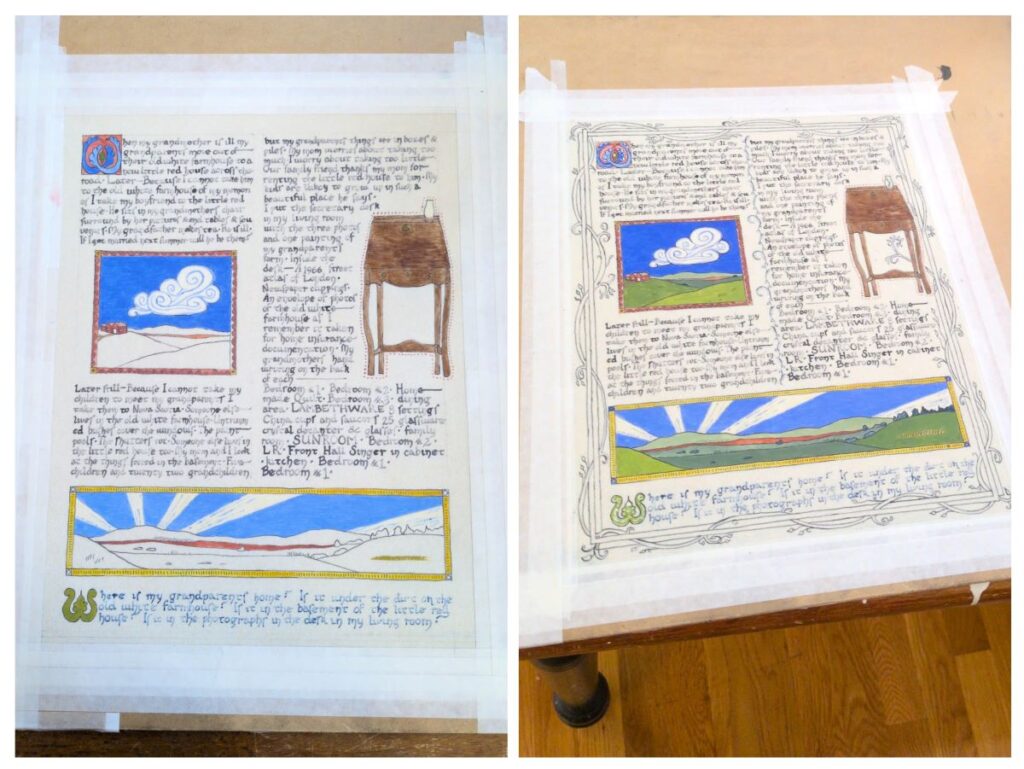
The real version was pretty straightforward by the time I got around to it, although it was a little stressful to worry about not smudging my work. I wrote the text, let it dry, and then inked the illustrations. Perhaps this is a good time to mention that the script is mostly based on Caroline minuscule, although I did make it my own a little.
After the ink dried, I very carefully erased my pencil marks, and then started painting. I still find it quite challenging to get an even texture with the egg tempera paint – I feel like there must be some kind of trick to it that I haven’t figured out yet. I made the brown extra eggy because it made it streaky and shiny in a way that does look quite a lot like wood stain.
After the paint is on, I went back in with the ink to go over any lines that got a bit covered or didn’t look dark enough, and used white ink to add some highlights. I found this piece very challenging to photograph – the angled shot is more accurate in terms of color and paint texture.
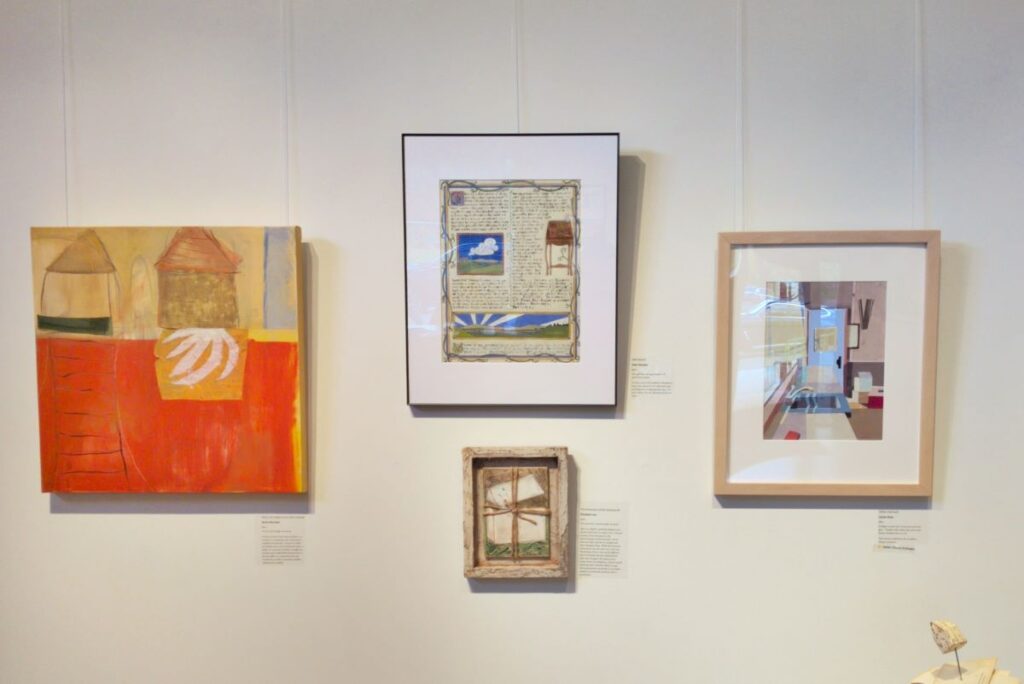
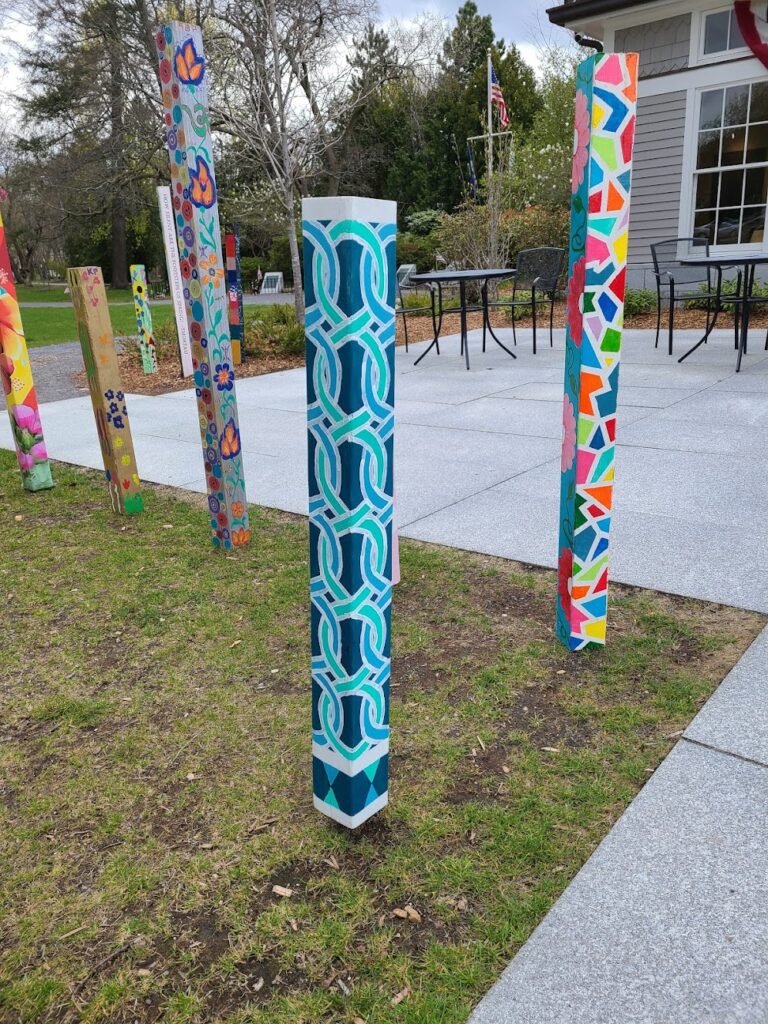
I was pretty pleased with how this piece came out. You can see a high resolution scan of the final version here, and here it is on the wall in the gallery with its friends at the HOME show:
Details:
“Attachment”, 2025, 11 inches by 14 inches
Materials & tools:
Pergamenata parchment paper
McCaffery’s Penman’s Ink in black (an iron gall ink), white, and indigo blue
Quill pens for the lettering (I bought these precut ones and modified the nibs)
G-nib dip pen for the lines in the illustrations
Sennelier egg tempera paint in carmine, red brown, cadmium yellow light genuine, cobalt blue genuine, ultramarine blue, burnt umber, Van Dyck brown, and zinc white
Paintbrushes (Princeton Neptune 2 round, Da Vinci Cosmotop Spin 4 round, Da Vinci Cosmotop Spin 3/0 round)
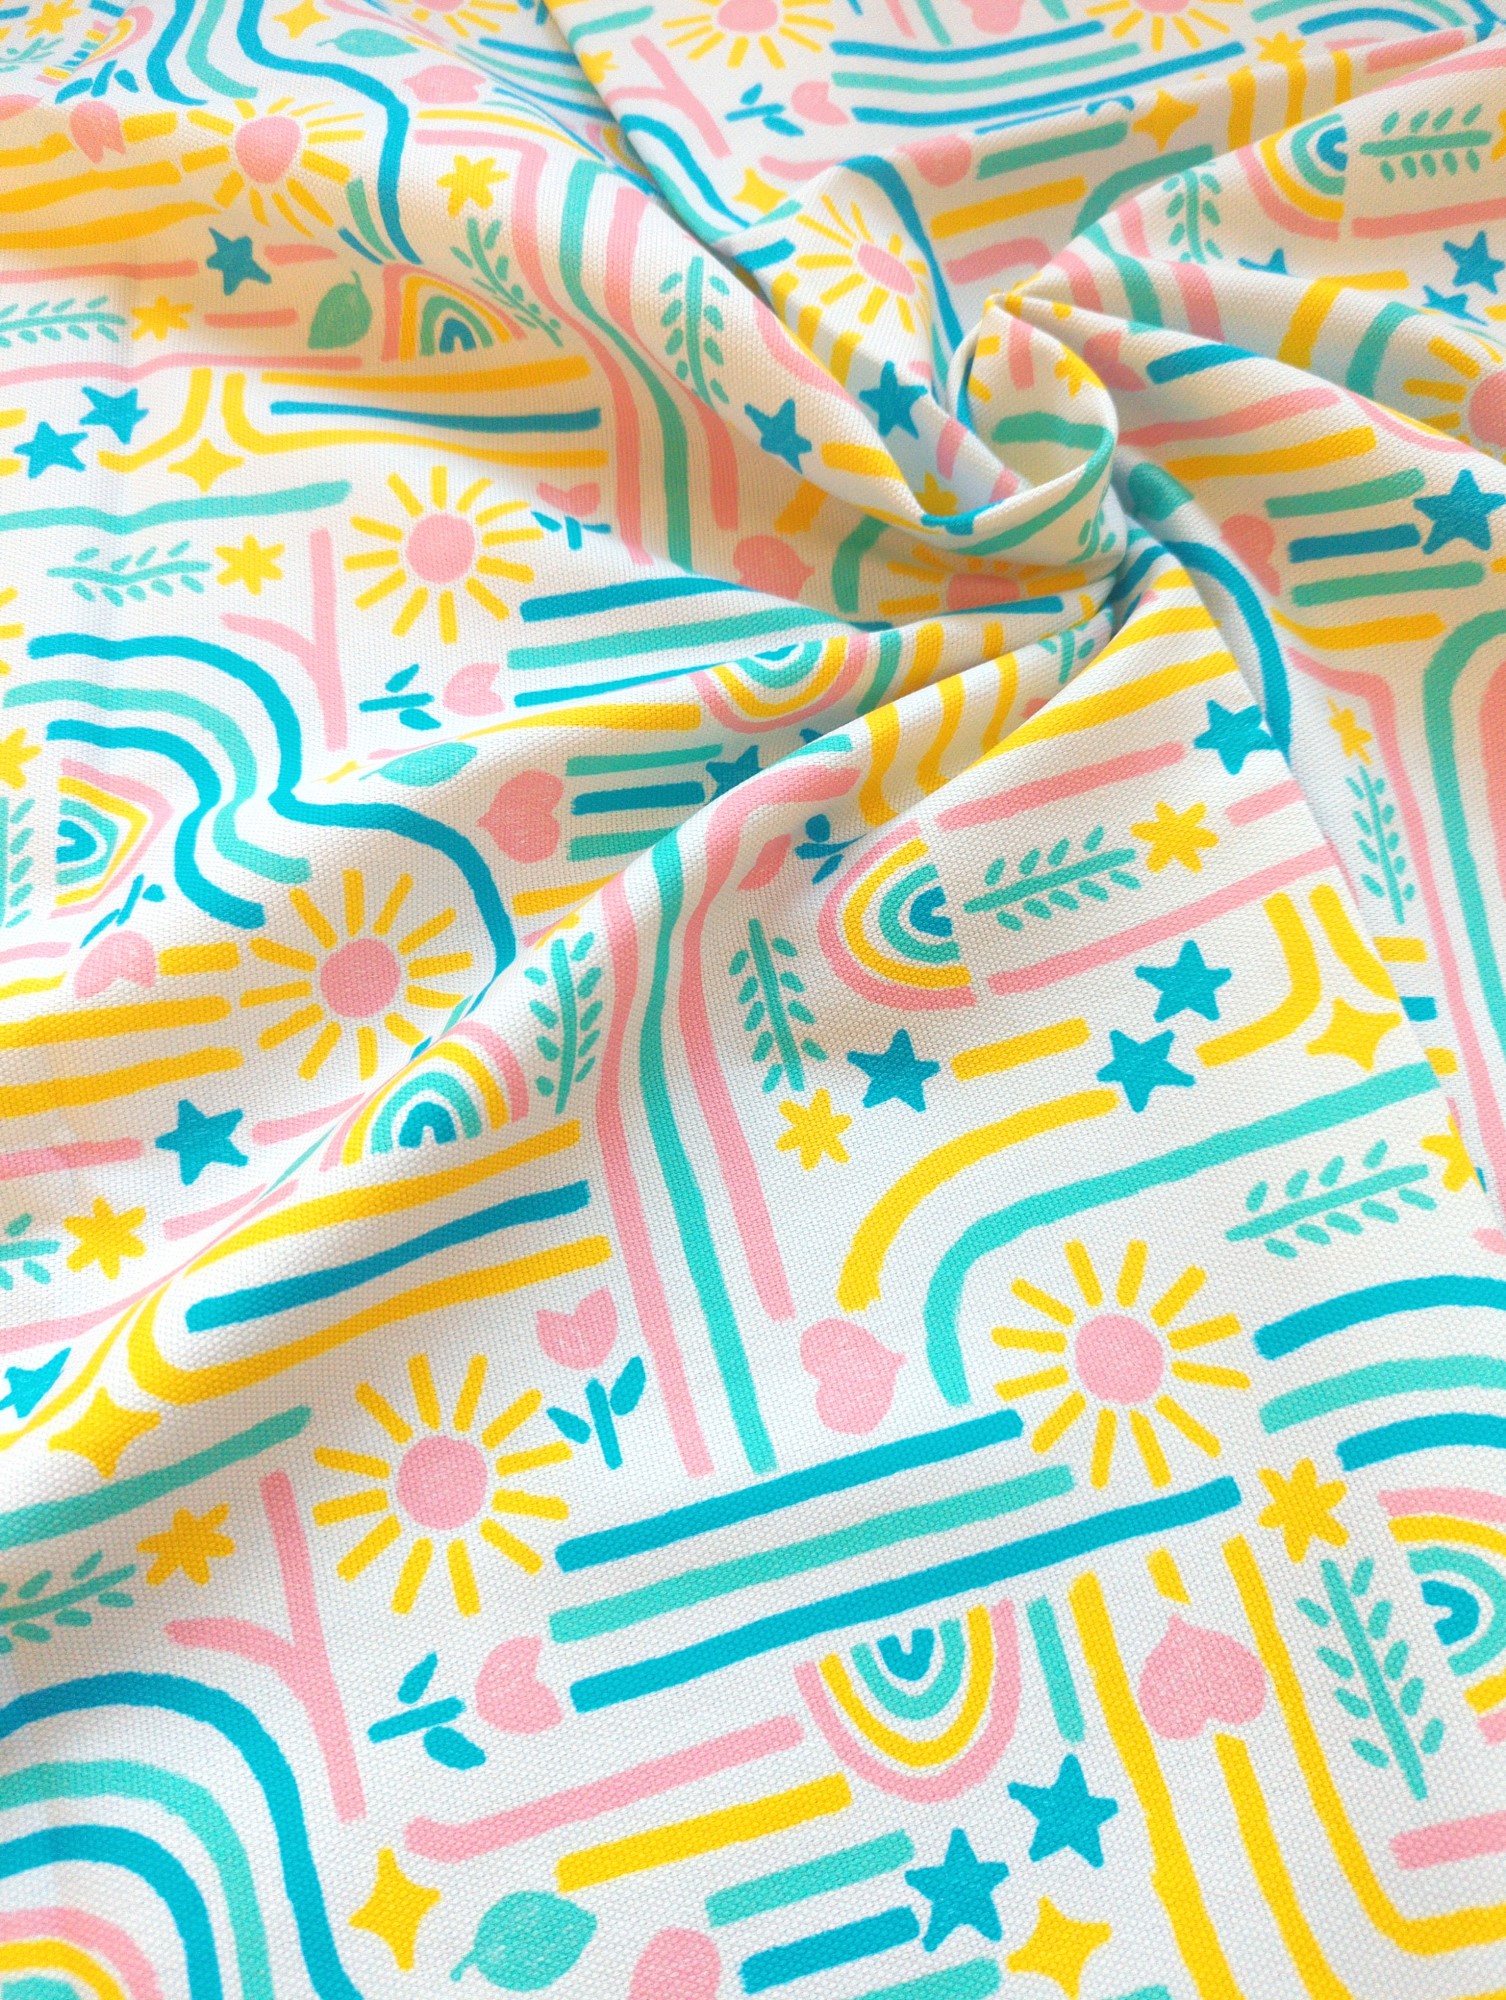
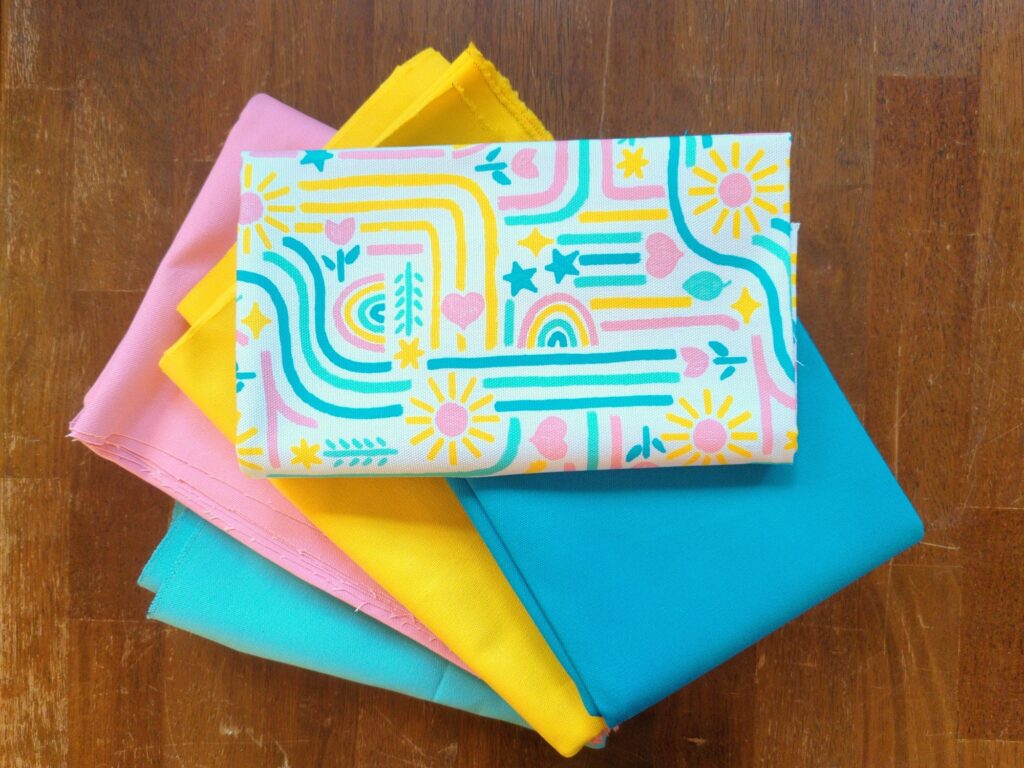
Look! Look look look! I designed a fabric and got it printed for a project, and if you like it YOU can order it too!
This design is called “Chalk Doodles” because it’s supposed to look like (a professional rendition of) children’s chalk drawings.
I’m planning to make some toddler backpacks to sell, and I thought having my own lining fabric would make them extra special. I got some help with color matching via instagram polls, and then did my best to make something happy and fun, that would make you smile every time you opened the backpack.
This is my first official foray into surface design, although I’ve been filling up papers with doodles and patterns for most of my life. I’m really happy with how it turned out, I think it’s just as cheerful and energetic as I wanted it to be.
I got my fabric printed at RealFabric.com, on their cotton canvas. I’m really happy with the quality of both the print and the fabric. The colors are bright, the lines are crisp, and I think this canvas is going to be just right as the lining for the backpacks I want to make – it’s lighter than the canvas I got for the exterior, but still nice and sturdy.
ALSO, the most exciting part for me is that RealFabric approved the design for their marketplace, which means that you can order Chalk Doodles on any of their fabrics!
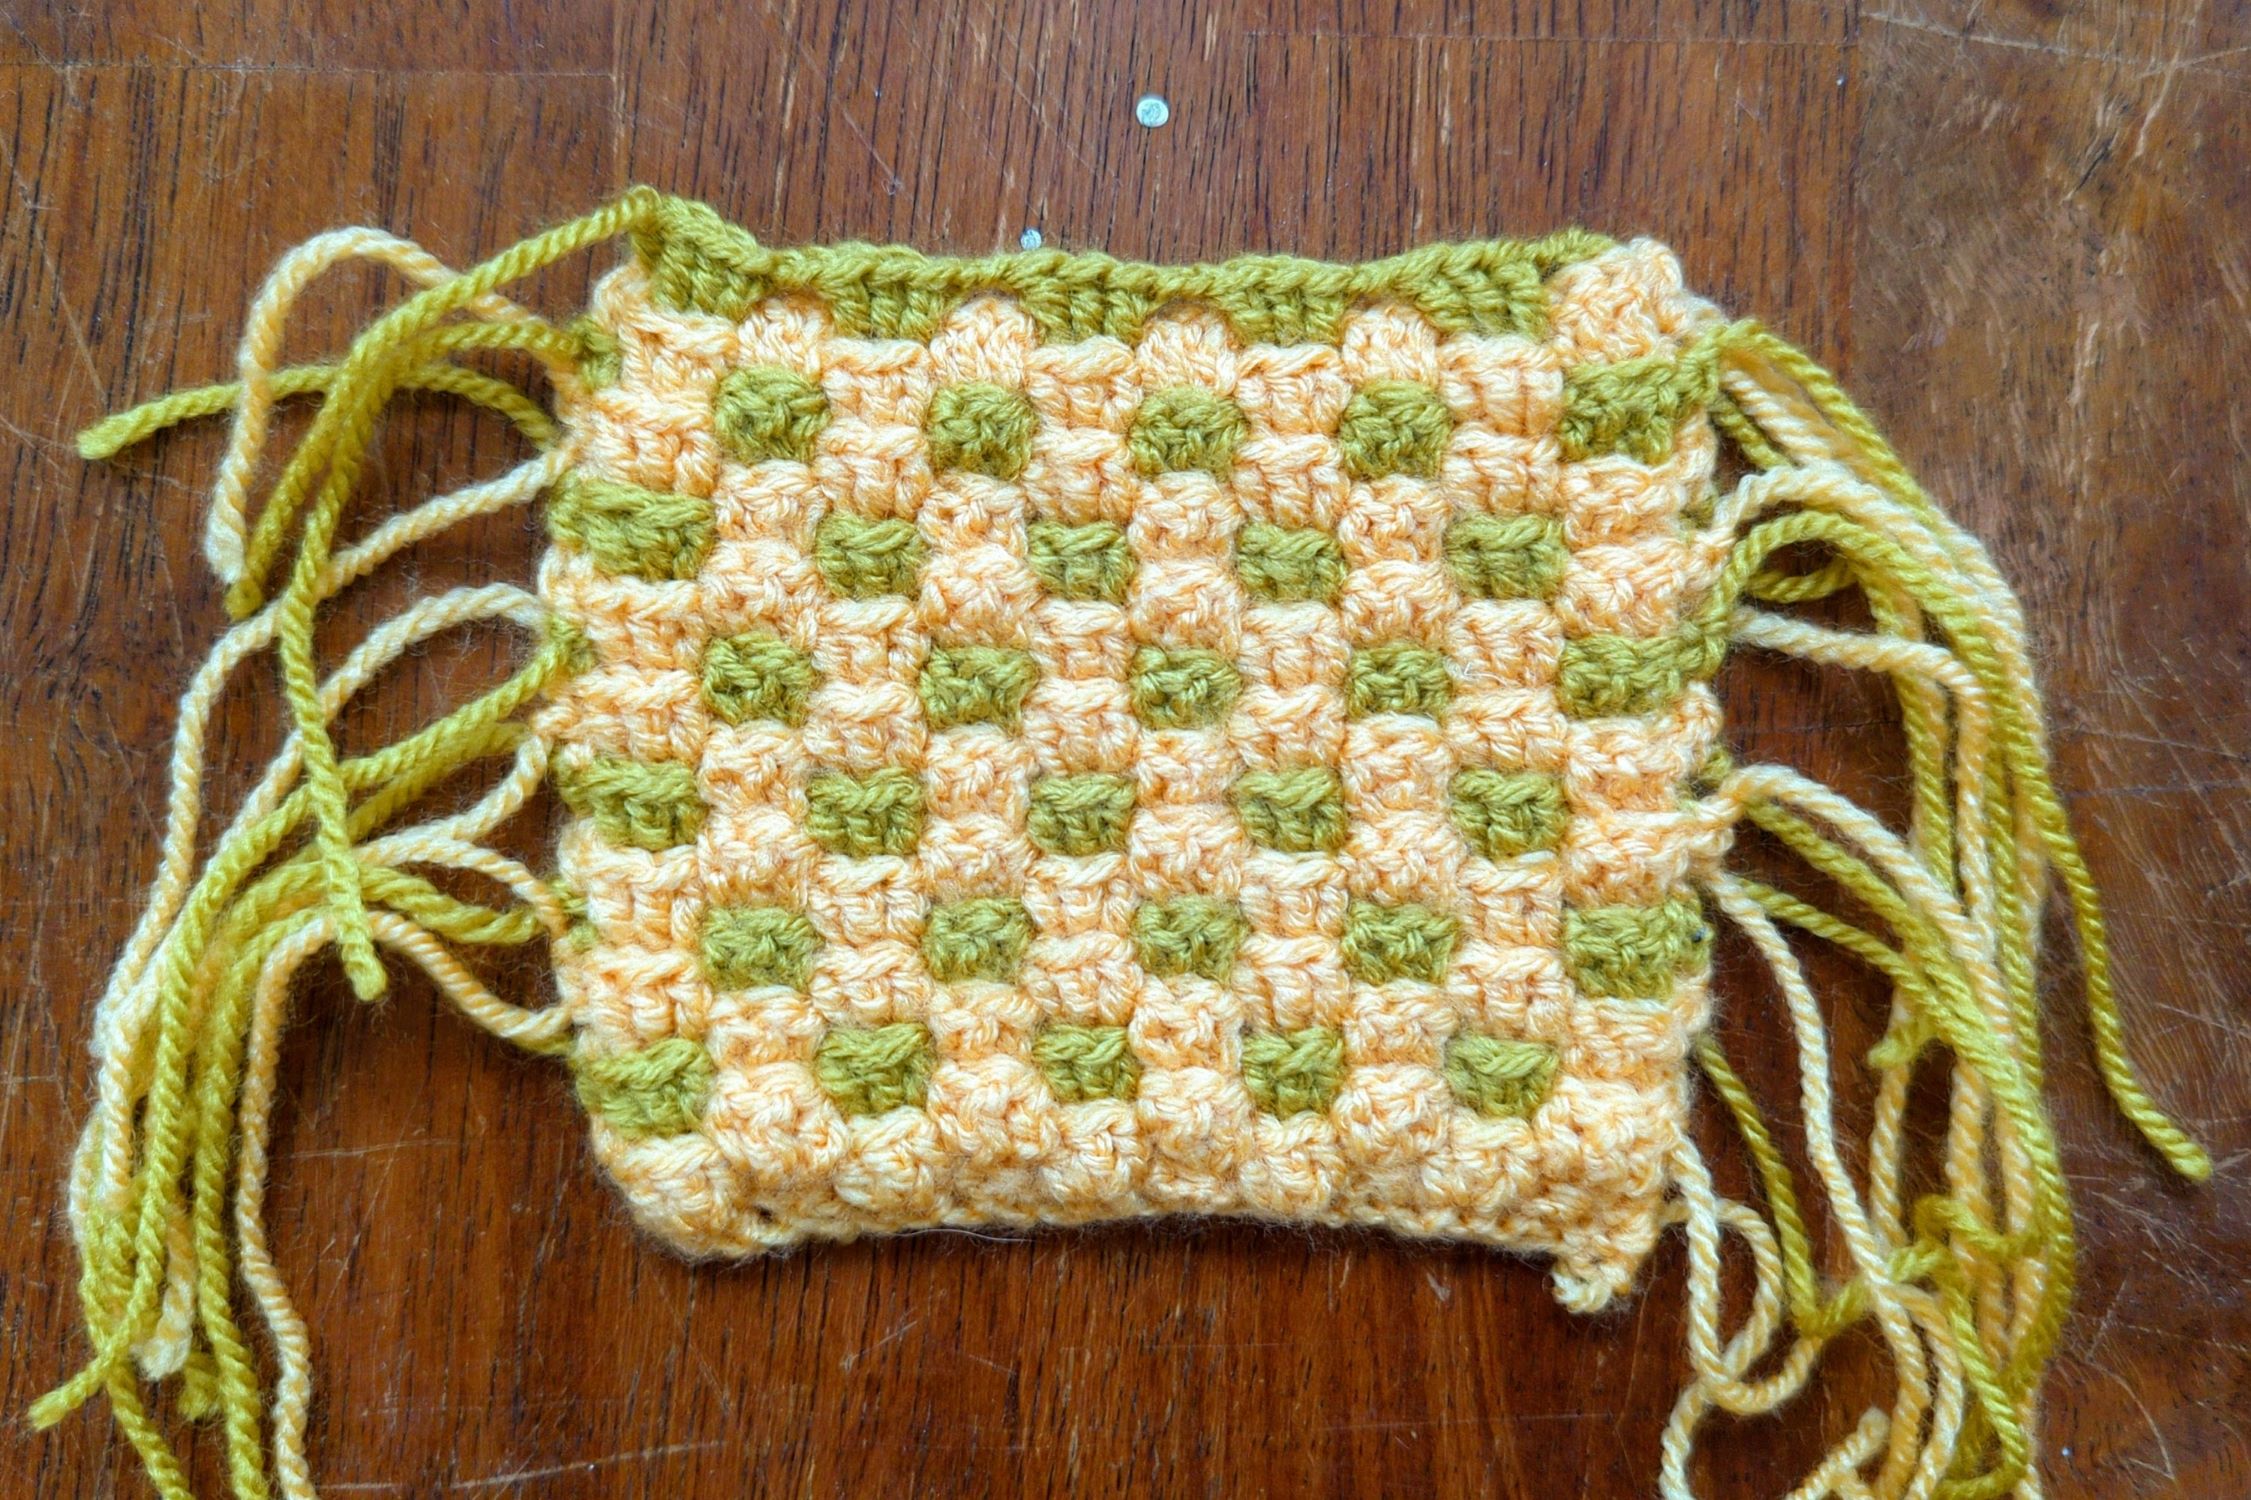
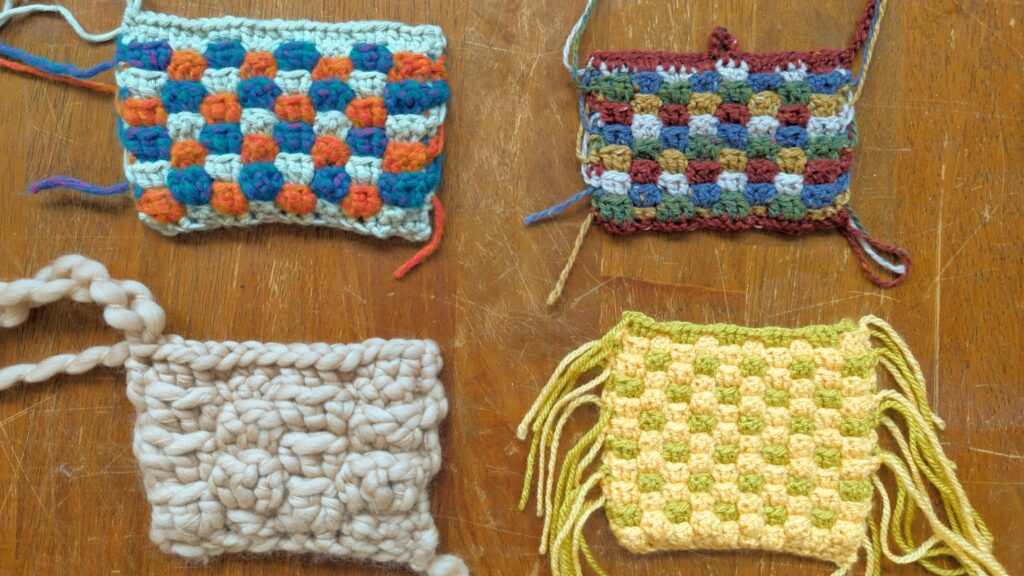
This is a tutorial for a crochet stitch I’ve been calling the interlocking granny stitch. It’s a pretty dense stitch that produces interesting textures on both sides, and its honeycomb-like pattern is a fun base for color work.
Examples of the interlocking granny stitch. Clockwise from top left: 3 color design using Aran weight yarn and a 5.0mm hook (Scheepjes River Washed XL Yarra, Nile, Crystal Quartz); 5 color design using DK yarn and a 4.0mm hook (Scheepjes Terrazzo Espresso, Acero, Pera, Acciaio, Prosecco); 2 color design using DK yarn and a 3.5mm hook (I think it’s Scheepjes Colour Crafter Gouda and Nijmegen?); single color design using super bulky yarn and a 8.0mm hook (Loopy Mango Merino No. 5 Cafe Con Leche)
I’m not quite sure whether to claim I invented this stitch – on the one hand, I had the idea for a texture I wanted, couldn’t find anything similar in my crochet books or online, and played around with yarn until I came up with this. On the other hand, enough people have been doing crochet for enough years that it seems very likely to me that I’m not the first person to have this idea! If you’ve seen this stitch before, please let me know where and I will happily link it here.
I hope you give the interlocking granny stitch a try! If anything is unclear, please use the comments to ask me.
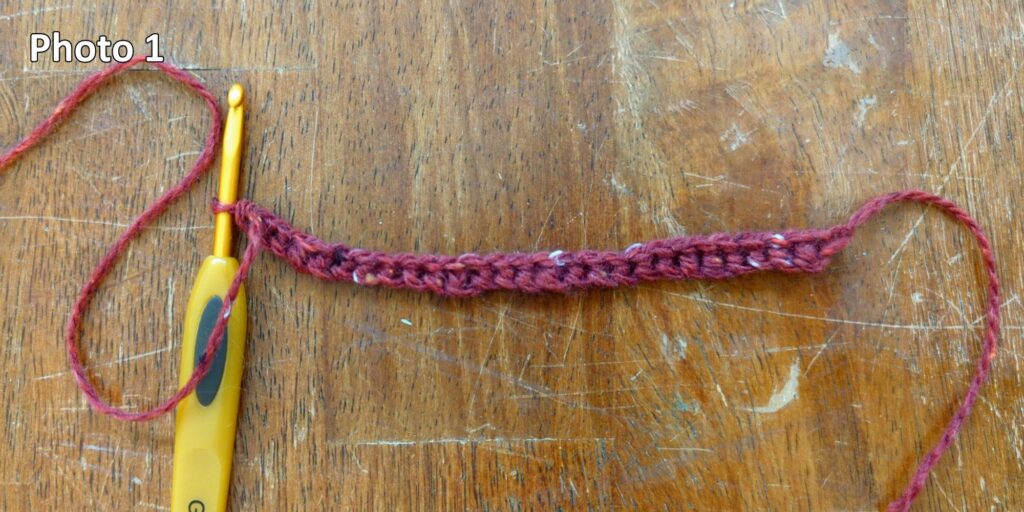
Row 1 – Right side facing. Foundation single crochet a multiple of 6, plus 2. Ch 1 and turn (Photo 1). If you find foundation sc really annoying, you can chain a multiple of 6 plus 3, then sc across starting in the second ch from the hook, which should give you a multiple of 6 plus 2 scs.
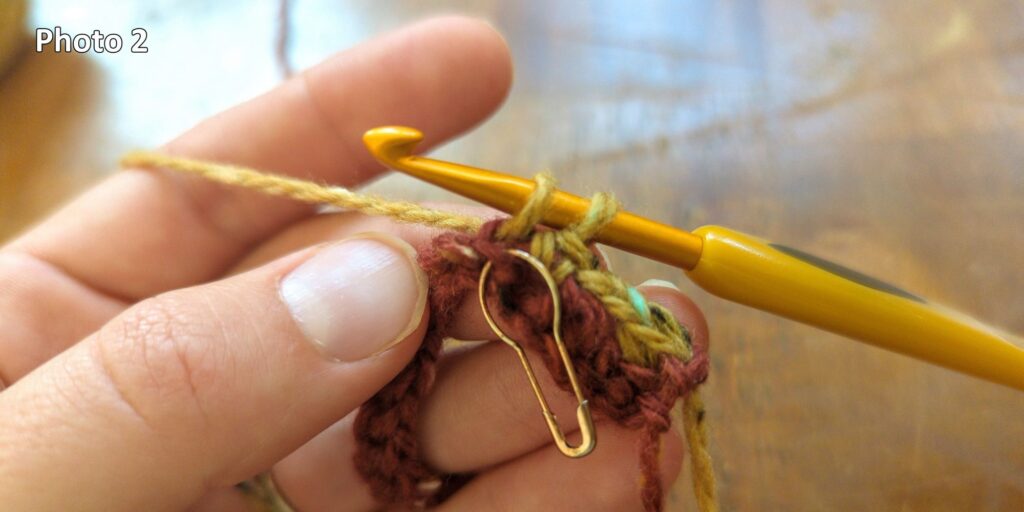
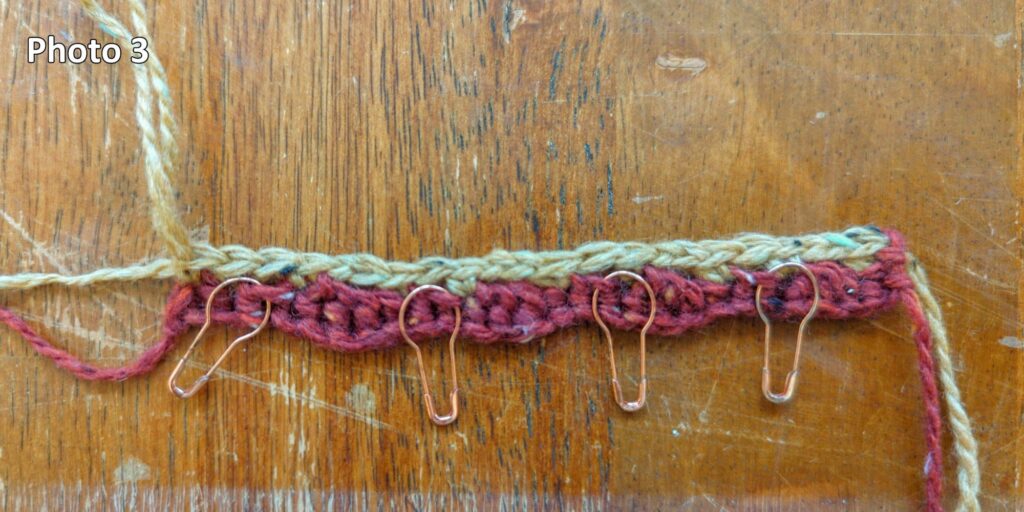
Row 2 – Wrong side facing. Sc in first stitch. *Ch 2 and skip 3 stitches, sc in the next stitch, sc in the back loop only [i.e. the loop on the right side] of the next stitch, marking the other loop with a stitch marker (Photo 2), sc in next stitch*. Repeat from * to * until 1 stitch left. Sc in last stitch. Ch 1 and turn.
Your work should have scs in the first and last stitch, and the stitches in between make alternating groups of chain 2/skip 3 and three scs where the center sc is blo (Photo 3). Note that if you make your chains tight, you might want to do ch 3 every time I say ch 2 for this row and all following rows.
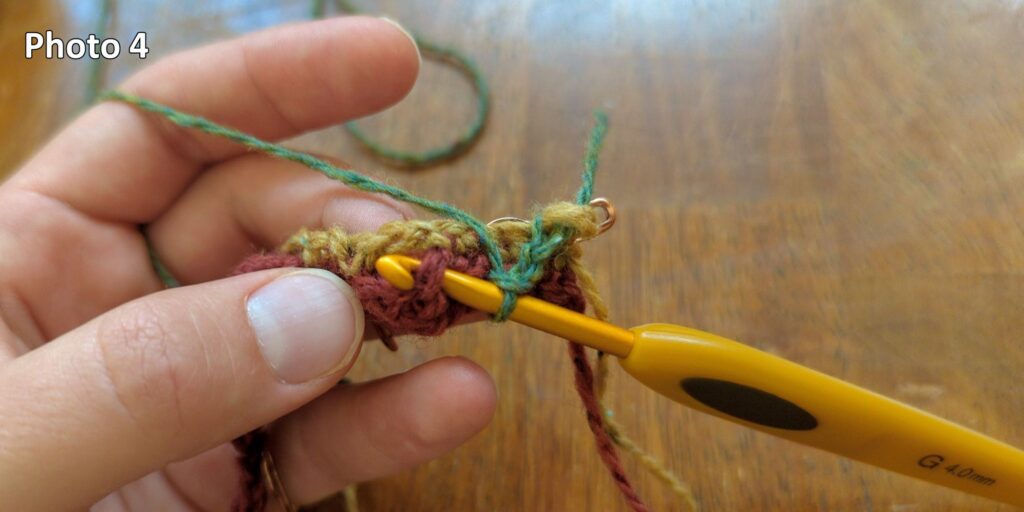
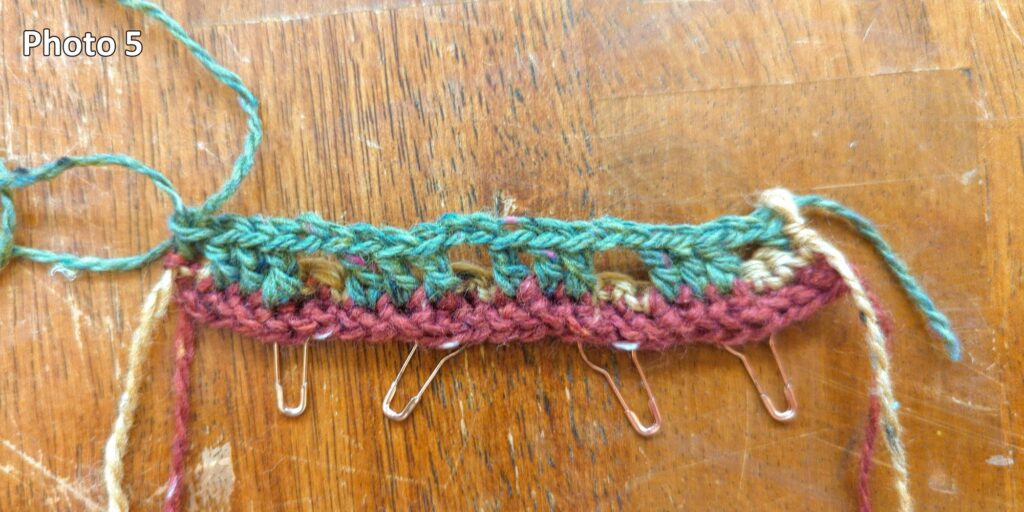
Row 3 – Right side facing. Sc in the first stitch from R2. Ch 2 and skip the 3 scs from R2. Working in front of the ch 2 space from R2, dc in each of the 3 stitches from R1 that were skipped in Row 2 (Photo 4 shows how to bend the chain from R2 to the wrong side to work in these stitches). *Ch 2, skip the 3 sc from R2, dc in the 3 skipped stitches from R1*. Repeat from * to * until 1 stitch left. Sc in the last stitch from R2 (Photo 5). Ch 1 and turn.
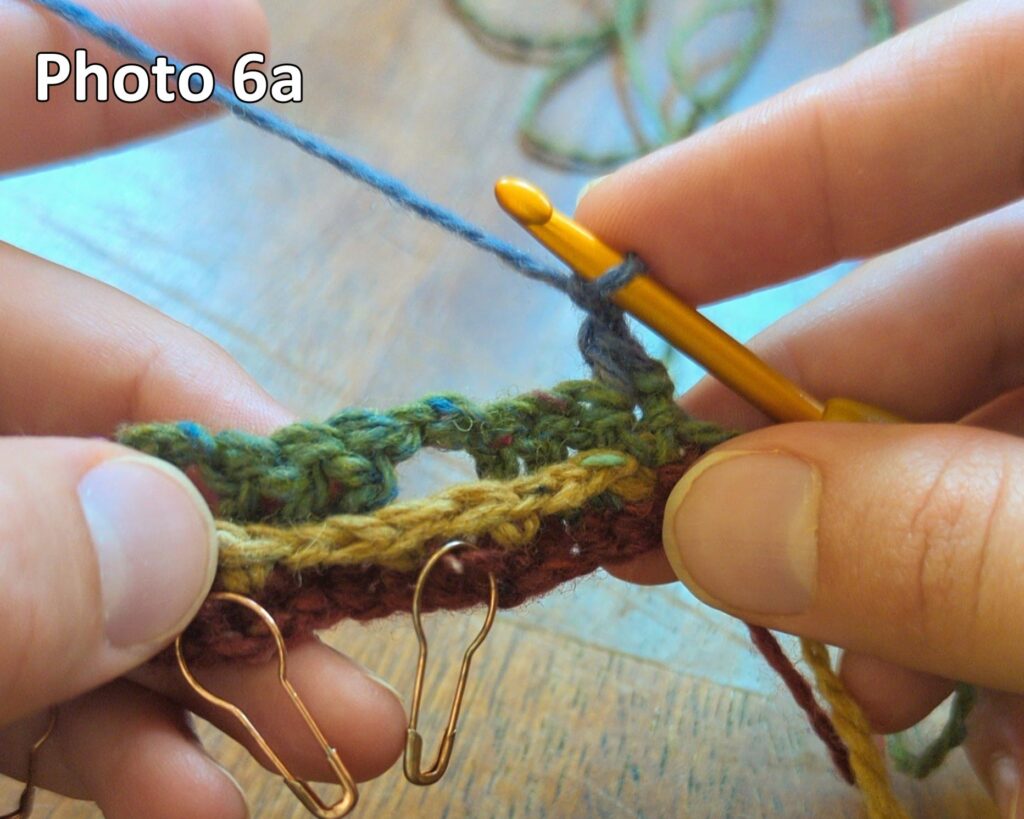
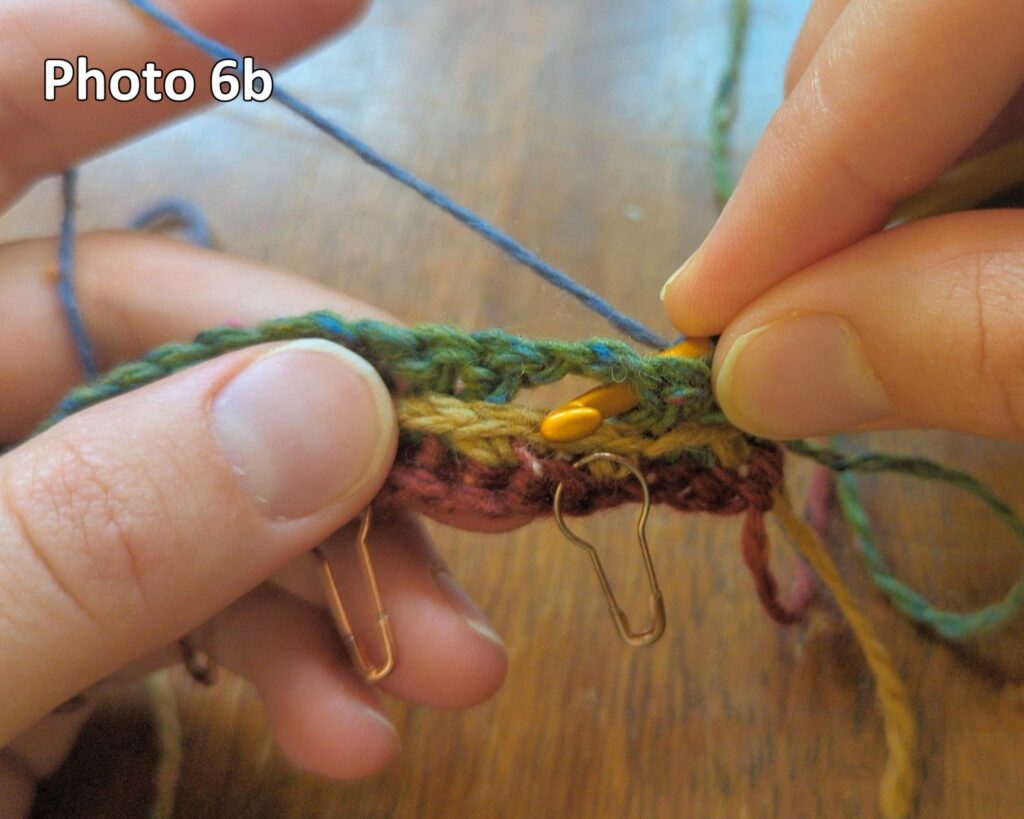
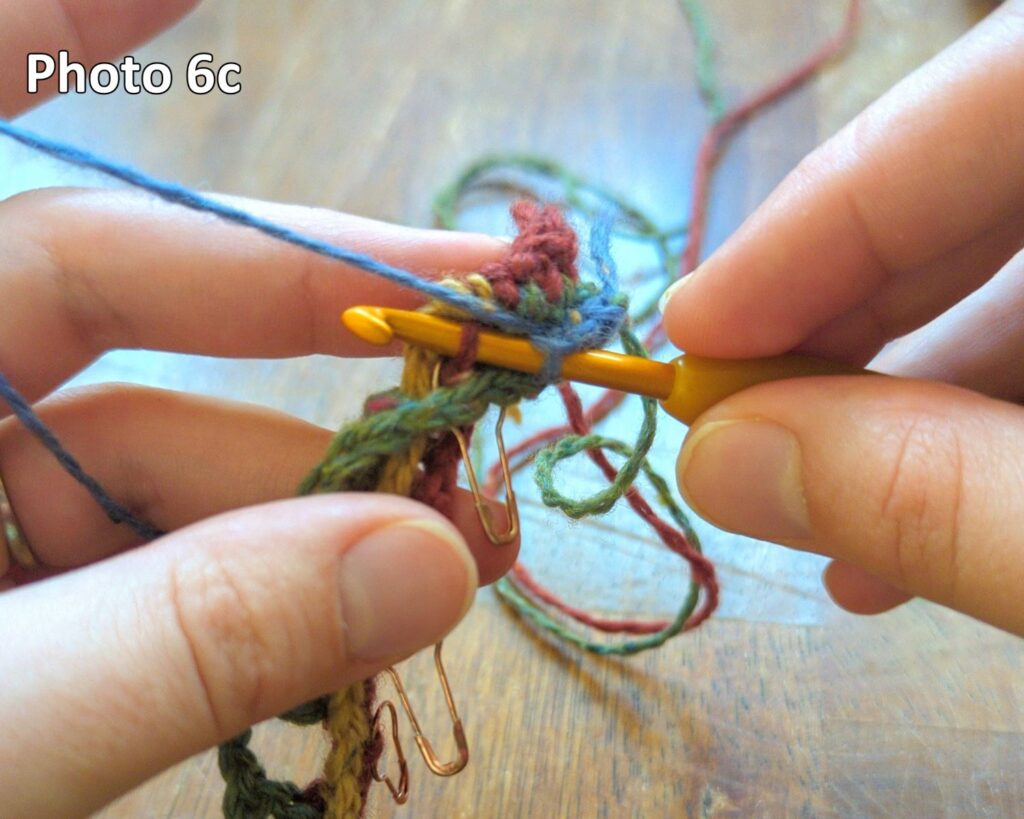
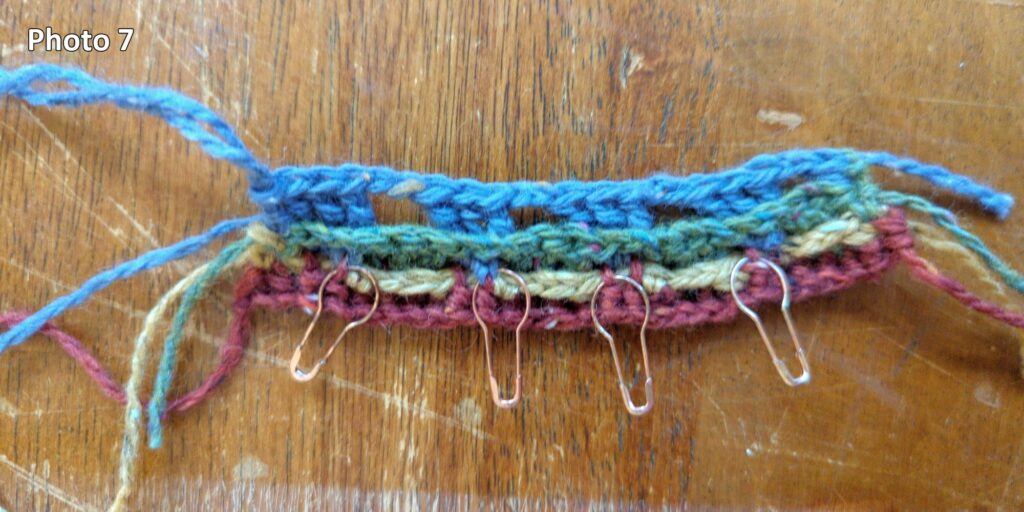
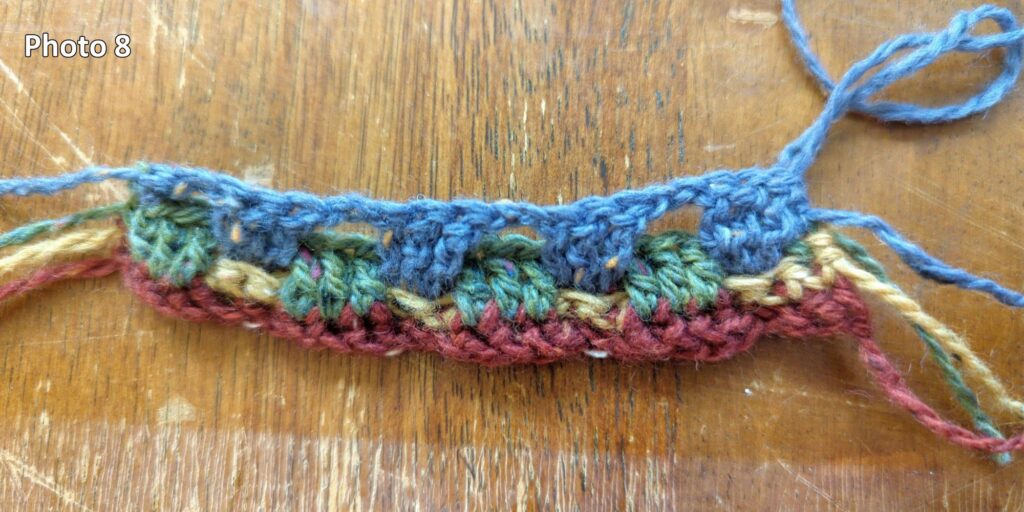
Row 4 – Wrong side facing. Ch 1 and hdc in first sc from R3. *Ch 2, skip the 3 dcs from R3. Bend the ch 2 space from R3 towards the wrong side, and bend the scs from R2 towards the right side. Tr 3 in the front loop of the sc from R1 with the stitch marker (Photos 6a-c show how to find this loop and pull it up)*. Repeat from * to * until 1 stitch left. Hdc in the last stitch from R3 (Photo 7 shows the wrong side at this point, Photo 8 shows the right side). Ch1 and turn.
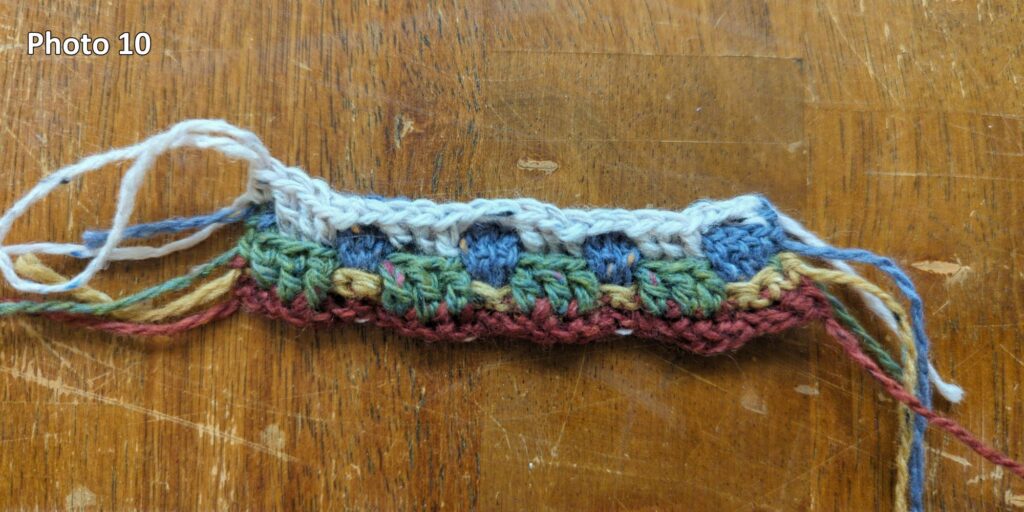
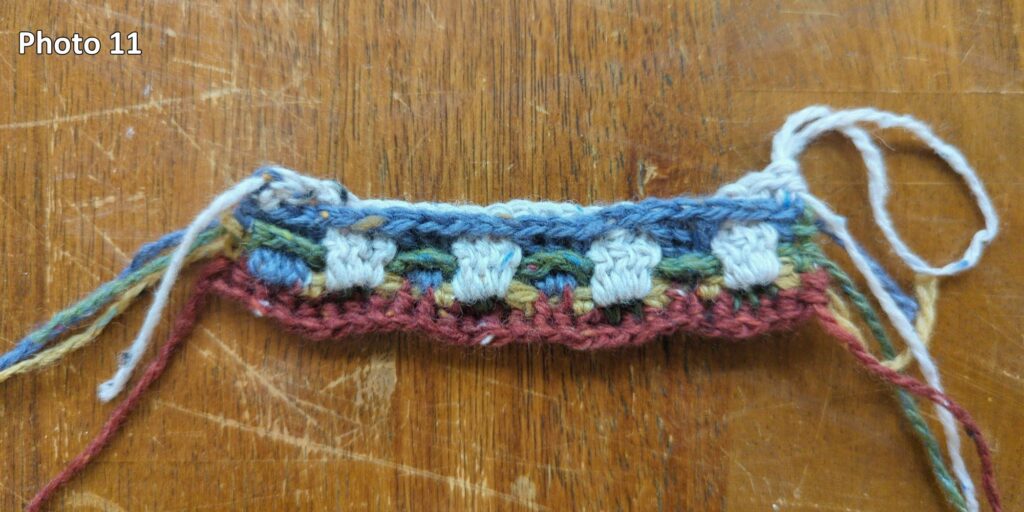
Row 5 – Right side facing. Ch 1 and hdc in the first stitch from R4. *Ch 2, skip the 3 trs from R4. Fold the chain from R4 towards the wrong side, and fold the trs from R3 towards the right side. Tr 3 in the ch 2 space from R2 (Photos 9a,b show how to find this chain and pull it up).* Repeat from * to * until 1 stitch left. Hdc in the last stitch from R4 (Photo 10 shows the right side at this point, Photo 11 shows the wrong side). Ch1 and turn.
Repeat the instructions for Row 5 until you’re about one tr short of the desired length.
In the instructions for the last couple rows, I’m going to call the final row Row F, the second to last row Row F-1, and so on.
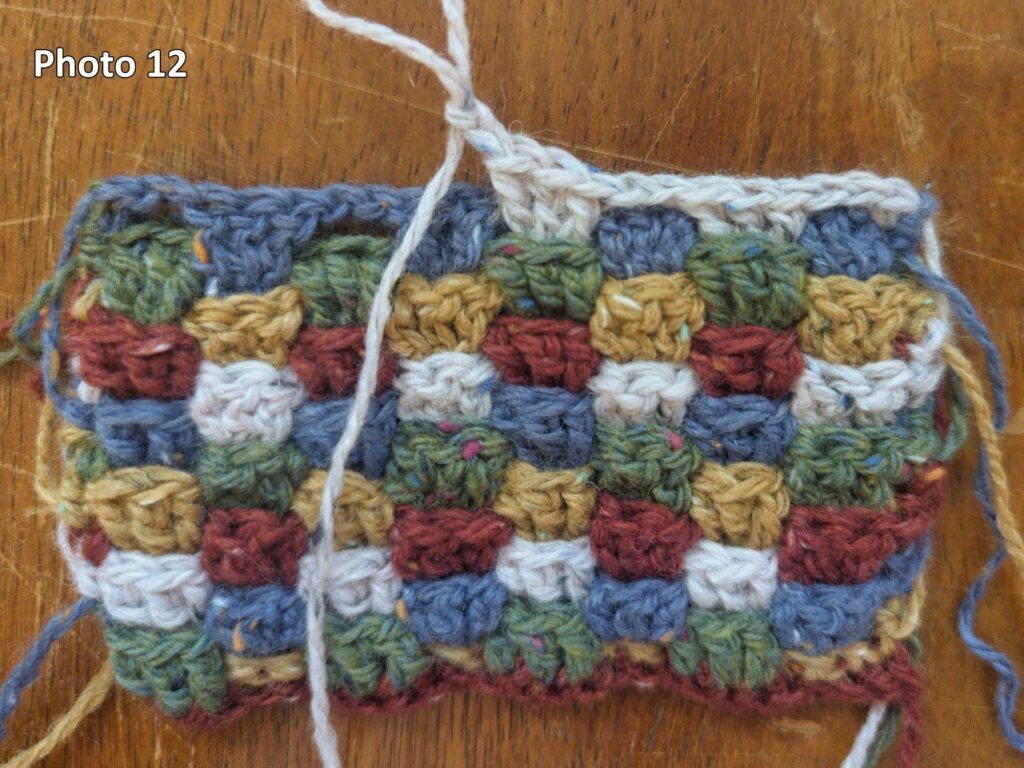
Row F-1 – Sc in the first stitch from Row F-2. *Ch 2, skip the 3 trs from Row F-2, and dc 3 into the ch 2 space from Row F-4*. (Photo 12 shows this row in progress from the right side, notice that because we used dcs instead of trs, this row is shorter and approximately level with the previous row.) Repeat from * to * until 1 stitch left. Hdc in the last stitch from Row F-2. Ch1 and turn.
Now, take a look at the wrong side of your work. Photo 13 shows the wrong side after Row F-1 is completed.
As you have been working, each row hides the chain 2 spaces from a single previous row (the one three rows prior), but now we have three sets of chains (Row F-1, white; Row F-2, blue; and Row F-3, green) to hide and only a single final row. There are two methods for the final row, depending on whether you want the chains from Row F-1 and Row F-2 to be visible.
Row F (SHOWING the extra chains) – Hdc in the first stitch from Row F-1. *With the ch 2 spaces from Row F-2 bent to the wrong side, hdc in all 3 dcs from Row F-1. With the ch 2 spaces from Row F-1 bent to the wrong side, dc 3 in the ch 2 space from Row F-3*. Repeat from * to * until 1 stitch left. Hdc in final stitch from Row F-1.
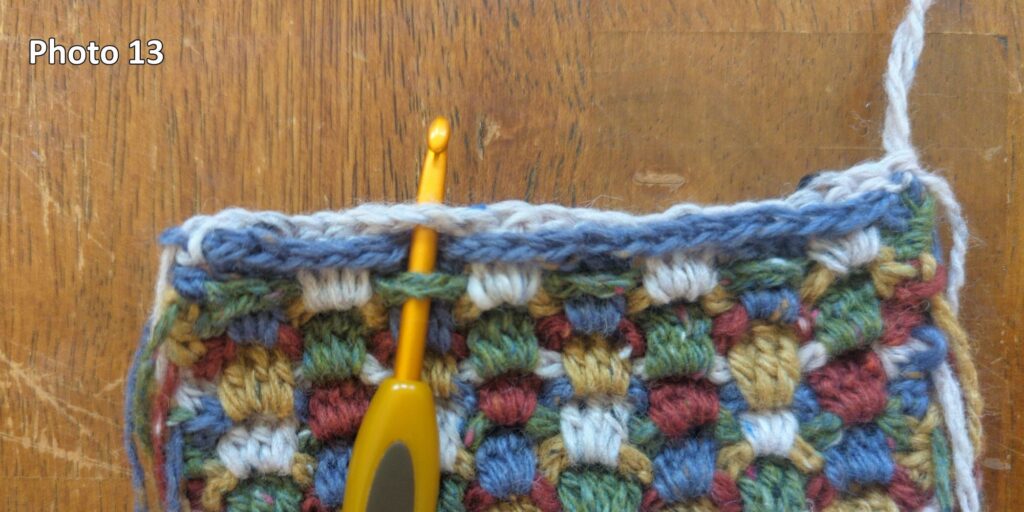
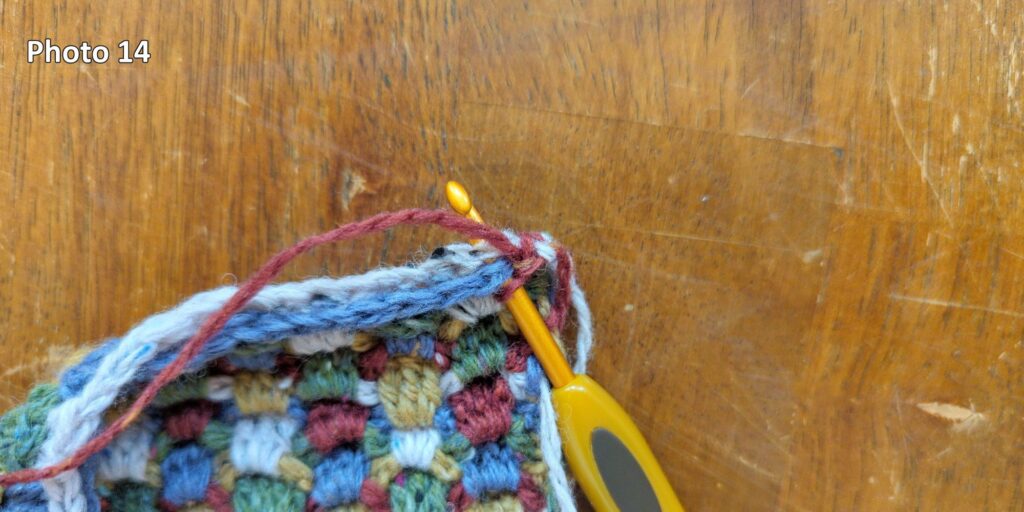
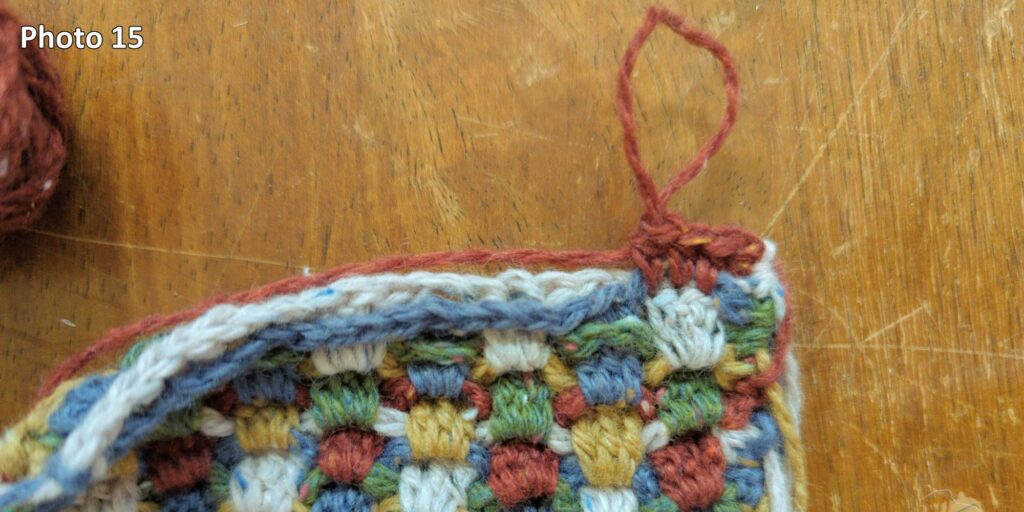
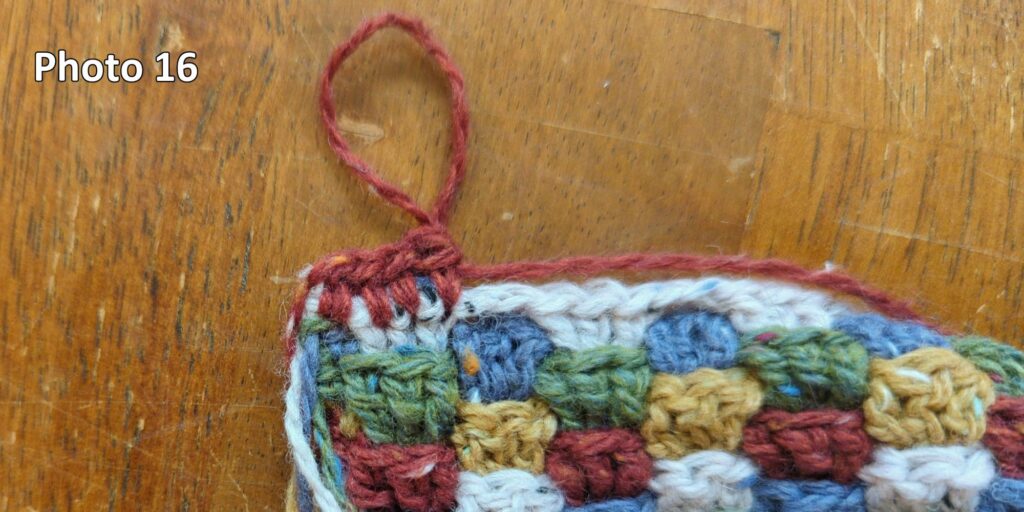
Row F (HIDING the extra chains) – Hdc in the first stitch from Row F-1. Hdc in all 3 dcs from Row F-1, making sure to catch the chain 2 space from Row F-2 and work around it (Photo 14 shows where to put your hook, Photo 15 shows the hdcs from the wrong side, and Photo 16 shows them from the right side).
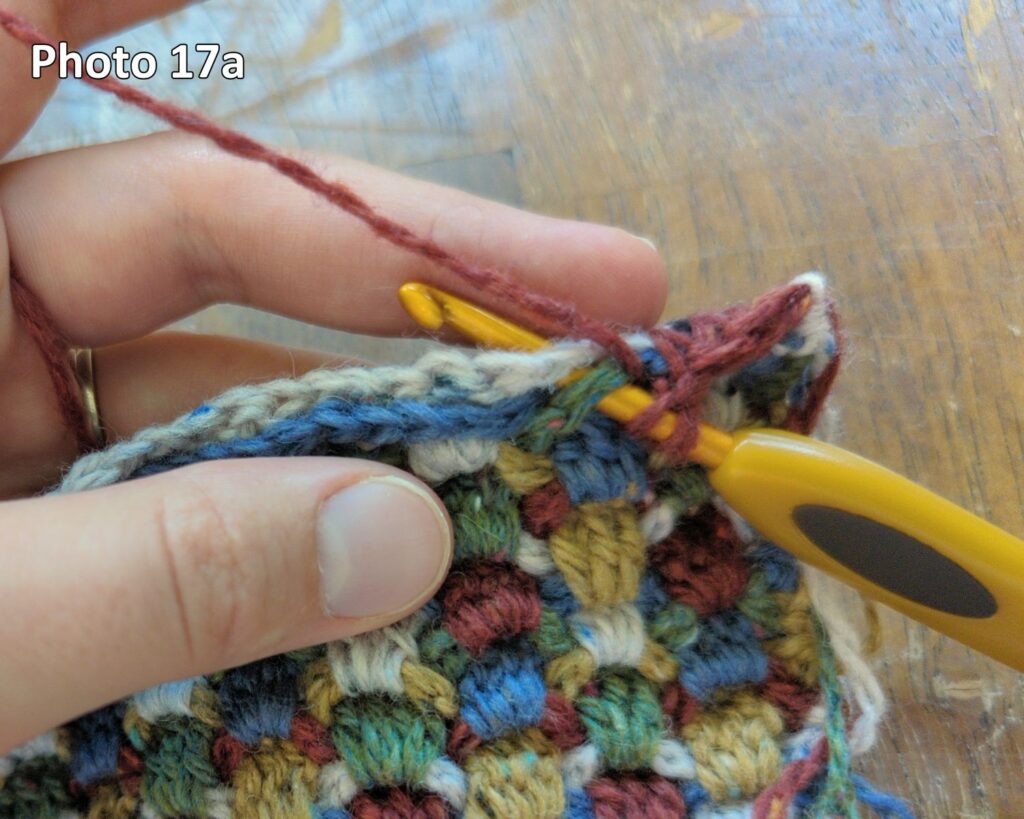
Next, we need to dc in the ch 2 space from Row F-3 (green in photos), but we need to do it around the ch 2 space from Row F-1 (white). If you just put your hook through both loops (as in Photo 13, above) and make a regular dc, the stitches will pull and look bad. Instead, we want to catch the chain from Row F-1 in the middle of the dc, not at the bottom. Here’s how we do that:
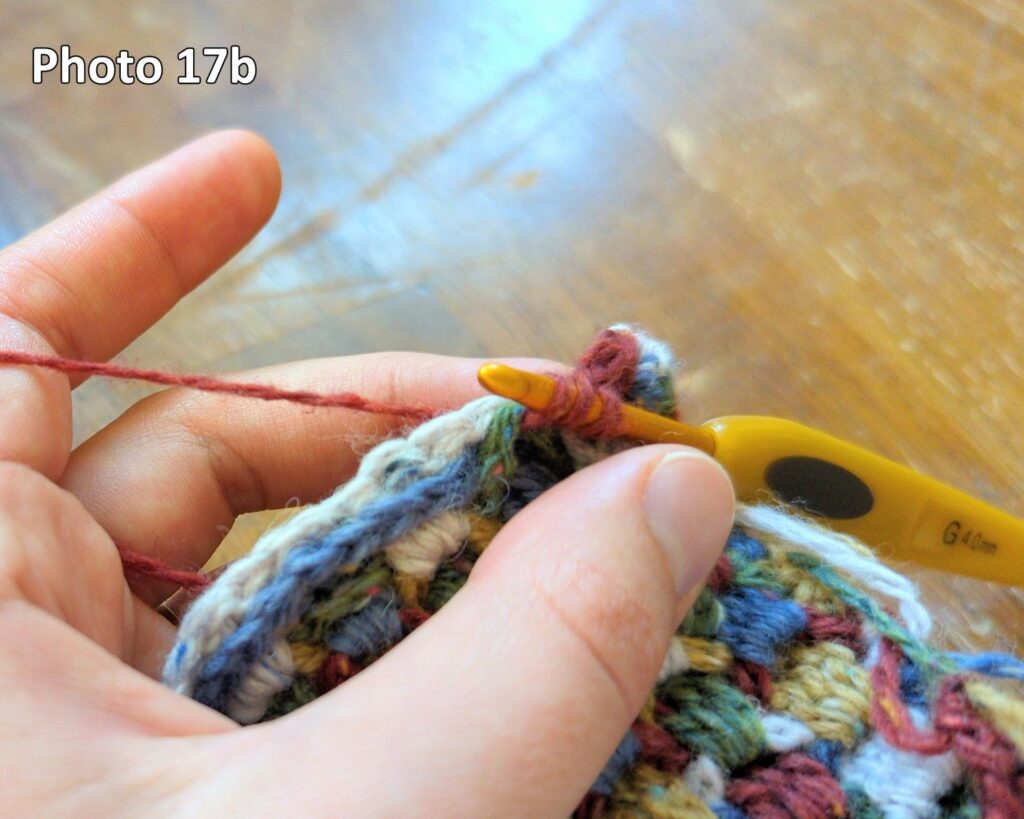
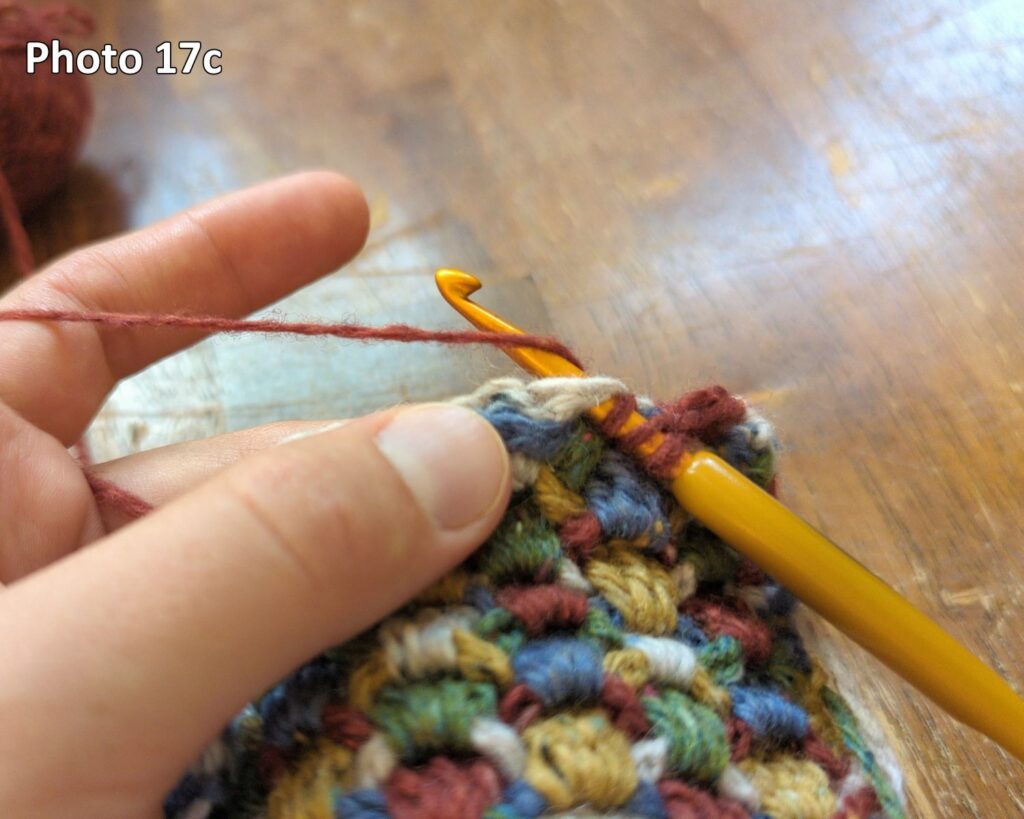
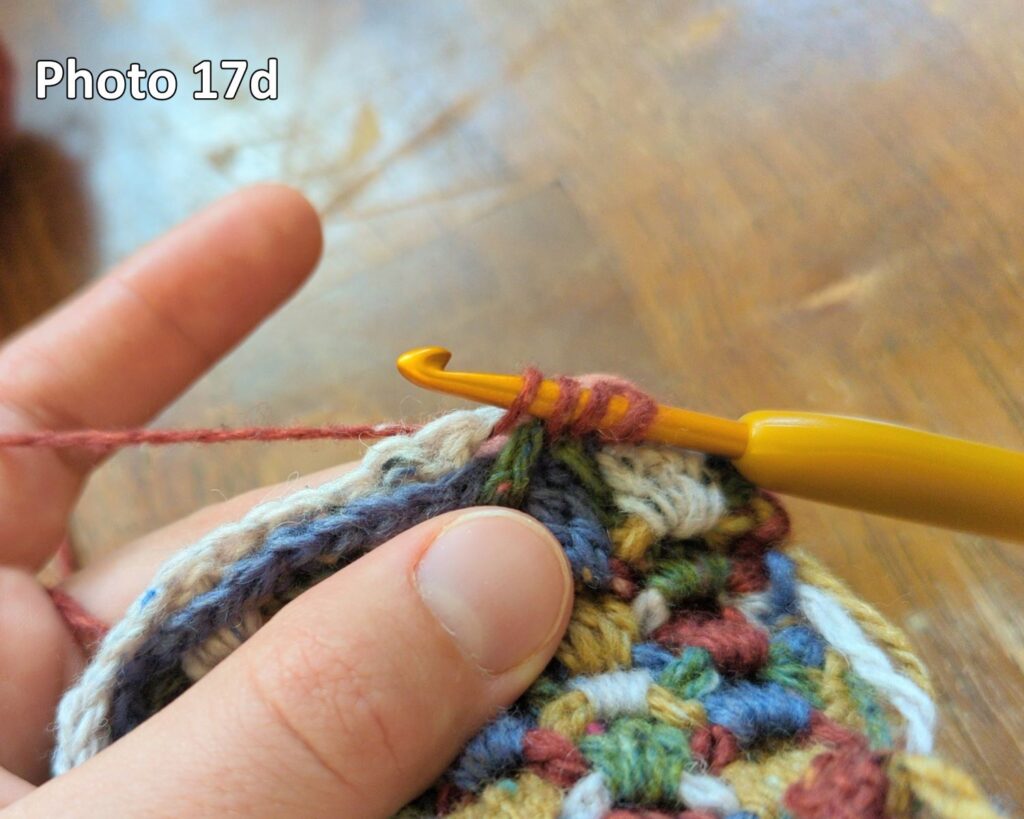
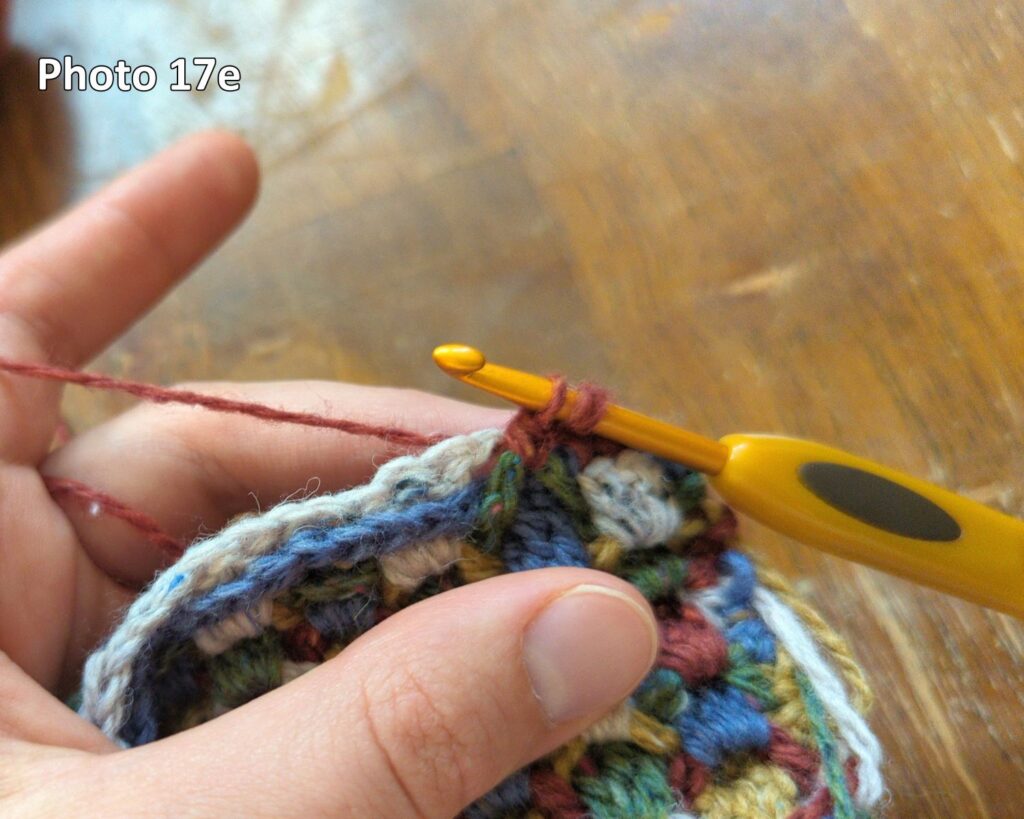
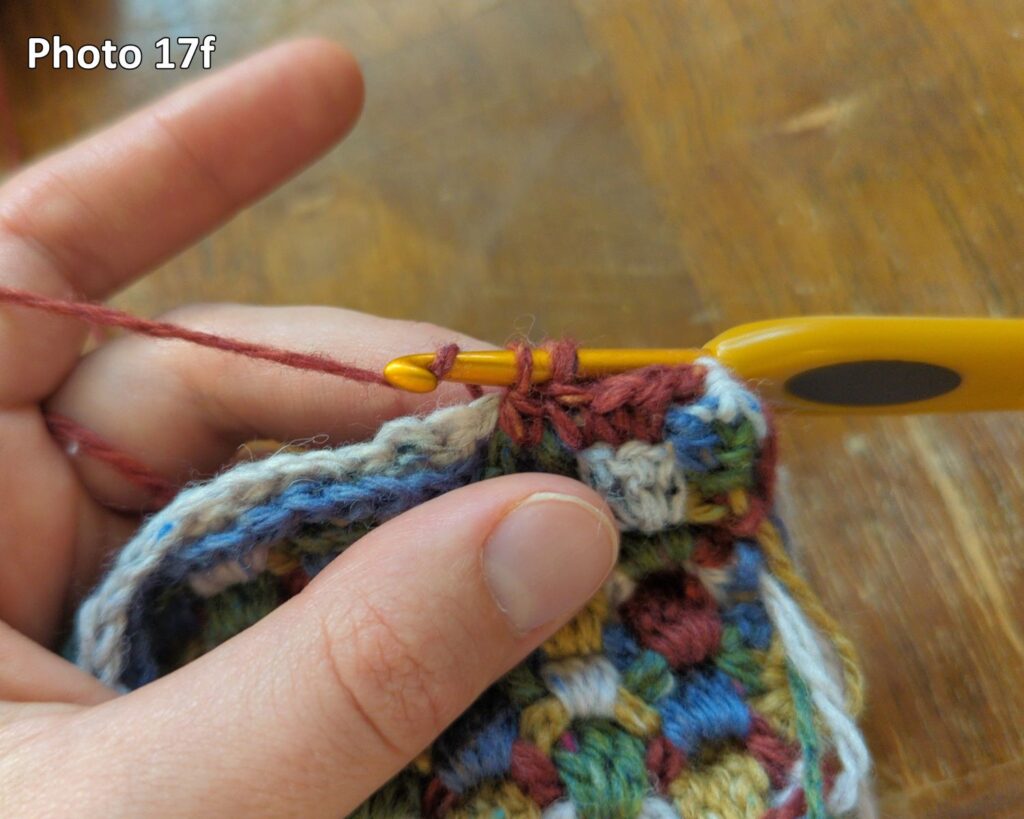
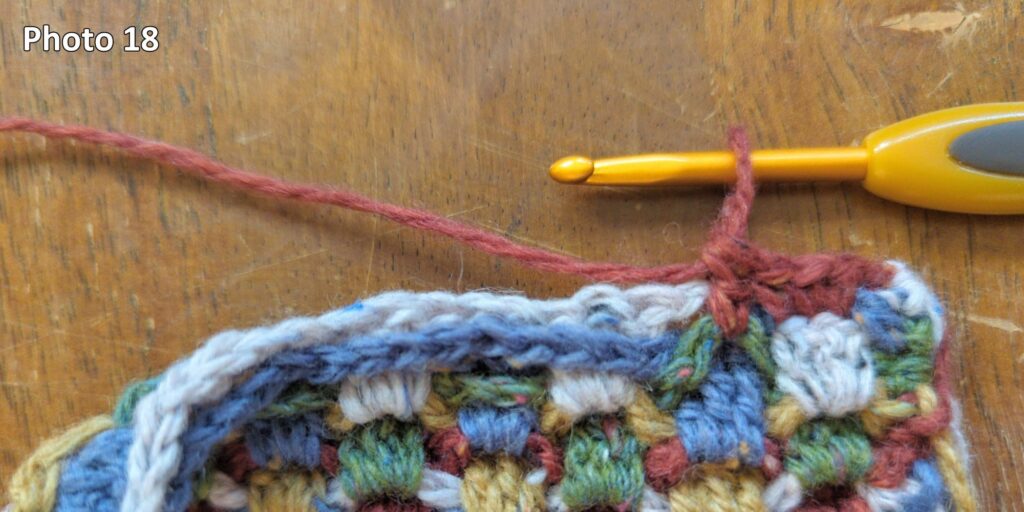
**Yarn over (2 loops on hook), insert your hook under both chains (Photo 17a), yarn over, and pull up loop (3 loops on hook, Photo 17b). Instead of finishing your dc the usual way, insert your hook under the top chain only (Photo 17c), yarn over, and pull up a loop (4 loops on hook, Photo 17d). Be careful NOT to yarn over again at this point, as that will make a tr instead of a dc. Instead, pull the most recent loop through the next 2 loops (2 loops on hook, Photo 17e), yarn over (3 loops on hook, Photo 17f), and pull through 2 loops (dc made, Photo 18).**
Repeat from ** to ** twice to complete the group of 3 dcs.
*Hdc in the next 3 dcs from Row F-1, working around the ch 2 space from Row F-2. Dc 3 in the next ch 2 space from Row F-3, working around the ch 2 space from Row F-1*. Repeat from * to * until 1 stitch left. Hdc in final stitch from Row F-1.
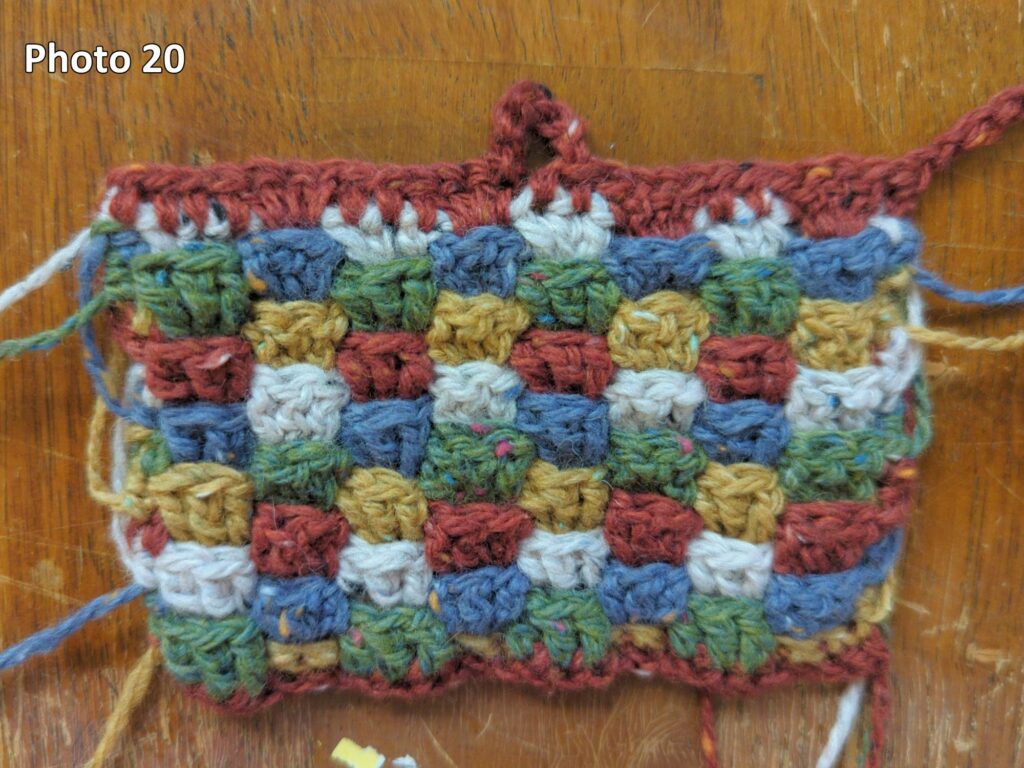
Photo 19 shows the finished row from the wrong side, Photo 20 shows it from the right side. The first half of the row (right in Photo 19, left in Photo 20) is worked using the second method to hide all the ch 2 spaces. The second half of the row leaves the white and blue ch 2 spaces visible on the wrong side.
I did the final row in red for the tutorial, but in general, it looks better to match the color of the final row to the row before it, as in the sample below (Photo 21).
That’s it! Experiment with different color combinations and yarn sizes and see what you can make!
NOTE: I wrote the interlocking granny stitch pattern using multiples of 6 stitches, so that each row would start with a ch 2 space and end with a group of trs. This makes it so that the same instructions apply to odd and even rows. Once you understand the stitch, you can work in multiples of 3 instead. Everything will be the same except that your rows will start and end with either a ch2 space or a group of trs, depending on whether the right or wrong side is facing.
Simple instructions – interlocking granny stitch
Row 1 – RS facing. Fsc a multiple of 6, plus 2. Ch 1 and turn.
Row 2 – WS facing. Sc in first st. *Ch 2 and skip 3 sts, sc in next st, sc blo in next st, sc in next st*. Repeat from * to * until 1 st left. Sc 1 in last st. Ch 1 and turn.
Row 3 – RS facing. Sc in first st from R2. Ch 2 and skip the 3 scs from R2. Working in front of the ch 2 space from R2, dc in each of the 3 sts from R1 that were skipped in R2. *Ch 2, skip the 3 scs from R2, dc in the 3 skipped sts from R1*. Repeat from * to * until 1 st left. Sc in last st from R2. Ch 1 and turn.
Row 4 – WS facing. Ch 1 and hdc in first sc from R3. *Ch 2, skip the 3 dcs from R3. Bend the ch 2 space from R3 towards the ws and bend the scs from R2 towards the rs. Tr 3 in the front loop of the sc from R1*. Repeat from * to * until 1 st left. Hdc in the last st from R3. Ch1 and turn.
Row 5 – RS facing. Ch 1 and hdc in the first stitch from R4. *Ch 2, skip the 3 trs from R4. Fold the chain from R4 towards the wrong side, and fold the trs from R3 towards the right side. Tr 3 in the ch 2 space from R2.* Repeat from * to * until 1 st left. Hdc in the last st from R4. Ch1 and turn.
Repeat the instructions for Row 5 until you’re about one tr short of the desired length.
Row F-1 – Sc in the first st from the Row F-2. *Ch 2, skip the 3 trs from Row F-2, and dc 3 into the ch 2 space from R F-4*. Repeat from * to * until 1 st left. Hdc in the last st from Row F-2. Ch1 and turn.
Row F – Hdc in the first st from Row F-1. *Hdc in all 3 dcs from Row F-1. Dc 3 in the ch 2 space from Row F-3*. Repeat from * to * until 1 st left. Hdc in final st from Row F-1. To make the back neater, make the hdcs around the ch 2 spaces from Row F-2, and make the dcs so that the ch 2 spaces from Row F-1 are caught in the middle of the dc.
Please let me know in the comments if you spot any errors in these instructions, or if there’s anything I can clarify! If you try this stitch, I would love to see what you make with it – you can find me as @katederosier on instagram, tumblr, and tiktok.
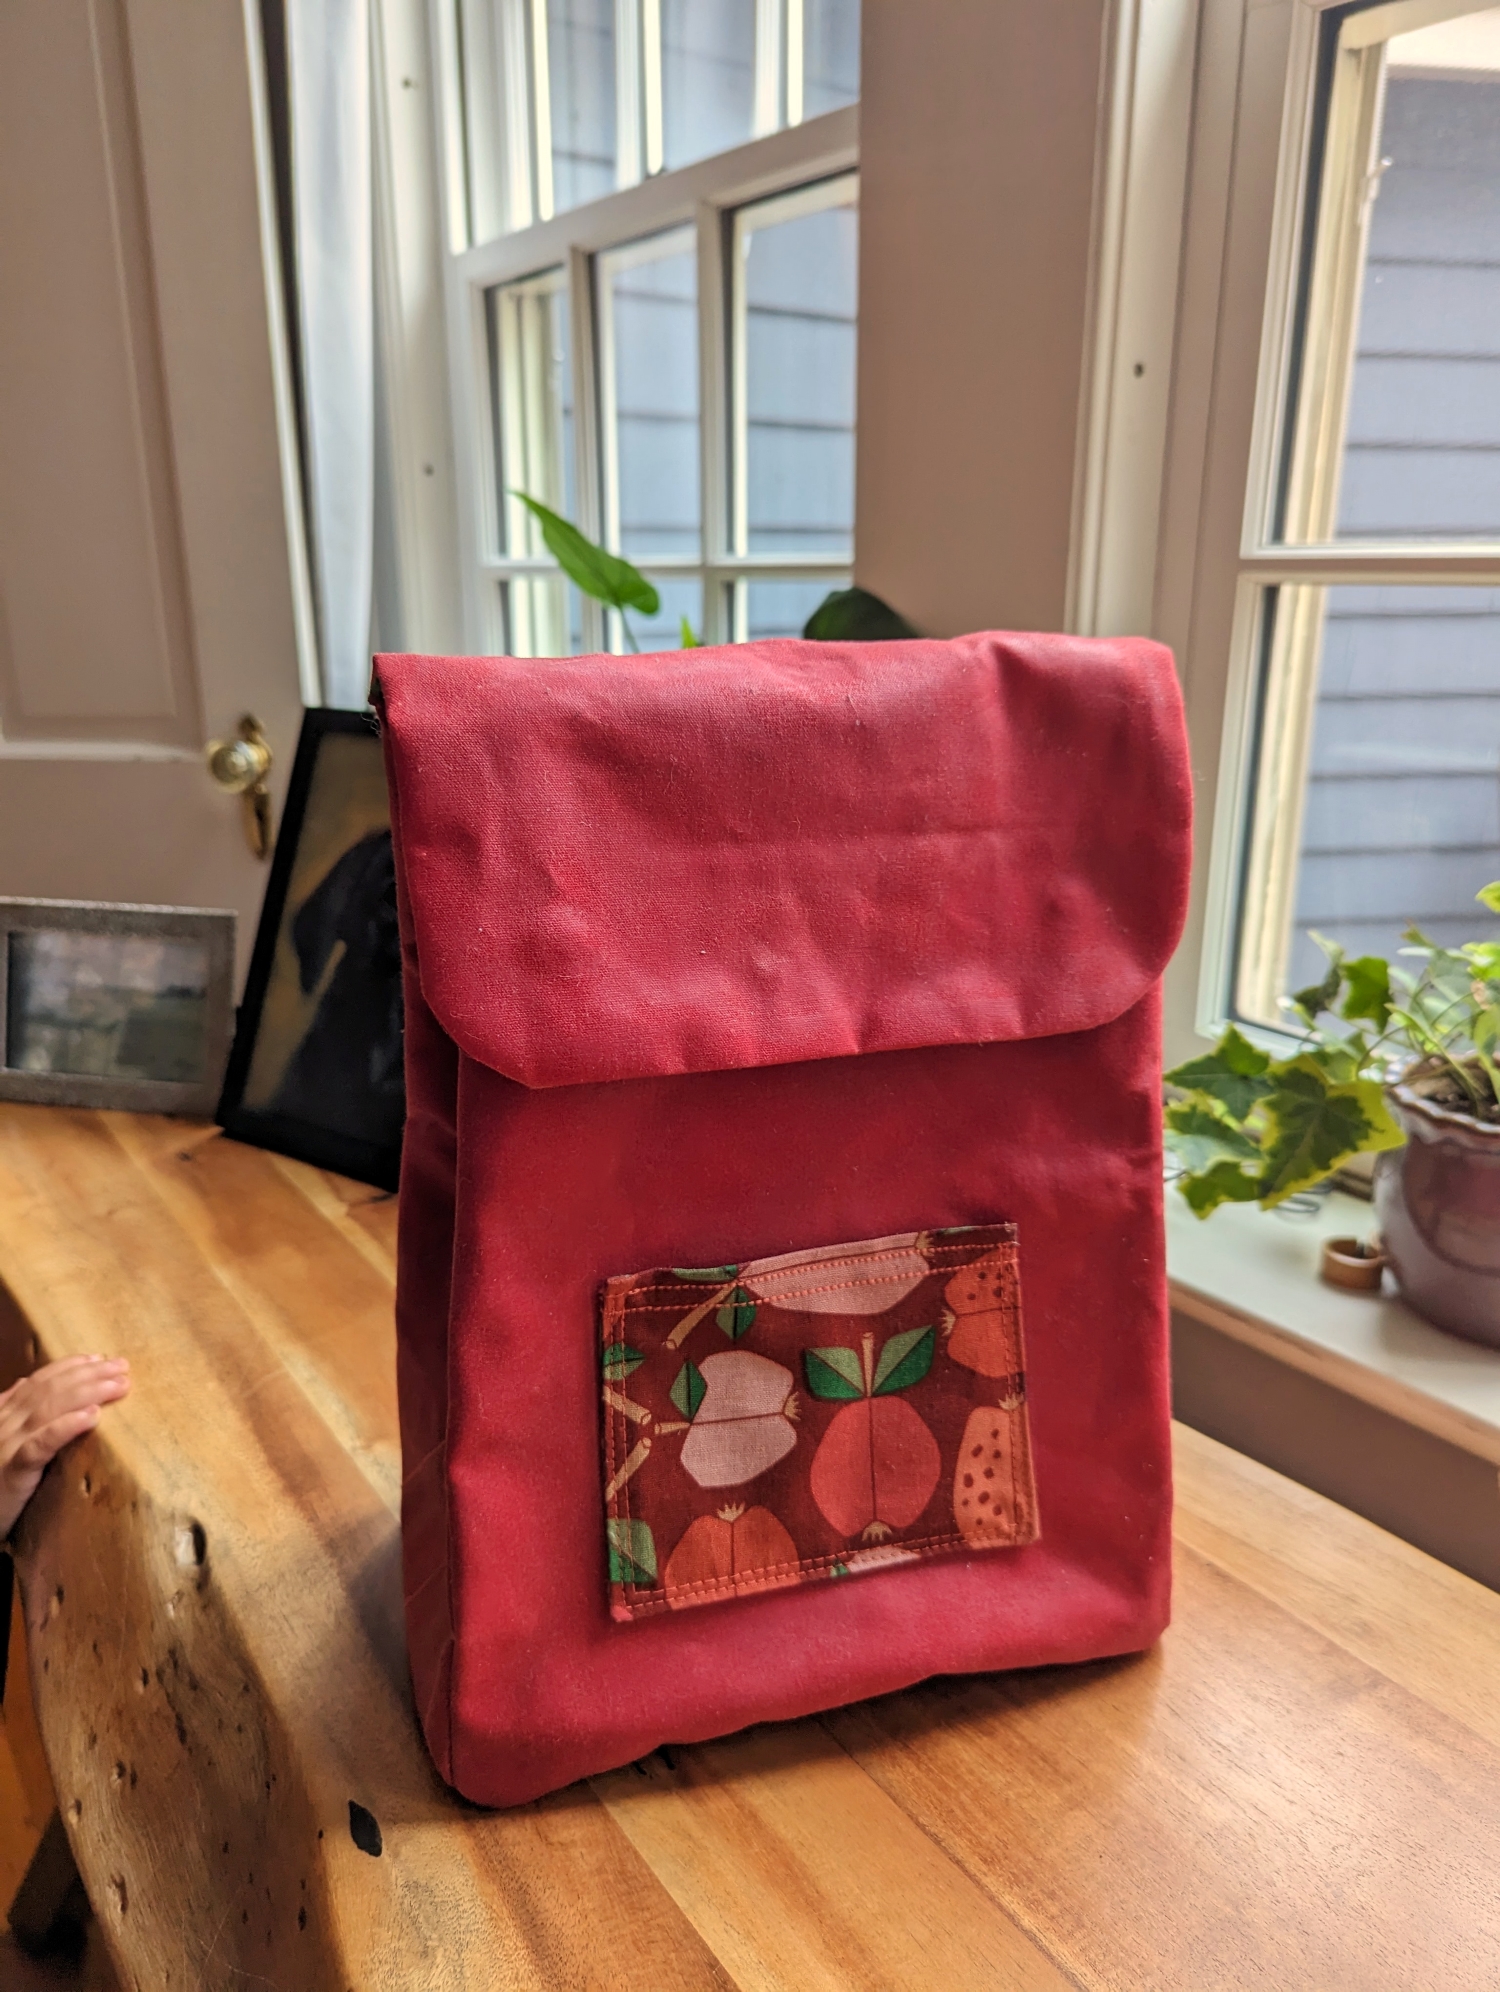
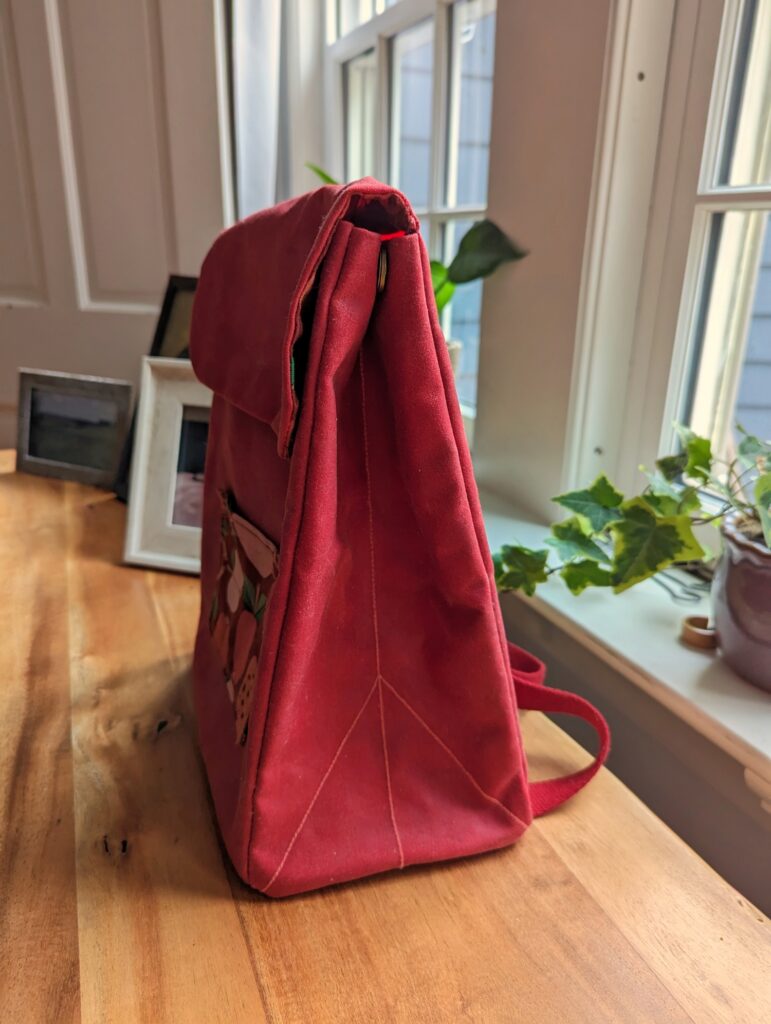
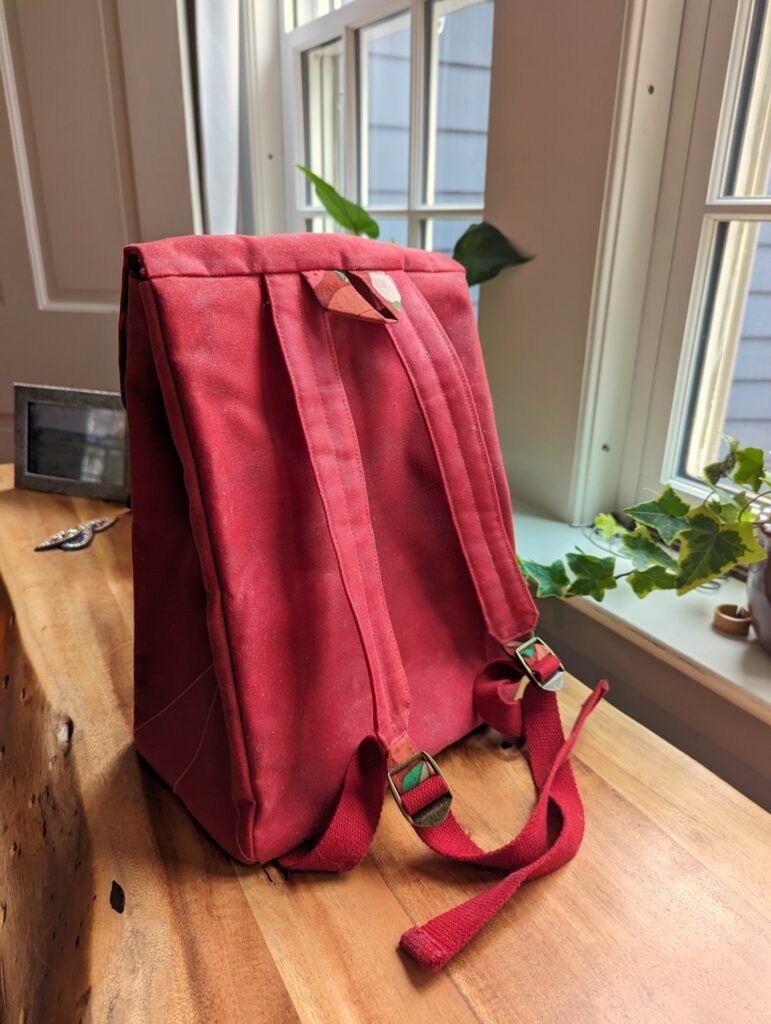
I recently designed and sewed a backpack for my toddler. It was fun and not too hard. In this blog post, I will walk you through all the steps from design to construction, explaining my thought process at each step. You can follow my process to create a simple and functional toddler backpack, or use this as inspiration to make your own backpack customized to your needs and preferences.
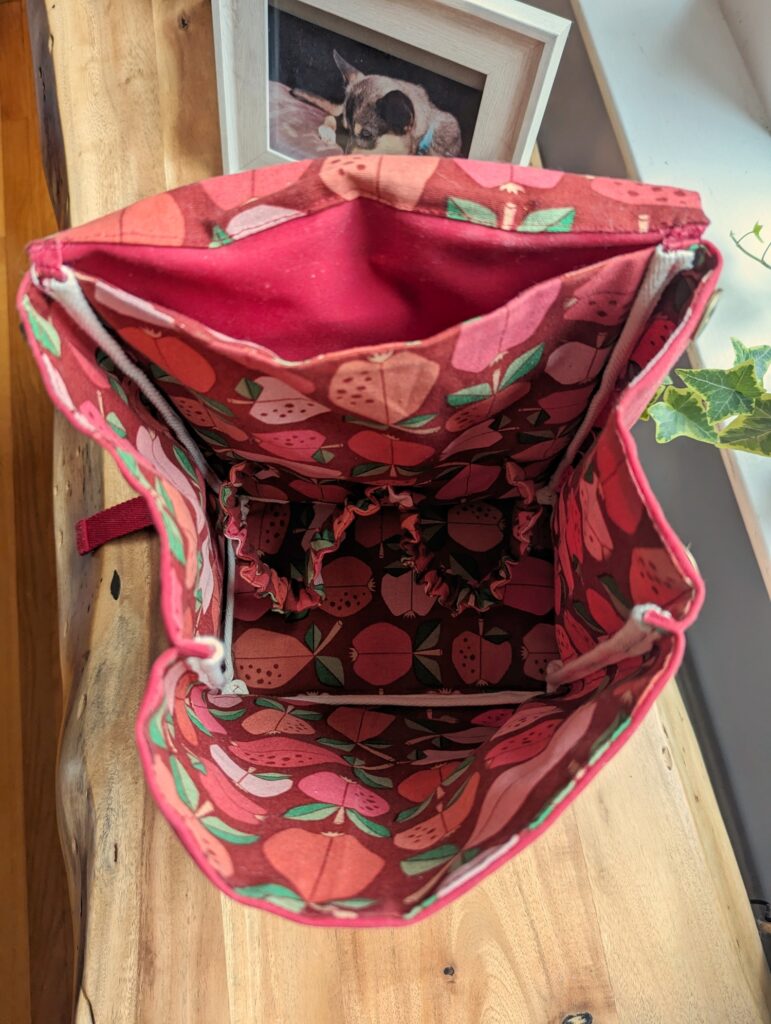
This is a simple backpack, made from mostly rectangular panels. Inside, the backpack has one large pocket – sized to fit a lunchbox, water bottle, and maybe a spare change of clothes or a hat and mittens – and a second, flat pocket sized to fit US letter paper. The large interior pocket also has little “scrunchie” bands to hold a water bottle and thermos upright. The outside of the backpack has a decorative patch pocket, a foldover top, adjustable straps, and a loop to hang it from.
I bought 2 yards of a 55” 10oz duck canvas and had very little left
I used a waxed canvas and found it very difficult to work with. Personally, I would not use pre-waxed canvas again.
Lining / contrast fabric
I bought 4 yards of a 44” lighter weight canvas and had enough left that I think I might have been able to use 3 yds
Bias binding
I used cotton twill tape. You can also make bias binding from your lining fabric or use premade bias binding.
You need a final width of about twice your seam allowance, so about 0.75” for a ⅜” seam
You need enough length for all four vertical seams, plus the perimeter of the bottom panel, plus a little extra on all the ends to fold over. If you do the same size I did, this works out to about 2.5 yards.
Cotton batting or interfacing
I bought 2 yds but I think I used less than 1 yard.
You could use double D rings instead, or make fixed length straps.
Webbing
I used exactly 1 yard of 1”/25mm cotton webbing.
Fasteners
I used 4 magnetic snaps: one set on each of the side panels to hold them folded, and two to hold the top flap down. (I used these snaps from Sallie Tomato.)
You could also use buttons, regular snaps, velcro, fabric ties, buckles, clasps…
Elastic
This is for the scrunchie pieces that hold water bottles/containers upright, the amount will depend on your design choices.
Thread
I used both a matching and a contrasting thread.
Tools
Sewing machine and needles
You might find it helpful to have an edgestitch foot or a seam guide foot for some of the steps, and I also found myself wishing I had an even-feed foot.
Iron
Clear ruler with seam allowance markings
I have this one, which I like because it has a ⅜” mark.
Fabric marker or chalk
Pins
Use old pins that you don’t mind bending, because some of the layers get pretty thick
Clips
These clips are much easier for bias binding than pins
Drafting & cutting
Before you draw your pattern pieces, take some time to think about what you want the backpack to hold and how you want it to fasten. If there are specific objects you want to carry in the backpack, measure them! If you are making the backpack for a young child, think about what kinds of fasteners they know how to use. If you are making big changes from my design, then draw a couple pictures of your design – front view, side view, maybe an “exploded” view of the various pattern pieces.
In this section, I will walk you through my backpack design one pattern piece at a time. I give measurements in inches, but you can easily convert each measurement to the nearest half centimeter. The photo below shows all of the pattern pieces laid out to illustrate their relationship to each other, and each section will include a (not to scale!) sketch of the pattern piece.
I made my pattern pieces with no seam allowance and used my ruler to draw the seam allowance on the fabric, but you may prefer to add seam allowances to your paper pattern pieces before you cut them out. When I talk about measuring from the edge of a pattern piece to add markings, I mean measuring from the seam line/finished edge of the piece, before seam allowances are added. Unless otherwise noted, I used a ⅜” seam allowance.
The front and back panels are the same shape: a 9.5” by 12.5” rectangle. You can use the same pattern piece with two sets of markings, or you can make two pattern pieces. Mark the center at the top and bottom for both panels.
For the back panel, you need marks for the straps and the hanging loop. The size and location of these marks will depend on the size of the straps and loop. I made the top of the straps 1.5” wide, and placed them so that the inner edges were 0.5” out from the center mark. Measuring across the top from the left, this means: a mark for the outer edge of the strap at 2.75”, a mark for the inner edge of the strap at 4.25”, the center mark at 4.75”, a mark for the inner edge of the second strap at 5.25”, and a mark for the outer edge of the second strap at 6.75”. I used the same marks for the inner edges of the hanging loop. At the bottom of the panel, you need marks for the webbing portion of the straps. My webbing was 1” wide, and I placed it ⅜” in from the outer edges of the panel.
For the front panel, you need markings for the patch pocket. Make your patch pocket pattern piece (see below), hold it up to get a rough position, and then measure to center it. My patch pocket was 5.5” wide by 4” tall, and I placed it 2” up from the bottom of the panel and 2” in from the sides. You also need marks for the snaps (or other fasteners). I used ½” magnetic snaps, with the center placed 2.5” down from the top edge and 1 ⅝” in from the outer edges. This placement worked fine, although I might round up to 2” in from the outer edges next time.
Add seam allowance and cut one back panel from the main fabric. You could line this panel if you want to, but I didn’t.
Add seam allowance and cut one front panel from the main fabric and one from the lining fabric. I lined this panel to hide the inside of the snaps, but depending on what kind of fastener you’re using you may not need to. If you do not line this panel, you probably want to either increase the seam allowance on the top edge (to make it easier to fold over and hem), or add a facing along the top.
Patch pocket
I made my patch pocket 5.5” by 4”, which works as a decorative pocket, but is maybe a little too small to be very useful. Make whatever size pocket you like, and adjust the patch pocket markings on the front panel accordingly.
Add seam allowance and cut two patch pocket pieces from the lining fabric for a contrasting pocket from a lighter weight fabric. If you want to make the patch pocket from a heavier fabric, it might be easier to do a single layer patch pocket, in which case you might also want to use a larger seam allowance on the top edge.
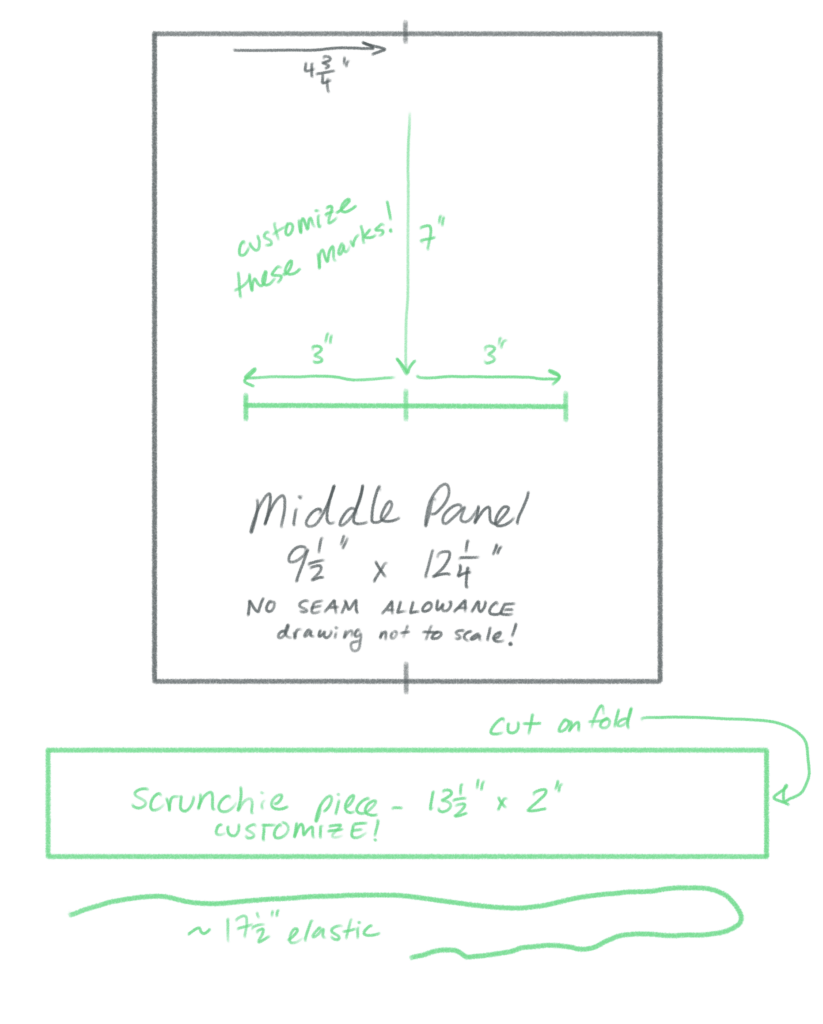
Middle panel and scrunchies
When the backpack is finished, the middle panel should be a little shorter than the back panel, to allow access to the back pocket. I used the same pattern piece for the middle panel as for the front and back panels, and then just scooted it down a bit and trimmed the seam allowance when assembling the backpack, but it might be wiser to make a separate, shorter pattern piece, say 9.5” by 12.25”. Mark the center along the top and bottom edges (4.5” in from the sides).
If you are making the “scrunchie” pieces to hold a water bottle or thermos, you will need to design these pieces and then make placement marks for them on the middle panel.
In my case, I had a thermos and a sippy cup of similar size, so I could hold them with a single scrunchie piece attached at the sides and the center. If your objects are different sizes, you might need separate pieces for them, or your pieces might need to be asymmetric.
I laid my objects down on paper the way I wanted to arrange them in the backpack, marked approximately where the scrunchie pieces should attach, and then measured from mark to mark both flat on the paper (to get the placement markings for the middle panel) and around the containers (to get the length of the scrunchie pieces, see photo below).
The measurement around my containers was about 9”. The elastic part of the scrunchie should be shorter than the measurement around the container, so that the elastic will have some tension when the container is in it. I used 8” of elastic on either side, but this will depend on the stretch of your particular elastic. To get 8” of elastic on each side, I cut about 17.5” of elastic and marked the center and 8” away from it on either side, then trimmed the extra off later when sewing it.
The fabric part of the scrunchie should be about 1.5 times as long as the measurement around the object, so in my case, about 13.5” on either side of the center. It should also be at least twice as tall as the width of your elastic. My scrunchie pattern piece is a 2” by 13.5” rectangle, and I cut it on the fold to make a 2” by 27” long strip, with the center marked.
For the placement markings on the middle panel, I put the center of my scrunchie piece 7” down from the top edge of the panel, centered horizontally (so 4.75” in from the sides). The sides of the scrunchie are attached along the same horizontal line, 3” out from the center.
Add seam allowance and cut two middle panels from the lining fabric, and one (with no seam allowance) from cotton batting or interfacing. Add seam allowance and cut scrunchie pieces from lining and elastic.
Side panels
The side panels are 6” by 12.5” rectangles. If you want to do the same paper bag fold decorative stitching that I did, mark the (vertical) center line (3” in from the sides), then mark a dot on the center line 4” up from the bottom, and draw diagonal lines from the bottom corners to that point. If you do not want to do the decorative stitching, just mark the center along the top and bottom edges for alignment.
I added magnetic snaps on these panels to help the fold stay closed. In the photos, you can see that I placed my snaps a little too high. For ½” snaps, I think a better position would be to put the centers 1.5” in from both the top and outer sides. Wherever you place your snaps, make sure they’re symmetric around the center line.
Add seam allowance and cut two side panels from the main fabric.Add seam allowance and cut two side panels from the lining fabric. If you do not use a lining, you likely want to either add a facing or increase the seam allowance on the top edge.
Bottom panel
The bottom panel is a 9.5” by 6” rectangle. Mark the center of all four sides.
You will also need marks for the webbing end of the straps on the side that will connect with the back panel (one of the long sides). These should match the marks on the bottom edge of the back panel. Mine were 1” wide, placed ⅜” in from the outer edges.
Add seam allowance and cut one bottom panel from the main fabric and one from the lining. Cut one bottom panel with no seam allowance from the cotton batting (or interfacing).
Top panel
To draft the top panel, first draw a 9.5” by 6” rectangle and then round the corners on one of the long sides. You can do this with a french curve ruler, or by tracing any appropriately curved object in your house, or by folding in half and drawing the curve by hand. Mark the center on both of the long sides (4.75” in from the sides).
The side with the rounded corners will be the loose, folded over side – let’s call this the bottom edge. The other long side will be attached to the top of the back panel – let’s call it the top edge. The top edge needs markings for the straps and hanging loops – these should match the marks you made on the top edge of the back panel. (Mine are 0.5” out from the center mark.)
You will also need marks for the snaps to close the backpack (unless you are using a different fastener). The horizontal position of these marks should match the marks on the front panel, but the snaps should be lower (farther from the top edge) on the top panel than they are on the front panel, because the top panel needs to fold over all the other panels and the interior space of the backpack. For my ½” snaps, I placed the centers 1 ⅝” in from the outer edges, and 4.5” down from the top edge. This is 1.5” lower than the snap position on the front panel, which seems to give enough length to wrap around the backpack, even when it’s reasonably full, but you may want to play around with this.
Add seam allowance and cut one top panel from the main fabric and one top panel from the lining. This is one panel that I do recommend lining – even if you don’t need to hide snaps, you will need to hide the ends of the straps and hanging loop.
Straps and hanging loop
The loop pattern piece is a 4” by 2” rectangle. Add seam allowance and cut one from the lining fabric (or from the main fabric, if you want it to match).
The backpack strap comes in two pieces. The first piece is a tab that threads through the top of the slider buckle. Before you draft this, measure your slider buckle. My buckles said they were 1”, but the part up top where the tab threads through was slightly narrower. The tab pattern piece should be 2” tall (so that it will fold down to about 1” when it goes through the buckle – this gave me just enough room to keep the buckle out of the way when sewing). For width, you can use either twice the width of the buckle measurement and fold it in half, or you can use the width of the buckle measurement, hem the sides, and let the wrong side of the fabric be hidden by the fold (see picture below).
Add seam allowance and cut two tab pieces from the lining fabric.
To draft the second strap piece, start with a 1.5” x 10.5” rectangle. Mark the center on the top and bottom (short) sides. If you want a line of decorative stitching, then mark the center line. On each side of the strap: mark the bottom edge ¼” in from the outer edge, then mark the side ½” up from the bottom edge, and then connect these two marks with a diagonal line. In other words, cut off a ¼” wide by ½” tall right triangle at each bottom corner, leaving a 1” wide bottom edge to fit the tab piece. If your tab piece was more than a little bit smaller than 1”, you should adjust accordingly.
Add seam allowance and cut four strap pieces from the main fabric. Cut two strap pieces with no seam allowance from the cotton batting (or interfacing).
Construction
My general strategy was to assemble each panel into near-finished condition separately, and then attach the panels to each other. I have broken this into two sections:
The backpack is mostly flat lined, with the seam allowances finished by binding them and the bound seams visible inside the final pocket of the backpack (as opposed to bag lining, where you would assemble one backpack from the main fabric and a separate one from the lining, then put the lining inside the outer so that the seam allowances are hidden between the two layers). The short answer for why I did it this way is that every backpack I looked inside was like that. I think it makes the construction a little easier, and it makes sure the lining stays in place.
Assembling the panels
Front panel
Prepare the patch pocket and attach it to the right side of the main fabric front panel according to the marks. (More detailed instructions here.)
Align the main fabric and lining top panels right sides together, and sew along the top edge only. You can sew all the way across, including in the seam allowances. Open the piece up, press the seam open, and then understitch the lining to the seam allowances.
Open the piece up and attach the snaps at the marked spots on the main fabric front panel (your snaps should come with some sort of instructions). Make sure to use the same side of the snaps on both spots, because these attach to the top panel, not each other.
Iron everything flat with right sides out, and pin or baste the layers together. Set this panel aside until it’s time to assemble the backpack.
Side panels
Take one main fabric side panel and one lining side panel. Align and pin them right sides together, then sew across the top edge only. Understitch the lining to the seam allowance. Repeat for the other side panel.
Open up the layers on one of the side panels. Attach the snaps to the main fabric layer at the marked locations according to the snap instructions. Make sure to use snap pieces that fit together, because these snaps are for holding this panel folded shut. Repeat for the other side panel.
Iron everything flat with right sides out, and pin or baste the layers together. If you’re doing the decorative top stitching along the fold lines, then sew along the marked lines using a contrasting thread, working from top to bottom, with the main fabric facing up so that the magnets don’t stick to your machine. Set this panel aside until it’s time to assemble the backpack.
The picture shows one assembled side panel wrong (lining) side up, and the second side panel right (main fabric) side up. You can see my snaps are placed too close to the top.
Bottom panel
Cut the webbing for the straps into two equal pieces, and then do something to keep the ends from fraying. I had fabric wax, so I melted some and dipped the ends in. You could also zig-zag stitch, overlock, or use an anti-fraying spray.
Align the webbing with the marks on the right side of the main fabric bottom panel and tack them down by sewing across them inside the seam allowance. When aligning the webbing, remember that the longer part of the webbing should be over the body of the panel (see the photo below). If you do it the other way around, so that the long part of the strap is hanging off the edge of the panel, then the strap will end up inside the backpack.
Align all the layers right side out: lining layer with right side down, cotton batting (or interfacing) inside the seam allowance of the lining, main fabric layer with right side up and webbing on top. Baste the layers together and use clips to hold the webbing out of the way. Set this panel aside until it’s time to assemble the backpack.
The first photo shows the bottom panel right (main fabric) side up. Note the placement of the webbing. The second photo shows the bottom panel wrong (lining) side up. The third photo is a side view showing the interfacing layer.
Middle panel
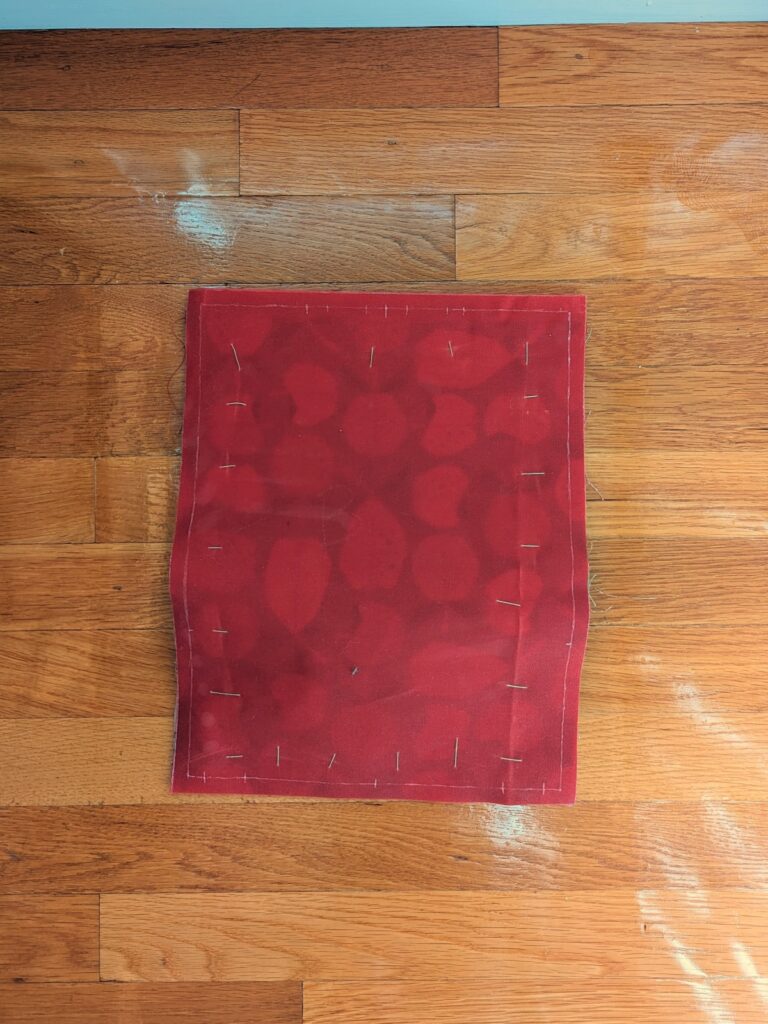
Align the two middle panel layers (both cut from lining fabric) right sides together and sew along the top seam only. You can sew into the seam allowance. Press the seam open.
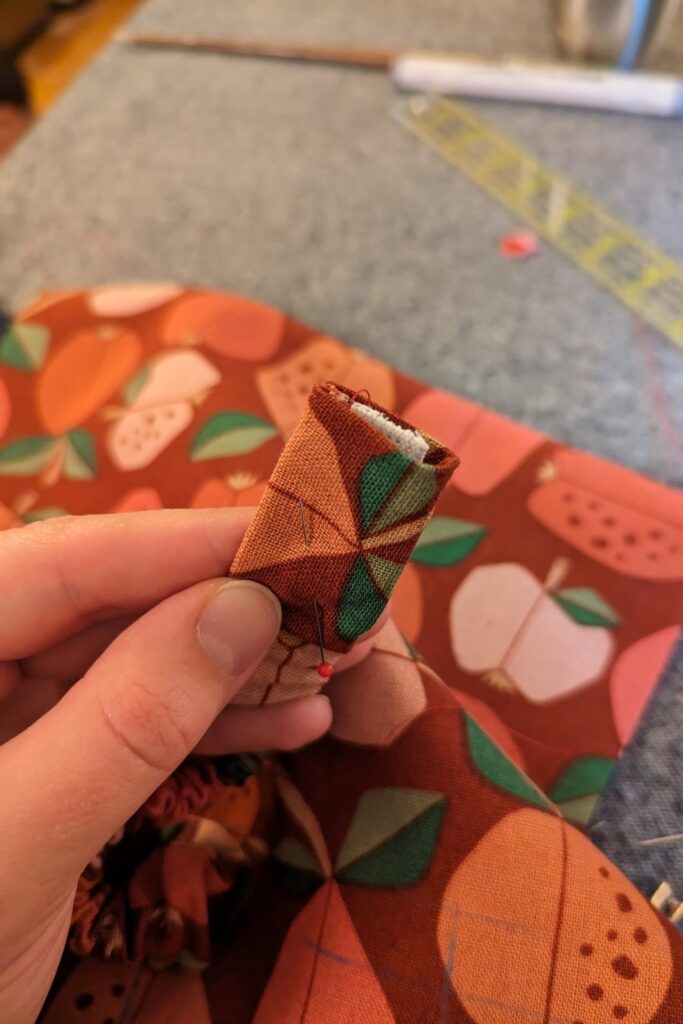
The next step is to make any scrunchies or pockets you want on this panel, which will depend on your design choices. For mine, I folded and pressed the scrunchie piece in half the long way, with right sides together, and then sewed along the long side to make a tube. I tried to skip a step by not pressing it again with the seam in the center instead of along the edge, but that was a mistake, because the edge with the seam allowance doesn’t scrunch down as tight as the other edge, so the final scrunchies look asymmetrical. Invert the tube, then thread the elastic through and tack it down at the center. At each end: fold the seam allowances in to the wrong side; press; pull the end of the elastic up to the end of the fabric; trim any extra elastic; tuck the elastic in under the fold (see photos below for before/after this step) and pin in place. Open the middle panel pieces up and sew the scrunchie onto the marks on one layer only.
Iron everything flat with right sides out. Insert the cotton batting (or interfacing) piece between the two layers, lining it up with the seam allowance along the sides and bottom. Baste the layers together, and pin or clip the scrunchies out of the way.
Back panel
Align the middle panel assembly from the previous step with the back panel piece, matching the center markings along the bottom edges. The top edge of the middle panel should be below the seam allowance on the top edge of the back panel. The wrong side of the back panel should be touching the side of the middle panel that does not have scrunchies or pockets. Baste the layers together and set this panel aside until it’s time to assemble the backpack.
The first photo shows the assembled back panel “wrong” side up – this is the side that will be in the interior of the backpack. The second photo shows it “right” side up – this is the outside of the backpack.
Straps and top loop
First make the hanging loop: Fold the loop piece in half the long way, with right sides together, and press. Sew shut, invert the tube, and press so the seam is in the center instead of the edge. Press into a loop shape (see photo below).
Next, make the tab portion of the straps. For tab style A: fold in half the long way, with right sides together; press; sew shut; invert; and press again with seam in the center. For tab style B: fold seam allowances over; press; and top stitch close to each edge. Repeat for the second tab. Fold the tabs in half, press, and thread through the top of the buckles (see photo below).
For my backpack, I was using canvas that came waxed on both sides. It was basically impossible to invert a tube of this fabric because the wax would stick to itself, so I had to assemble the straps using topstitching. I pressed the seam allowance towards the wrong side along the sides and bottom edge of both straps (not the top edge). I then carefully arranged my layers: one main fabric strap piece with right side down and seam allowances folded in on top; cotton batting layer tucked in under the seam allowance of the previous layer; the tab and buckle assembly with top side down; the second main fabric strap piece with right side up and seam allowances folded in on the bottom. I very very carefully aligned and pinned the layers, starting with the center of the bottom edge, and then top stitched all around, as close to the edge as possible.
If your fabric isn’t waxed, you might be able to sew the long edges with the fabric right sides together and invert. Unless your buckles are small enough to fit inside the straps, you’ll probably still need to press and topstitch the bottom edge. If you try this, please leave a comment telling me how it goes.
If you’re doing the line of decorative stitching, topstitch down the center line after you finish assembling the layers.
Repeat for the second strap.
Top panel
Set the main fabric top panel piece right side up. Align the hanging loop with the marks on the top edge, right side down, and pin. Align the straps with the marks, right side down. Before pinning the straps, rotate them outwards very slightly. Tack the straps and loop down by sewing across them inside the seam allowance.
The first photo shows the assembled top panel right side up – note that the straps and loop are upside down and point in over the top panel, so that they will end up on the outside of the finished backpack. The second photo shows the assembled top panel wrong side up. This is the side where the top panel lining will eventually go, but do not place it there yet!
Attach the snaps to the lining fabric top panel piece according to the snap instructions. These two pieces should each be the same side of the snap, not pieces that fit together. The first photo shows the right side of the top panel lining, the second photo shows the wrong side.
Do NOT sew, pin, or baste the main fabric and lining fabric pieces together. Set both pieces aside until it’s time to attach the top panel to the back panel.
Attaching the panels
I thought it sounded easier to sew all the side seams before attaching the bottom panel, but it was difficult enough that I’m not sure that was best. If you try another order, please leave a comment letting me know how it goes.
Back to sides
Treating the assembled panels as single pieces, where the “right side” is the right side of the main fabric and the “wrong side” is the right side of the lining, align the back panel and one side panel right sides together (taking care to match the top of the side panel with the seam allowance marking on the back panel) and sew from the top down. You can sew in the seam allowance at the top edge, but do not go into the seam allowance at the bottom edge. You can reverse direction to secure the ends, or leave them loose and secure by hand.
Repeat for the other side panel.
Press seams open, and then press again towards the back panel. Bind the seam allowances. Fold the binding over neatly at the top, but leave the bottom end loose. Sew from the top and stop a little bit above the bottom seam allowance, so that the binding can be folded out of the way when sewing the bottom panel on. Press the bound seam allowance in towards the back panel at the top edge.
Top to back
Align the back panel and the main fabric top panel with right sides together and pin or clip. The straps and hanging loop should be between the right side of the back and the right side of the top panel. Make sure the bound seam allowances from the previous step are pinned inside the seam allowance marks on the sides of the top panel. Sew across, taking care not to catch the top of the middle panel.
Unfold and press the seam open, then press it again towards the top panel. Press the straps and loop down towards the back panel.
Take the lining fabric top panel and press the seam allowance on its top edge (the long side without rounded corners) towards the wrong side of the lining fabric. Don’t do this precisely along the seam allowance line – make the seam allowance just a little bit smaller, so that the lining top panel will be just a bit taller than the main fabric top panel, and able to cover the top panel to back panel seam from the previous step.
Pin the top panel lining to the top panel with right sides together and sew around the short sides and bottom (side with rounded corners), leaving the side with the pressed seam allowance open. Clip the corners, press the seam open, and then flip the lining around so that it’s on the inside of the backpack. The inside of your piece should now look like the photo below, except that for the photo I pulled the top panel lining back to show you the seam between the back panel and the main fabric top panel – your lining should just barely cover that seam.
Carefully press and pin (or hand baste) the lining layer so that it covers the seam between the main fabric top panel and the back panel. Turn over and stitch in the ditch to secure the lining.
Front to sides
Align the front panel with one of the side panels, right sides together, and sew from top to bottom. Be careful to match the top edges exactly, and do not sew into the bottom seam allowance. Repeat for the other side.
If you’re using magnetic snaps, they may stick to your machine. You might be able to prevent this just by flipping the fabric and sewing from a different side, but if that doesn’t work, you can baste on a square of mid to heavy weight scrap fabric to cover the magnets temporarily.
You should now have an inside-out bottomless backpack. This is a good time to clip or secure any loose threads so that they don’t get in the way when attaching the bottom.
Bottom to front, sides, back
Align the bottom panel and pin to all four sides. This step gets very unwieldy. I think the easiest thing to do is to pin with the bottom panel up (so that the pins run parallel to the bottom panel), but then turn over and sew with the bottom panel on the bottom and the sides of the bag standing up as vertically as they can. I found it easier and neater to sew four separate seams than to turn the corners. Try not to sew into the seam allowance, because that makes binding the raw edges harder.
Finishing
Binding the raw edges
Bind the remaining side seams, folding the top ends neatly and leaving the bottom ends loose. Trim the side seam bindings so that they don’t go past the bottom panel seam allowance. Then bind the bottom edges, catching the loose ends of the side seam bindings. You can do this with a single piece of binding (see photo below). I found it easier to sew each side separately instead of turning the corners.
Turn the backpack right side out and push the corners out.
Finishing the straps
Now you can undo all the basting and pinning, and hide any loose threads. The final step is to thread the webbing through the buckles, and finish the ends by folding over twice and hemming.
You should now have a backpack! If you made a backpack using this post for guidance, I would love to hear how it went, especially if you figured out an easier way to do any of the steps.
Appendix: Technique tutorials
These are all pretty basic sewing techniques that you can find hundreds of tutorials for online, but I didn’t like the idea of providing incomplete instructions, so I wrote up some mini-tutorials.
Patch pocket
If your patch pocket fabric is not too heavy, I recommend doing a two layer patch pocket. This will work with a quilting cotton or lighter canvas, for example. Cut two patch pocket pieces, and press the top edge seam allowance toward the wrong side on both. Align the pieces right sides together and sew around the other three sides, reversing at the ends to secure the threads. Clip the corners, press the seam allowance to the wrong sides, and then turn it right side out. Push the corners all the way out and then press it flat. If you like a line of decorative stitching at the top of the pocket, stitch the open side closed using contrasting thread and then put this side on top when pinning the pocket to the front panel. If you do not want a line of stitching across the top of the pocket, leave the folded side open and put it on the bottom when you pin the pocket to the front panel, so that it will get closed when you attach the pocket to the front panel. Stitch around the bottom three sides to attach the pocket to the front panel, sewing as close to the edge of the pocket as you can (an edge stitch or rolled hem foot helps).
If you’re making your pocket out of a heavy fabric, like a 10 or 12 oz duck canvas, you might want to do a single layer patch pocket. In this case, you cut a single pocket piece, and begin by pressing the seam allowance to the wrong side of the fabric around all four edges. Make the corners as neat as you can (it may help to clip them a little). Hem the top edge. Line the pocket up with the marks, pin in place, and stitch around the remaining three edges (sides and bottom), reversing at the start and end to secure the threads.
Because the edges of the patch pocket are visually prominent, make sure to do your veryxz best ironing when pressing the pocket seam allowances. Use a spray bottle to get the fabric wet. Fold it very carefully. Iron on the hottest setting your fabric can tolerate until it’s all the way dry. Put a wooden block or rolling pin on top of the edge while it cools.
Understitching is a technique for keeping the lining layer from bubbling up and being visible over the edge of the main fabric. I’m not sure it’s really necessary here, because the flat lining is also holding the lining in place, but I really wanted the top edge to look as neat as possible, so I figured understitching wouldn’t hurt.
To understitch, first sew the seam right sides together. Press the seam open, and then press the seam allowances towards the lining side. Then stitch the lining to the seam allowances, just below the seam. When you’re done, you’ll see a line of visible stitching close to the edge of the piece on the lining side, but it should not be visible on the main fabric side.
Basting is just temporarily sewing something with very big stitches that you remove later. When you’re working with very thick layers, basting is often easier than pinning them together.
As long as your pieces stay aligned and your basting stitches are easy to remove, then you’re doing it right, but there’s a couple common methods. Some people sew next to the seam line using the longest stitch length setting on their machine. I like to baste by hand, aligning the pieces carefully and then taking really big stitches starting in the middle and working out. Leave the ends of the thread loose. Try not to baste right on the seam line, because if you sew your real seam through your basting thread, it will no longer pull right out. (If you do sew through your basting thread, cut the basting thread close to the spot where it’s sewn, use your seam ripper to separate the fibers of the thread, and then pull on the thread from the other side.)
Turning a long narrow piece right side out can be difficult, but there’s a couple tricks to make it easier. First, you should turn by pushing the end down the inside of the tube, not by folding it outwards. Second, it helps if you attach a small safety pin, or baste on a long piece of thread like a leash, to give you a way to grab the end when it’s inside the tube. Third, a chopstick often comes in handy.
If you want to do a really neat binding, you should probably look for a tutorial on a quilting blog, because I’m sure there’s a lot of tricks I don’t know, but the basic idea is just to wrap something around the raw edges of your seam and sew along it so that both sides of the binding are caught and the edges are encased in the binding. Clips are usually better for holding the binding on than pins.
“Stitch in the ditch” means sewing right along a previously sewn (and pressed) seam, usually to attach a lining or hold a facing in place. If you do this very carefully, with a well color-matched thread, the stitching ends up being nearly invisible.
Here, we’re using stitch in the ditch to sew down the final side of the top panel lining over the top panel and back panel seam allowances, using the top panel to back panel seam as the “ditch” to sew in. First, press and pin or baste the lining so that it just covers the top panel to back panel seam. Make sure you’re really confident that this edge is lined up correctly and will stay in position, because this side needs to go on the bottom while sewing, so you won’t see if it gets pushed out of place. Once the lining is perfectly positioned and secure, turn the piece over so the lining is on the bottom and sew along the top panel to back panel seam. Go as slowly as needed to make sure the new stitches are exactly in the old seam.
I was lucky enough to draw four illustrations for the Tuyo World Companion, which is (as indicated by the title) a companion book for the Tuyo series by Rachel Neumeier. I love this series, so I was excited when Rachel tossed around the idea of a world-building book on her blog, even more excited when she invited me to provide feedback on an early version, and absolutely thrilled when she liked the sketches I showed her enough to want to include my art in the book.
If you’re not familiar with the series, the companion book is probably not the place to start. Even if you really, really love reading world-building and behind the scenes content, I suggest reading some of the stories first. I think Rachel recommends Tuyo at a minimum, but in my opinion, a lot of the encyclopedia-like portion won’t make much sense unless you have read all three books in the Tuyo–Tarashana–Tasmakat trilogy, and the novella included at the end (which I loved!) will be better if you have read Tano too. (So yes, this is a blog post basically saying, “Look at these pictures I drew – oh, but you have to read four other books first, and one of them is extremely long!”)
Anyway, like the Tuyo World Companion, the rest of this blog post will make more sense if you have read Tuyo. I drew four pictures for the book (not the maps, someone else did those!) and I wanted to share sketches and detail shots from two of them. Before we get into it, I probably should say that I don’t think anybody should take my thoughts as 100% absolute canonical truth – sure, my illustrations are in the book, but all that means is that my version was close enough to Rachel’s vision that it wasn’t worth another round of revisions. Personally, I’ve been thinking of them as secondary sources: pictures drawn by somebody (me) who talked to an eyewitness (Rachel).
Ugaro Weaver and Blanket
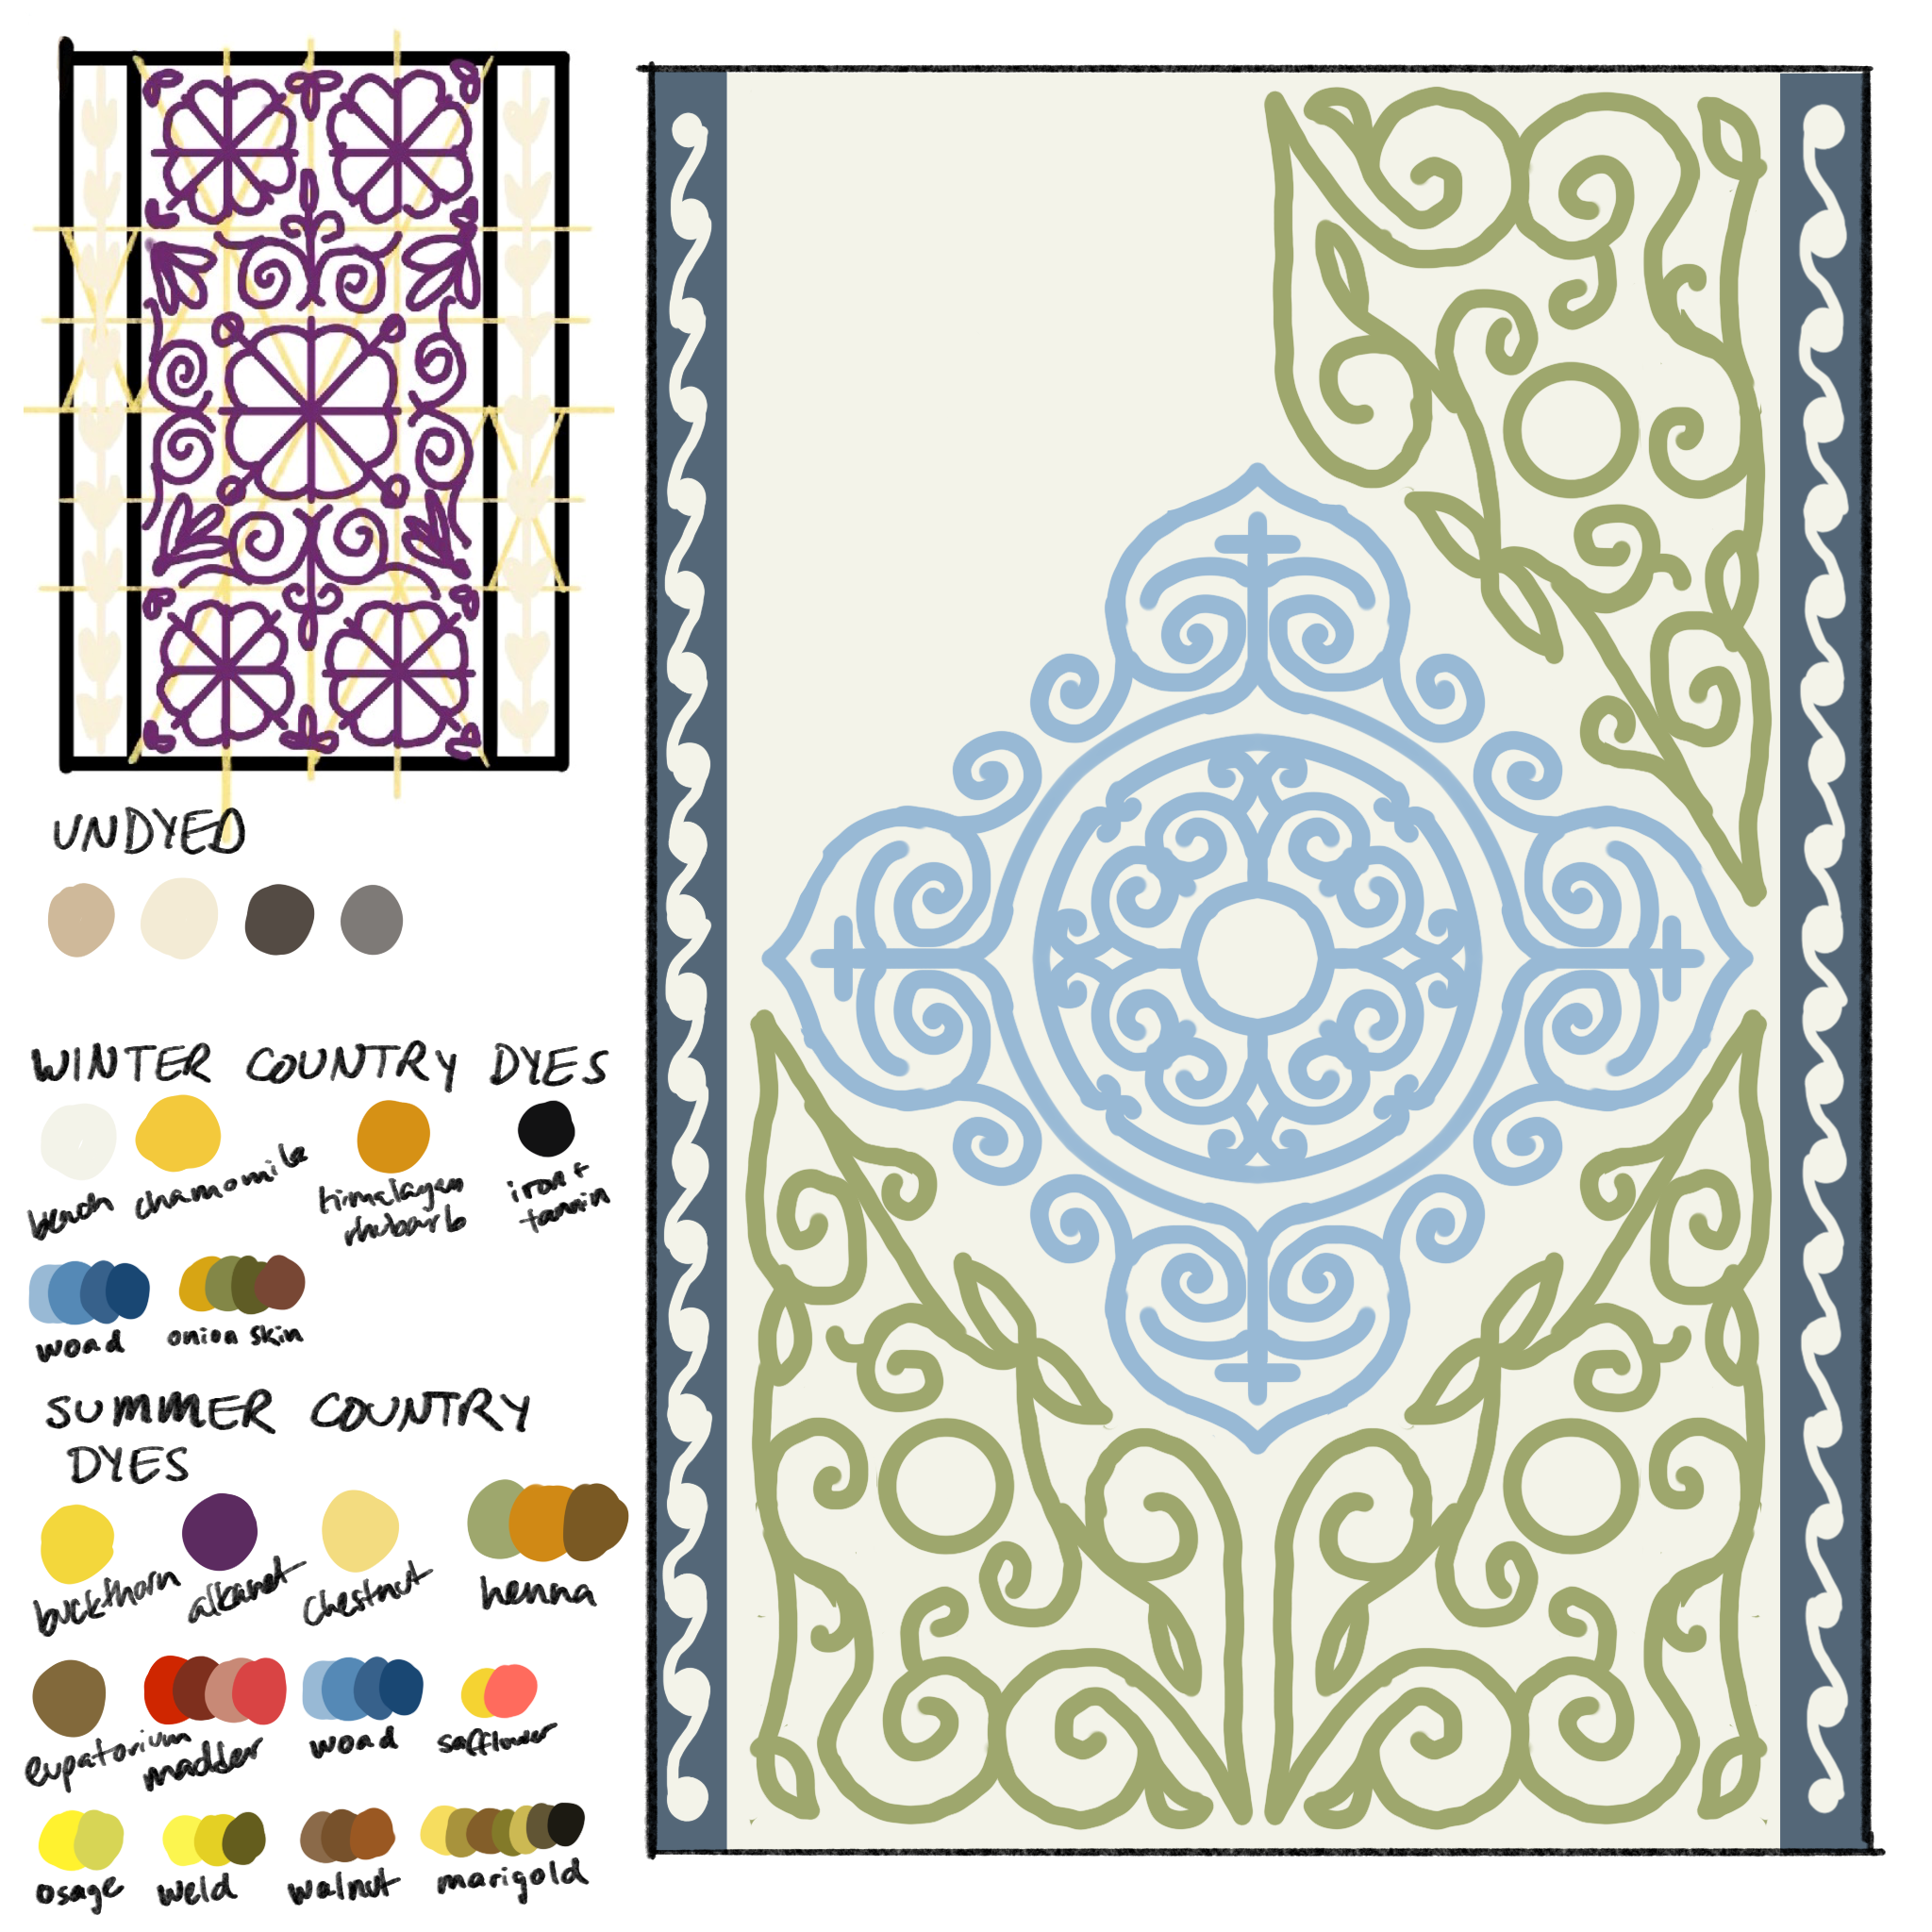
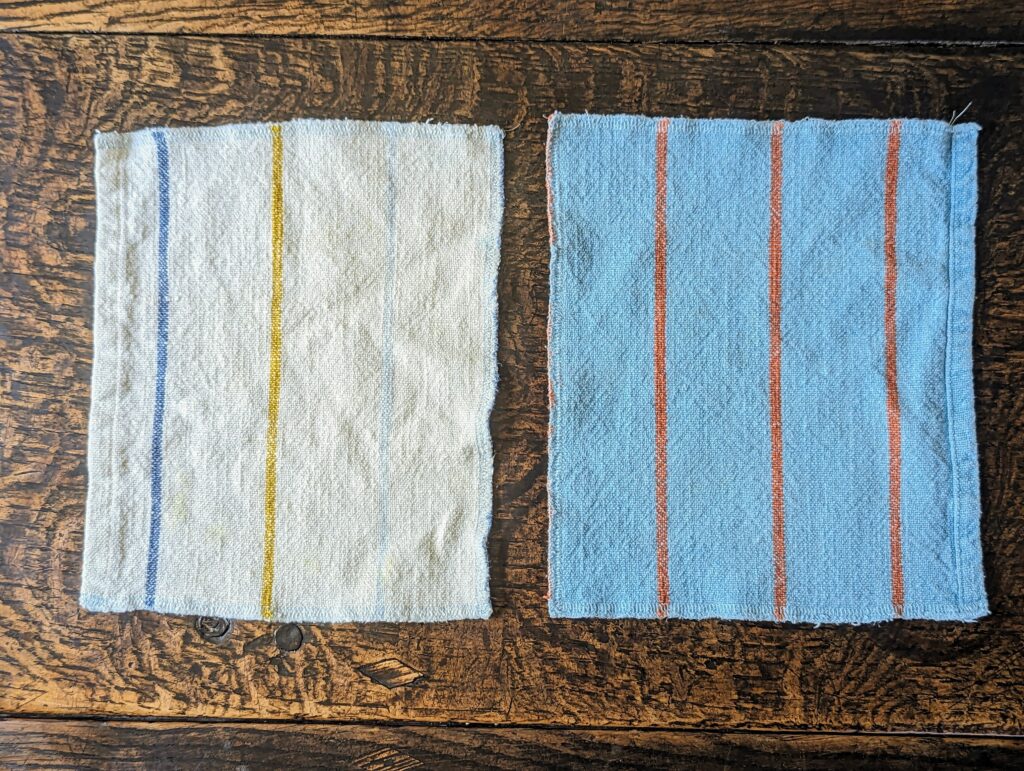
I had fun with all the illustrations, but I think my favorite is the Ugaro weaver. I’ll save the full final version for the book, but here’s my initial sketch, some planning/design work, and a little zoomed in detail shot:
I started with the little color swatches in the bottom corner of the second image. I knew I wanted to draw an Ugaro blanket, and because this book is for the readers who care about all the little world-building details, I felt like I couldn’t possibly start until I knew what sorts of materials an Ugaro weaver would have access to when she sat down to design a blanket. I found a big long list of natural dyes online, and I went through them all one by one, googling the plants (or bugs) and deciding where they would live in Tuyo-world (I relied very heavily on Wikipedia, and made snap judgements for most of them, so I’m sure somebody could make a case that I have misclassified some of them). The picture in this post shows the colors that I thought would be pretty easily available from foraging in the winter country or by trading with the Lau, but my full list does include the country of sand and farther off parts of the summer country. That gave me a general sense of what the available palette was, and which colors would be cheap (and therefore common in everyday textiles) or expensive (and therefore more likely to show up only in smaller amounts, or in special textiles for important people).
The next thing I thought about was the weaving process and loom technology. The Ugaro are nomadic, so their looms need to be portable, and since blankets and rugs don’t really seem like distinct categories in the stories, I have always imagined a single multipurpose class of flat-woven textiles. With those two features in mind, I did some research into the looms and weaving techniques of both Navajo and kilim rugs. One of the things I like so much about this series is that it’s never so straightforward as “this group of people is just a fantasy version of some real-world culture” – it’s always more like a detail from here, an idea from there, and plenty of stuff straight from Rachel’s imagination. I wanted to keep that up in the illustrations, so the loom in the picture has some features I saw on images of Navajo looms, some features I saw on kilim looms, and a couple other details and modifications that I made up.
Once I knew what colors and what kind of loom an Ugaro weaver would have, I was ready to design the blanket. I looked up decorative textiles from cultures living in cold climates all around the world, and decided to draw my inspiration mostly from keste, or Kazakh embroidery, because it was abstract and intricate (which fit the descriptions of Ugaro textiles), and because I just really liked it. I didn’t copy any particular design or object, instead I tried to just draw my own thing while having a lot of keste images up on my screen in the background.
The first blanket design I did was the blue, green, and cream blanket. I chose the colors because Rachel says in the Tuyo World Companion that the Ugaro consider blue and green to be feminine colors, and because this is supposed to be an ordinary, every day sort of blanket, so I wanted to use mostly “cheaper” colors. The blank space in the top left is intentional, because I was imagining the central blue medallion as representing the moon, and the three surrounding green designs as the Dawn Sisters (of which I’m pretty sure there are three – I didn’t actually look it up to check, it will be embarrassing if I have misremembered!). I wasn’t quite sure about having such a large, asymmetric blank space in the design, but since I didn’t include the full blanket in the final illustration, I didn’t actually have to decide if I liked that choice.
Later, after I had worked out most of the illustration, I realized I needed another design to fill in the blanket the weaver was sitting on, and I quickly threw together the purple and gray design. The thought process there was a little less involved – I have no ideas about the symbolism of this design, and I chose the colors just because Rachel had said the Ugaro use a lot of purple and I wanted something dark on the ground.
If you know anything about weaving, you will probably be wondering about the vertical borders on these blankets. Long vertical lines don’t come naturally in kilim or Navajo style flat weaving. Usually the weft yarns wrap back around at the edges of a block of color, so if you have two blocks with a long vertical border between them, it will make a vertical hole in the blanket. However, I really wanted the Ugaro rugs to have an obvious design feature that is not common in any particular school of real-world weaving, so I decided that vertical borders made by double-clamping or interlocking would be a near-universal feature of Ugaro rugs (at least when I draw them, Rachel does not necessarily agree with all of my theories and opinions about Ugaro weaving techniques).
Something else that will be obvious to fiber artists (but maybe not other people), is that there is a mismatch between the number of warp threads I drew and the fineness of the curves in the rug design. If there were really that few warp threads, the shapes on the rug should be much blockier. This is kind of an artifact of the drawing style: I couldn’t fit any more warp threads without making the lines narrower, but a very narrow line width on the threads looked out of place with the rest of the image; similarly, trying to make the design just a little bit blockier also looked wrong because it seemed like a higher level of detail and realism than the rest of the image. So, in my mind, the truth is somewhere in between – the imaginary “real” blanket has more warp threads than shown, but the curves aren’t quite as smooth as in the drawing.
There is of course also a person in the illustration, but as I’m sure you can tell, I am a big fiber arts nerd and my true love here is the blanket that is barely shown in the final image, so I have a lot less to say about the weaver! She is intended to be sort of an Ugaro everywoman – she is certainly not Darra, Marag, Etta, or anyone else important we have met. Her clothes and hair are based on descriptions from the Tuyo World Companion and in the final couple scenes of Tasmakat, and on some reference photos I found of Inuit women online.
The Break
This post is already much longer than I thought it would be, so I’ll keep things short for the second image. The other illustration I really sunk a lot of time into is the drawing of the Break. The original sketch I showed Rachel is on the left; as you can see, I just plopped some very American looking houses on the Lau side and called it a day. I knew the buildings were wrong when I did it, but at that point, I was just drawing for fun and I was more interested in the two different landscapes butting up on each other, so all I really wanted was kind of a placeholder “there are people here” image.
I knew I wasn’t quite putting the pieces of description together correctly, and that if I wanted to do it right, I would have to go back and read them over carefully and then find reference images. Rachel actually saved me a bunch of time by providing some reference images, and then I looked up more images of those cities (Al-ula, Saudi Arabia and Sana’a, Yemen), and wow, everything is so much easier when you’re looking at the right references! The picture on the right is a very, very zoomed in detail view of the Lau town in my final illustration of the Break. It still has a couple things I am not perfectly happy with, but it’s so much better! I’m really pleased with how this came out, I think it does a good job suggesting a lot more than what’s actually there. (You can also compare it to another artist’s vision of a different Lau town on the cover of an upcoming book here on Rachel’s blog.)
The other thing that was very fun in both of these illustrations was the challenge of trying to draw something that looks handmade and well-used. For both the Ugaro loom and the Lau town, I used perspective grid tools to draw a very crisp and clean version (you can find a process video of the Lau town on my instagram), and then went back and roughed things up to add age and detail. This two-step process is something I don’t really do when drawing from life, because the imperfections are already there, but I find that I can’t design an object and think about how it would age at the same time, so I have to draw an idealized version first. Adding the imperfections is one of my favorite steps, because it really makes something drawn from the imagination look like it might have been drawn from life.
In conclusion: I love these books, I loved drawing these illustrations, if anybody reading this is a fantasy author working on a world-building companion book and wants some illustrations, please consider me for the job.
A couple months ago, I visited a friend and discovered that she had mostly switched from using paper towels to cloth towels. Staying with her and using her towels convinced me this was an easier switch than I had thought, and by the time I went home I was resolved to switch to non-paper towels myself. Obviously cloth towels are a thing you can buy in stores – and there’s a lot that are specifically aimed at replacing paper towels – but I couldn’t find any exactly like what I wanted, so I ended up making my own.
A quick note on the environmental implications of this project: When it comes to cleaning up kitchen messes, your main choices are paper towels, synthetic towels (like the microfiber cloths my friend uses), or cotton towels (somebody out there probably makes towels out of other natural fibers, but if you’re looking for an absorbent and easily available natural fiber, cotton’s the obvious choice). I wanted to use less paper towels because I’m pretty sure the problems with toilet paper production also apply to paper towels. Reusable towels of any kind will reduce the amount of paper towels used, but I just didn’t like the idea of replacing something biodegradable with something plastic, so I chose cotton over microfiber. Is this actually the best choice? I honestly don’t know. I didn’t have enough information about the manufacturing process of the specific options I was comparing to do any kind of lifecycle emissions comparison. Also, I think that if I tried to optimize every single choice like this, I would end up paralyzed by indecision, and therefore make fewer of these sorts of changes. Instead, when I see an easy opportunity to reduce either waste or emissions, I try to take it, and hope that overall these choices add up to be better for the environment.
Making the towels
For this project, I used a Ruby Star Society cotton toweling fabric that I bought at Portsmouth Fabric Co, a not-quite local fabric store that I like to drop by whenever I’m up that way. I couldn’t choose between the white and blue, so I made about half in each color.
I wanted my towels to be 8” by 10”, and the toweling fabric is 16” wide, so that means I can fit two towels for every 10 inches of fabric. I think I ended up making 24 of each color, so that’s 24 towels x (10 in / 2 towels) = 120 inches, or 3 ⅓ yards for each color. The outside edges of the toweling fabric come pre-hemmed, but you’ll notice that the layout I described doesn’t leave any room for hemming the remaining three edges. That’s because I decided to overlock them instead of hemming them – it was more important to finish them quickly than have a beautiful finish, and I also didn’t want them to be too bulky when they were stacked together.
Luckily, I have a friend who (1) is a better sewer than me; (2) owns a serger/overlocker; and (3) is always willing to help me out with big projects (she helped with my bookshelf covers too). So, I took my fabric over to her house, we cut out the 8” by 10” rectangles, and then she quickly overlocked the edges while I used a darning needle to securely tuck the loose ends in. We did them all with a light blue thread that was a good color match for the blue towels and a nice contrast on the white towels.
Using the towels
We’ve been using these towels for a while now, and I’m very happy with them. We do still have paper towels in the house, but the cotton towels are out on the counter where the paper towels used to be, and the paper towels are tucked away in a cupboard so that we only get them out when we really need them. (For example, we’re still using paper towels to collect food grease, since that’s difficult to wash out of the cotton towels and those paper towels can go in the compost.)
One of my original hesitations with switching from paper towels to fabric towels was that the additional laundry would be a lot of work, but it’s not as bad as I feared. That’s mainly because I don’t actually fold them – I just stack them up neatly and then bend the whole stack and stick it into a basket. It takes way less time than folding each towel, and it’s pretty easy to grab and yank out a single towel when you’re using them. I owe this tip to my friend who originally sold me on cloth towels! It would literally never have occurred to me that something could go through the laundry and not get folded, but when I was helping with her laundry, I asked her how she folded her kitchen towels and she was like “I don’t.”
My other tip about using cloth towels is to make sure you give the wet ones a chance to dry out before tossing them into the laundry basket. I have a laundry basket sitting just outside my kitchen, and when I use these towels, the mostly dry ones go right in the basket but I make sure to hang the more damp ones over the edge of the basket until the next morning. In the morning, I toss all the dry used towels from the day before into the basket, making room for new wet towels along the edge. This means I don’t have to worry about the towels getting gross and moldy before I wash them.
Overall, I think it was a very successful project and I’m glad I did it.
After a several years of gluten free baking and making variations on several other recipes, I’ve developed a really good gluten free bread recipe. This is a gluten free version of anadama bread, a type of bread made with molasses and cornmeal that’s popular in New England. It’s not too hard to make, it has a good flavor, and it’s big enough and sturdy enough for making serious sandwiches.
In a small bowl, mix the warm water and molasses. Add the yeast and set aside.
In a medium bowl, stir together the gluten free flour, cornmeal, psyllium, and salt, and set aside.
Melt the butter and warm up the milk (I usually do this by microwaving them in the same bowl).
In a large bowl, slowly add the egg and egg whites to the milk and butter and whisk thoroughly. Once the eggs are incorporated, add the water, molasses, and yeast mixture and whisk again.
Slowly add the flour mixture to the wet ingredients, mixing as you go. Once all the flour has been added, mix for 10 minutes on medium to medium-high speed.
While the dough is mixing, preheat the oven for rising. If your oven has a bread proof or similar setting, use that; otherwise, you can preheat your oven to 200ºF and then turn it off and leave the door closed after putting the dough in.
While the dough is mixing, prepare your bread pan. I usually coat it in a layer of vegetable oil and then a layer of (gluten free) flour, but if you prefer parchment paper or some other method that’s fine.
After 10 minutes of mixing, the dough should be very thick and sticky. Scrape it out into the bread pan, level it a little with a spatula or by shaking, cover it with plastic wrap, and let it rise in the warm oven for 60 minutes.
After 60 minutes, remove the bread from the oven and preheat the oven to 375ºF. (If you leave the bread on top of the oven, it will stay warm and keep rising while the oven preheats.)
Remove the plastic wrap and bake the bread for 70 minutes. Let the bread sit for at least 5 minutes before trying to remove it from the pan, and let it cool to room temperature before cutting.
Notes & Substitutions
Flour mix: I usually use Cup4Cup, but most commercial blends should work. ^
Dairy: You can substitute a cooking oil for the butter and a plant-based milk for the whole milk. I would avoid strongly flavored options (eg. vegetable oil instead of olive oil, and no vanilla flavoring in the milk) and look for a higher-fat milk. ^
Eggs: This bread really depends on egg whites for its structure. If you wanted to substitute a vegan egg alternative, I think you would need to go through several rounds of tweaking the recipe to get something that works. ^
Molasses: If you don’t have molasses, you can use sugar (same weight). In my opinion, it’s worth getting molasses for the flavor, especially for those who are new to eating gluten free. The molasses flavor is part of what makes this anadama bread, and it also helps distract from the fact that there’s no wheat flavor. ^
The other week I participated in a fun community art project! The art center in my town supplied blank wooden posts. We had a couple weeks to decorate them and return them, and then they were put on display by the town’s visitor center.
I have never done a group project quite like this before, but I thought I’d give it a try. The biggest challenge for me was working with exterior paint on wood – I don’t have much experience with either of those materials, and I found it tricky to get clean lines. The white paint especially was quite runny no matter how much I stirred it. It didn’t give even coverage, and even when I used painter’s tape, it had a tendency to leak through. I corrected it as best I could in the time I had, and I think in the end it looks really good (as long as you don’t get too close)!
If you have both bookshelves and a child of a certain age in your home, then you have experienced the child pulling the books off the shelf and throwing them all over the floor.
At first, I thought the “right” way to respond was to teach the baby to leave the books alone. After several months of failing to do that, I tried removing all the books on the bottom shelves, but then I had an office filled with stacks of books and a living room with eerily empty shelves. Eventually, I decided that the easiest solution was to block access to the books, and since I couldn’t find an existing product for this, I decided to make one.
This was a very quick and easy sewing project, and I was able to use only materials I already had lying around.
I started by measuring my bookshelves and cutting rectangles out of an old sheer curtain. Using a sheer or semi-sheer curtain has several advantages: the visible threads help you keep your cuts square; you can place your rectangles to take advantage of the existing hemmed edges; and the fabric is see-through enough that you can look for books without removing the cover.
I hemmed the edges of my rectangles, and then sewed down strips of the loop (softer) side of some adhesive outdoor-strength velcro to the vertical sides. It’s important to use a very strong velcro so that little hands aren’t strong enough to take the cover off! The adhesive on the velcro stuck to my fabric well enough that I didn’t need pins, but it was weaker than the velcro sticking to itself, so it needed to be sewn down.
Then I put the other side of the velcro on, aligned the whole thing on my shelves, and stuck the other side of the velcro down, pulling as tightly as I could. And that’s it, all done!
It probably would have looked nicer with white velcro, but black is what I had. The other flaw is that I suspect the velcro will not come off the shelves cleanly, but these are relatively cheap bookshelves, so I don’t mind replacing them once everyone in my house is old enough to leave the books alone.
The bookshelf covers have been very effective. The toddler hasn’t gotten into the books at all, and it’s pretty easy for adults to get books when we need them (especially compared to the complicated baby proofing solutions in our kitchen). This was a simple project, but I’m really pleased with it!
I saw a thread on twitter about how to make your own sketchbook and thought, “Hey, I have all the supplies needed for that! Let’s try making a book!”
I have since lost the tweets in question, so unfortunately I can’t link you to the guide I followed, but it turns out that book binding is much easier than I thought it was. It took a really long time though, so I don’t think I’ll get into doing this regularly.
The cover is a lightweight canvas wrapped around cardboard, and the pages are watercolor paper that I had lying around.